Creating a data management system using Java
What Will I Learn?
- You will learn to Create a School Data management system using SQlite and Netbeans IDE
Requirements
- Java Knowlege
- SQLite and Netbeans IDE
Difficulty
- Intermediate
Tutorial Contents
In this tutorial, we will be building a desktop stand alone application to manage school data using SQLite Database and Java Language.
SQLite is a relational database management system contained in a C programming library. In contrast to many other database management systems, SQLite is not a client–server database engine. Rather, it is embedded into the end program.
SQLite Instalation
If you do not have this too installed, simply follow these steps to get it.
- Download the DB Browser for SQLite Here
- Install the Application
- Run
Creating UI With Netbeans
Before you begin writing codes, there is a process to go through so as to be able to write the codes efficiently, this is described in these two images below, first create a new Project as in Fig 1.0, then create a jframe form in the project as done in Fig 1.1.

Fig 1.0
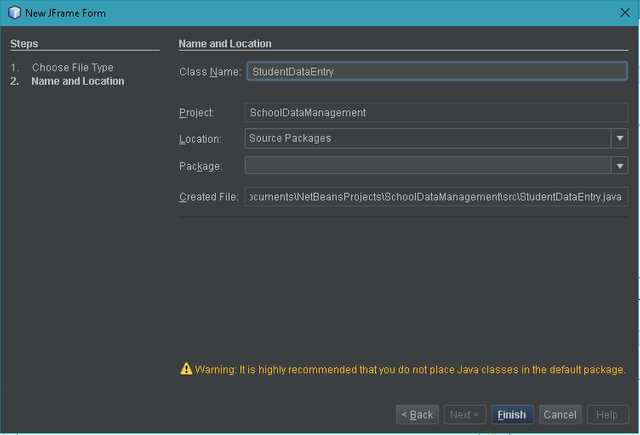
Fig 1.1
Creating Database with Required Table
Next up we create the database which we will be using in this tutorial from the SQLite manager we have downloaded, then select the project file created to hold the database so as to make it easy to remember the location. This is explained in Fig 1.2. Furthermore, add required table with rows that will be used in the program as in Fig 1.3.
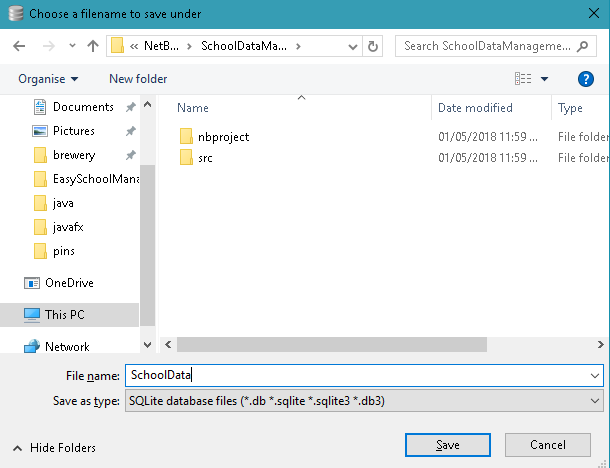
Fig 1.2
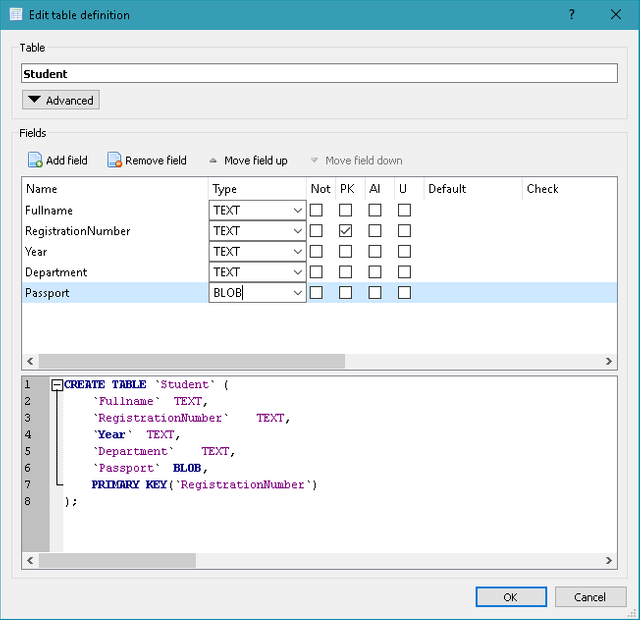
Fig 1.3
Connecting to Database
To connect the program to a database, you must first create a class to hold the code for the connection, this has been done in Fig 1.4. When this is done, you can now enter your code. You can also do the connection inside the main program but doing this way makes the code easier to understand.
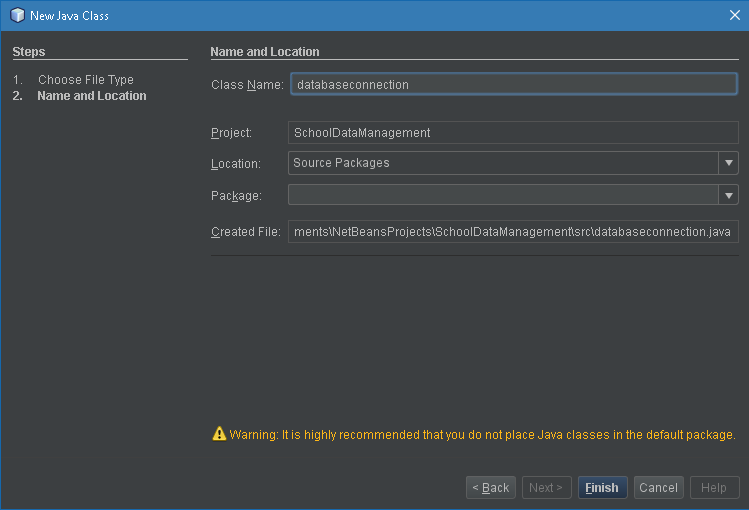
Fig 1.4
import java.sql.Connection;
import java.sql.DriverManager;
import javax.swing.JOptionPane;

/**
 *
 * @author HORD
 */
public class databaseconnection {
    Connection conn = null;

    public static Connection Connect() {
        try {
            Class.forName("org.sqlite.JDBC");
            Connection conn = DriverManager.getConnection("jdbc:sqlite:C:\\Users\\HORD\\Documents\\NetBeansProjects\\SchoolDataManagement\\SchoolData.db");
            JOptionPane.showMessageDialog(null, "Connection Established");
            return conn;
        } catch (Exception e) {
            JOptionPane.showMessageDialog(null, e);
            return null;
        }
    }
}
For this class to work, we have to add Sqlite JDBC jar file to our program library as this would handle the Drivers for SQLite.
To achieve the connection, we do the following;
- Create a method in the class which will be responsible to carrying out the connection, I have named my method Connect() with variable type Connection.
- Create a try and catch block, this is very important here because it handles exceptions that might arise in the execution.
- Drive the connection with
DriverManager.getConnection();by using the file path of the database created earlier, you can get this by viewing the properties of the database file from file explorer. - Don't forget every method has to return something, the method we have created will return a connection since that is the specified type.
- The catch block here has been set to display the error as detected by the program, you can set it otherwise by simply changing the message in
JOptionPane.showMessageDialog(null, e);to a custom message likeJOptionPane.showMessageDialog(null, "Your custom message");. JOptionPane allows you display messages in a windows box with the ok button, it can be seen in Fig 1.5.
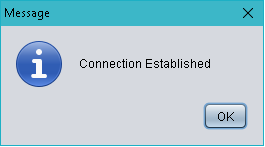
Fig 1.5Create a method to update the table
private void updatetable(){
String sql = "Select * from Student";
try{
ps = conn.prepareStatement(sql);
rs = ps.executeQuery();

stdtable.setModel(DbUtils.resultSetToTableModel(rs));
}catch(Exception e){
JOptionPane.showMessageDialog(null, e);
}
This method pulls data from the database into the table in the program, first we create a method with syntax; private voidmethodname(){ what the method should do } This method uses the SQL select statement to pull the data from the database, this data is then passed into the table from a result set as represented in the table, this is done using the .setModel(); method table.setModel(Dbutils.resultSetToTableModel(resultset)); the .resultSetToTableModel(); is a method getten from the rs2Xml library we have added to the program. Here's a screenshot of the working code.
Updated Table Screenshot: 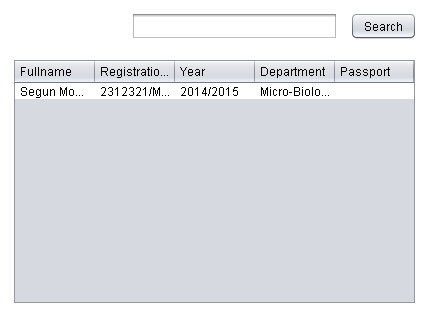
Generating Id
public int GenerateId() {
        int randomId = 0;
        Random rand = new Random();
        for (int j = 1; j < 1000; j++) {
            randomId = (int) rand.nextLong();
        }
        return randomId;
    }
Every new data entered in the database requires a unique ID which would be used in Identifying it else sorting or differentiating between two identical data would be difficult. This method would generate a random set of integers which would be used to identify data saved in the database.
Upload Image
  private void jButton2ActionPerformed(java.awt.event.ActionEvent evt) {
        try {

            JFileChooser chooser = new JFileChooser();
            chooser.showOpenDialog(null);
            filename = chooser.getSelectedFile().getAbsolutePath();

            File image = new File(filename);
            FileInputStream fis = new FileInputStream(image);
            ByteArrayOutputStream bos = new ByteArrayOutputStream();
            byte[] buf = new byte[1024];

            for (int readNum; (readNum = fis.read(buf)) != -1;) {
                bos.write(buf, 0, readNum);
            }
            person_image = bos.toByteArray();
            Imagedata = person_image;

            format = new ImageIcon(Imagedata);
            photo.setIcon(ResizeImage(filename));

        } catch (Exception e) {
            JOptionPane.showMessageDialog(null, e);
        }

        // TODO add your handling code here:
    }
The code above does the uploading of image to the program, First we call a JFileChooser to enable selecting the file directly from it's location, this is done with the first three lines where the second line opens the file selection dialog, and the third gets the file path which is then used to access the file.
Next we create a new file in the program from the image we have selected, next we use a fileinputstream to read the byte data of the image which is then converted to a byte output stream and saved in the person-image byte array, using the for loop and bytearrayoutput stream.
This is then placed in the label provided for the image.
Resize Image
public ImageIcon ResizeImage(String imgpath) {
        ImageIcon myimage = new ImageIcon(imgpath);
        Image img = myimage.getImage();
        Image newimage = img.getScaledInstance(photo.getWidth(), photo.getHeight(), Image.SCALE_SMOOTH);
        ImageIcon image = new ImageIcon(newimage);

        return image;
    }
You must have noticed the ResizeImage(); method in the previous code block for uploading Image, this is the method created for it. This method handles resizing the image uploaded from it's normal height and width to that of the provided space for the image. This is done using the getScaledInstance(); method.
Save information from program to database
Adding data tot he database is the major purpose of the program, since it is meant for data management. To achieve this, the program will be running sql statement Insert, usingprepareStatement();` method to pass the query to sql.
String regnumtxt = "SD/2018/" + GenerateId();
      String sql = "Insert into Student (Fullname, Registrationnumber, Year, Department, Passport) Values (?,?,?,?,?)";
      try {
          ps = conn.prepareStatement(sql);
          ps.setString(1, fulnametxt.getText());
          ps.setString(3, yeartxt.getSelectedItem().toString());
          ps.setString(2, regnumtxt);
          ps.setString(4, depttxt.getText());
          ps.setBytes(5, Imagedata);

          ps.execute();

          JOptionPane.showMessageDialog(null, "Information Saved");
          updatetable();
      } catch (Exception e) {
          JOptionPane.showMessageDialog(null, e);
      }
Then the button is clicked, First the registration ID is created and stored in a String variable, then the Sql statement is prepared, this arrangement makes it easier to understand, meanwhile the '?' in the parenthesis can be replaced with the data to be input directly, this would also work provided you get the syntax right. After all the data has been processed, the query is then executed with pst.execute();.
Subsequently, a try and catch block has to surround the code for exception errors.
Pick from table and view info
To view data that has been saved in the database, MouseClick event is set up for the data display table. This would automatically display the information in you desired arrangement, making it easy for the user to understand the information displayed.
 private void stdtableMouseClicked(java.awt.event.MouseEvent evt) {
        try {

            int row = stdtable.getSelectedRow();
            String tableclick = (stdtable.getModel().getValueAt(row, 0).toString());

            String sql = "Select * from Student where Fullname = '" + tableclick + "'";

            ps = conn.prepareStatement(sql);
            rs = ps.executeQuery();

            if (rs.next()) {

                fullname.setText(rs.getString("Fullname"));
                regnum.setText(rs.getString("RegistrationNumber"));
                year.setText(rs.getString("Year"));
                dept.setText(rs.getString("Department"));

                byte[] image = rs.getBytes("Passport");
                format = new ImageIcon(image);
                Image img = format.getImage();
                Image newimage = img.getScaledInstance(passview.getWidth(), passview.getHeight(), Image.SCALE_SMOOTH);
                ImageIcon images = new ImageIcon(newimage);

                passview.setIcon(images);
            }

        } catch (Exception e) {
            JOptionPane.showMessageDialog(null, e);
        }
First the index of the current row selected or clicked on by the user is stored in an integer value, that's int row = stdtable.getSelectedRow();, this is then used to get the data at the first column of the row using String tableclick = (stdtable.getModel().getValueAt(row, 0).toString());, here.toString();` converts the data to string, so if it was an Image it would be represented as a string too, This means any column you are or would be selecting should contain alphanumeric characters.
In this case since we are selecting data to view, the SQL statement would be a Select statement, and a resultset would be required to hold the result of the query.
if(rs.next()) This means if the result set is not null, then rs.getString(); pulls the characters from the database and sets then to the required field using .setText();.
Finally the image is pulled as a byte array, and resized as done in the ImageResize method that was explained earlier.
Create Data Card
After registering a student, a data card or let's call it a printout of the student information would be nice either for backup or for the student. To carry out this assignment, we will be using IText Pdf Library and I have added this to the program library already. And you can get it from the repository for this tutorial program.
 private void jButton5ActionPerformed(java.awt.event.ActionEvent evt) {
        try {
            Document doc = new Document();
            PdfWriter.getInstance(doc, new FileOutputStream("StudentData.pdf"));

            doc.open();
            doc.add(new Paragraph("                           Student Data Card", FontFactory.getFont(FontFactory.HELVETICA_BOLD, 24, Font.BOLD, BaseColor.CYAN)));
            doc.add(new Paragraph(" "));
            doc.add(new Paragraph("**************************************************************************************************************"));
            doc.add(new Paragraph(" "));


            doc.add(new Paragraph("Student Name:              " + fullname.getText()));
            doc.add(new Paragraph("Registration Number:    " + regnum.getText()));
            doc.add(new Paragraph("Student Year:                " + year.getText()));

            doc.close();

        } catch (Exception e) {
            JOptionPane.showMessageDialog(null, e);
        }
        // TODO add your handling code here:
    }
First we create a new Document, this would require you to import the Itext Library Class responsible for that import com.itextpdf.text.Document;, after creating the document, go ahead to name it and probably select the file path where it should be stored using the .getInstance(); method as done in the fourth line of this code section.
Next we open the document to be able to add data in it, we open using .open(); and add data using .add()basically we'll be using only paragraphs for this tutorial we can always add other things later on, or you can get how to do that yourself.
To create the header, I have made the font style different from the others using FontFactory, this is used to set size, color e.t.c of the text entered.
After the data has been added, use ``.close();` else the document would not open when you want to read it.

Required Global Variables
  private ImageIcon format = null;
    byte[] Imagedata = null;
    String filename = null;
    int s = 0;
    byte[] person_image = null;
The declared variables above have been used at one point or more in the code, so the have to be declared as global variables to avoid unnecessary errors.
Thank you for your contribution.
My opinion:
Your contribution has been evaluated according to Utopian rules and guidelines, as well as a predefined set of questions pertaining to the category.
To view those questions and the relevant answers related to your post,Click here
Need help? Write a ticket on https://support.utopian.io/.
Chat with us on Discord.
[utopian-moderator]
Hey @official-hord
Thanks for contributing on Utopian.
We’re already looking forward to your next contribution!
Contributing on Utopian
Learn how to contribute on our website or by watching this tutorial on Youtube.
Want to chat? Join us on Discord https://discord.gg/h52nFrV.
Vote for Utopian Witness!