Gns3 - Cisco IOS Image upload, Network design, Router configuration for Hostname, Build up, Wrong commands and Modes.
What Will I Learn?
- You will learn how to upload Cisco IOS Images in the Dynamips emulator.
- You will learn how to form a network topology comprising of routers and switches.
- You will learn to enter the configuration mode of a router from privilege mode using command line.
- You will learn to change the hostname of the router using the Command Line.
- You will learn how to build and save configuration in both privilege and configuration modes of a router with a command line.
- You will learn how to stop router from searching a wrong command entered.
- You will learn to view the configuration of the router.
Requirements
Windows 7 (64 bit) and later, Mavericks (10.9) and later, Any Linux Distro - Debian/Ubuntu are provided and supported.
Cisco IOS images.
Difficulty
- Basic
Tutorial Contents
Gns3 or Graphical Network Simulator is a simulator for virtual machine and uses dynamips emulator for loading Cisco IOS images. So before we can start configuring routers and switches we should be able to load the images of Cisco IOS in the emulator. I will first show you how we can load these images because without it we wont be able to initiate the network development process. This i will show you with some screenshots. We first have to open Gns3 software and go the edit option, select preferences.
Go to the Dynamips Emulator, IOS routers. When we open it we will see a blank window. There are no router images present so we have to add the images of different types of Cisco Routers. These may include routers like c2600, c1700, c3600 etc.
Here is source to some Cisco IOS Images.
IOS Images
Choose the IOS image that you want to add to the emulator as shown below.

We can add multiple images of different routers or other devices, depends on the device we want to configure. For the IOS Image source give above you will be able to add c1700, c2600, c3600, c3745, c7200 router images, Different routers have different and enhanced features. Some can even be used for both switching and routing.

Uploading of the Image results in the naming of the router device we are using and also helps to verify the platform and the chassis too. In the windows to follow we have to choose the slot and the port we want for the router like C1700-MB-1FE. It is a fixed fast Ethernet port for the c1700 cisco router which is used to connect switches and routers in a network. We can similarly choose different Routers and different ports for the slot available for the connection in a Local Area Network. We are also able to choose the idle PC value so that the image doesnot use the 100% of the operating system.
To form a network topology is very easy. We will first try to make a design of the network topology and figure out how many routers and switches and end devices are needed in a network design. Then we need to find out which router will we use for the routing of packets. Same is the case with switches and end devices. End devices can be our servers, PC's etc. Using this software for network topology is easy, simply drag and drop the router, switch and the end devices needed. Then we have to connect these end devices for that we use cables, serial cable for router to router or a straight cable for router to switch or switch to end devices. For connecting two switches we use cross cable. This is done by clicking on the cable feature and the clicking on a router, we select the port for the connection. Then we click on the switch for Connecting it with the router and selecting the port of the switch is needed too. It is shown below.

After we are done with two basic steps without which configuration was not possible it is time to start the router configuration. We have to first start all devices. We have to click on the Router and move into the command line(console). When we open the command line window we see the router in present in the privilege mode. Will be shown below.

- Command Line shows R1# (this is the privilege mode)
- We have to get inside the configuration mode for configuring the router. We use the command config t
- R1# config t (press enter)
- Command Line will show R1(config)#
(this is the configuration mode) - We can configure router in configuration mode.
Now we will learn to change the hostname of the router using the Command Line. For that we first have to enter the configuration mode of the router as already shown.

- In the Router configuration mode we write the command hostname starter where starter is any name we want to choose.
- The command will be like R1(config)# hostname starter
- On pressing enter the R1 hostname will be changed by Starter which we desired to keep.
As we have changed the hostname of the router, we have to save the changes made in the configuration. For that we take the following steps.
- We move back to the privilege mode by writing a command exit
- Command Line will show R1#
- Write a command wr in privilege mode
- Building configuration means the configuration is saved, this is also shown in above picture.
For saving the changes made directly from the configuration mode we can use the following commands, shown with the help of an image below.

- Here I have first changed the hostname again.
- To save the configuration in configuration mode we can use the command do wr or simply by using Ctrl+Z keys. The configuration will be saved. It is to be noted the command was only wr in privilege mode but in configuration mode we have to use do wr for the same purpose.
When we write a wrong command in a command line, the router tries to find the command. It moves from one loop to another and the configuration can be stopped by 15,20 mins. We can avoid that by entering a command in the configuration mode of a router before doing the job we want to, this helps to save us for the useless search of router for the wrong command. This is shown below

- In the configuration mode we have used the command no ip domain lookup
- It will look like R1(config)# no ip domain lookup
Another thing we can learn is the use of command line for viewing the configuration of the router. For this we have to write the command in the privilege mode of a router. Shown below.
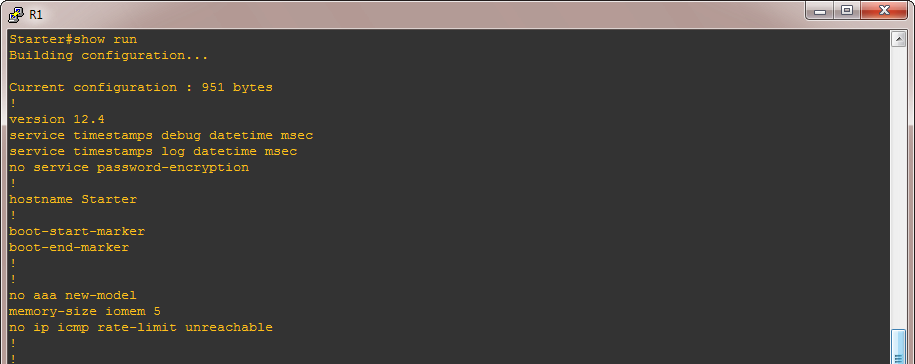
- In the privilege mode we write the command show run
- It will be like R1#show run
- We can also view it in configuration mode, for that we use the command do show run
- It will look like R1(config)#do show run
Curriculum
This is my first contribution for this app. Will continue with more tutorials for Routing and Switching .
Posted on Utopian.io - Rewarding Open Source Contributors
Your contribution cannot be approved because it does not follow the Utopian Rules.
Your tutorial is fairly short and is not basic at all. A person reading this without knowing what networking and GNS is will not understand anything. As for those who do know about networking and GNS, I believe they can easily do these.
You can contact us on Discord.
[utopian-moderator]
Congratulations! This post has been upvoted from the communal account, @minnowsupport, by neemanbhat from the Minnow Support Project. It's a witness project run by aggroed, ausbitbank, teamsteem, theprophet0, someguy123, neoxian, followbtcnews, and netuoso. The goal is to help Steemit grow by supporting Minnows. Please find us at the Peace, Abundance, and Liberty Network (PALnet) Discord Channel. It's a completely public and open space to all members of the Steemit community who voluntarily choose to be there.
If you would like to delegate to the Minnow Support Project you can do so by clicking on the following links: 50SP, 100SP, 250SP, 500SP, 1000SP, 5000SP.
Be sure to leave at least 50SP undelegated on your account.