GNS3 - Basic Router Configuration (part 3) - Configure an IP address for a network, Classes of IP address, Subnetting and how to create subnets.
What Will I Learn?
- You will learn IP address and its classes.
- You will learn Subnetting.
- You will learn how to create a subnet.
- You will learn to configure an IP address for a network with subnets.
Requirements
- Windows 7(32 bit) or more, Any Linux Distro - Debian/ Ubuntu are provided and supported
- Cisco IOS images.
- GNS3 Software.
Difficulty
Difficulty is at an intermediate level.
Description
In the video tutorial we will learn about the IP addressing of different interfaces with subnets. Before we can start the IP address configuration we need to learn what we understand by IP address and what are the different classes of IP addresses. I will also explain what we mean by subnetting and why we use it.
Learn what we mean by IP addressing and what are its classes.
IP address is a 32-bit number which is assigned to each host within a network. For communicating with other devices each device must have its IP address configured. Let's take an example, In order to access internet, our computer needs to have an IP address which is obtained by a router from Internet Service Provider (ISP).
IP addresses are divided into five classes identified by the value in the first octet as this address is a 32-bit address. The classes created are based on the network size. For Example, For small number of networks with large number of hosts Class A was created.
IP Address classes are given below
- Class A, 0-127 - e.g, 10.20.13.65 (used for large networks with many devices).
- Class B, 128-191 - e.g, 131.5.6.66 (used for medium sized networks).
- Class C, 192-223 - e.g, 192.168.1.1 (used for small networks with small number of hosts).
- Class D, 224-239 - e.g, 224.0.0.6 (used for multicast addresses).
- Class E, 240-255 (used for experimental purposes).
Learn what we mean by subnetting
Subnetting is the dividing of a network into two or more smaller networks and helps to reduce the size of the broadcast domain. Suppose we have a huge network which we can represent with a Class A IP address, say it is 10.0.0.0/24, All hosts within the network are in the same subnet resulting in various disadvantages such as single broadcast domain, network security and organizational problems. For these reasons we divide the network into small networks with the use of subnetting. By subnetting the IP address is divided into two parts, network part and host part. For example, for the above mentioned class A IP address 10.0.0.0, It consists of 8 network bits and 24 host bits. This is because the default subnet for Class A IP address is 8 bits (or, written in decimal notation as 255.0.0.0). Like IP address subnet mask also consists of 32 bits used to determine network part and host part of the network. 1's in subnet mask will represent network part and 0's will represent the host part. Let's take the above mentioned IP address 10.0.0.0, its default subnet will be 255.0.0.0
IP address 10.0.0.0 (convert it to binary) = 00001010.00000000.00000000.00000000
subnet mask 255.0.0.0 (convert it to binary) = 11111111.00000000.00000000.00000000
Learn to create subnets
Let's take a Class C IP address 192.168.0.0, It by default has 24 network bits and 8 host bits. Before we start subnetting we need to know two things, How many subnets do we need and How many hosts per subnet do we need.
- How many subnets we do need?
2* = number of subnets where * is number of 1's in subnet mask.
- How many hosts per subnet?
2* - 2 = number of hosts per subnet where * is number of 0's in subnet mask
Learn to configure IP address for a network
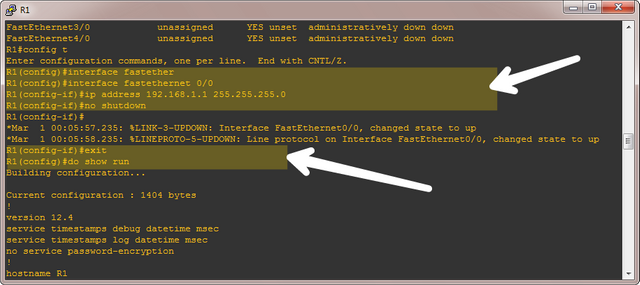
We will learn to configure the IP addresses of the different ports within the network. In the Video I have assigned IP addresses to Router 1 (R1) for the fastethernet 0/0 port and serial 0/0 port and the configuration for that is shown below with the help of an screenshot.

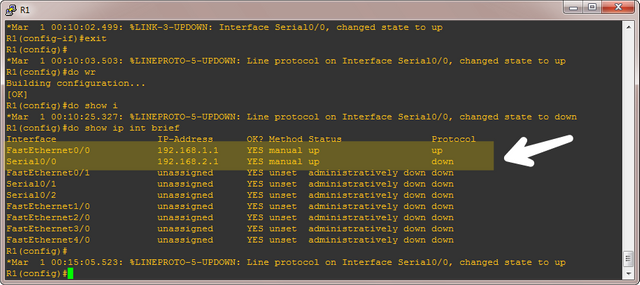
To check if the IP addresses are assigned write show ip int brief which shows us the running configuration as shown below with the help of a screenshot.
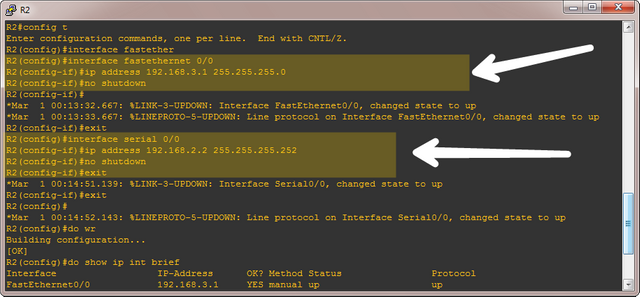
Similarly for Router 2 (R2) I have done IP addressing of the serial0/0 and fastethernet0/0 ports and their configuration is shown below with the help of a screenshot.

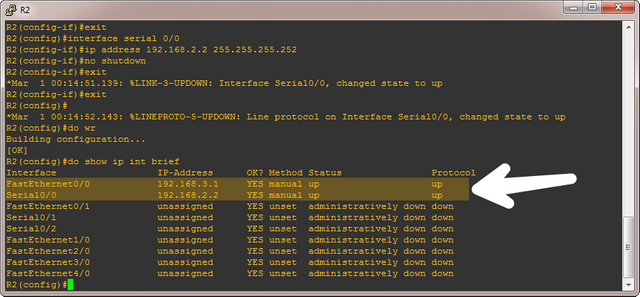
And then to check the assigned addresses write the command show ip int brief also shown below with the help of a screenshot.

Video Tutorial
Curriculum
Learn networking with the help of gns3 simulator. Follow the tutorial.
GNS3- Basic Router Configuration (Part 1)
GNS3- Basic Router Configuration (Part 2)
Posted on Utopian.io - Rewarding Open Source Contributors

Thank you for your contribution @neemanbhat. It has been approved.
This is fantastic as we move forward to create better and better video tutorials.
Need help? Write a ticket on https://support.utopian.io.
Chat with us on Discord.
[utopian-moderator]
Thankyou. I will work to improve my tutorials.
Hey @neemanbhat I am @utopian-io. I have just upvoted you!
Achievements
Utopian Witness!
Participate on Discord. Lets GROW TOGETHER!
Up-vote this comment to grow my power and help Open Source contributions like this one. Want to chat? Join me on Discord https://discord.gg/Pc8HG9x