Signal Processing: Add Echo Effect to an Audio Signal | Scilab Tutorial
What Will I Learn?
- You will learn how to do simulations in Xcos.
- Which components are used to build a system capable to process a signal and return data to the Scilab workspace.
- How to set suitable parameters to get an echo effect at the system output.
Requirements
- Basic programming knowledge.
- Basic signal processing knowledge.
- Scilab version 5.5.2 or higher.
Difficulty
- Basic
Tutorial Contents
I've been writing tutorials about Scilab but never about Xcos, therefore, this time I want to talk you about this feature of Scilab.
Xcos is a powerful graphical editor where you can simulate dynamical systems. It allows solving problems related to differential equations, control systems, signal processing, etc. Xcos is the open source equivalent of Simulink (Matlab).
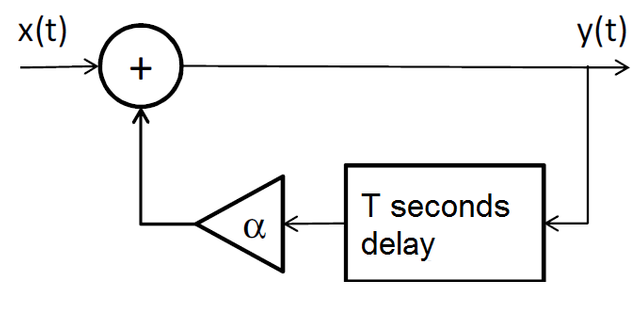
Today we are going to use Xcos to process a signal (an audio signal), with the aim of add it an echo effect. For this reason, we want to build the system shown in figure 1. This system has as output the sum of the input signal and the input signal delayed by T seconds and multiplied by a gain of alpha.
Sounds files must be .wav files since we're going to use functions: wavread and wavwrite. There are many apps and web pages that you can use to convert sound files into other sound extensions.
Creating the system scheme
The first step is creating the system scheme in Xcos. For this, once you've opened Scilab, go to Applications and click on Xcos. The Xcos and the Palette browser windows will be displayed.
The Palette browser contains all the blocks that we need to make the scheme. Each block has its own description and you can see it by right-clicking on it and left-clicking on Block Help. In the Palette browser, you will find electrical, continuous time systems, thermo-hydraulical and other kinds of components.
- Click on the
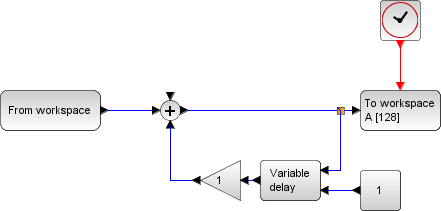
Sourcestag and find the block calledFROMWSB(From Workspace). This block gets data defined in the workspace to use it in Xcos. In our case, the data will be a signal made up two vectors: data vector and time vector. In other words, this block will play the role of the input.
At once, select blocks CLOCK_c and CONST_f and place them in Xcos.
- Click on
Sinksand look for the block called TOWS_c which will play the role of the output. After processing the signal, this block stores and sends the data to the workspace as a structure type variable with two fields: data field, and time field.

Both FROMWSB and TOWS_c are such important blocks since they connect Xcos with workspace, therefore, we must to properly set them.
- We're going to need one adder and one gain, therefore, go to
Mathematical operationsand find blocks SUM_f and GAIN_f and place them in Xcos.

- The last component that we need is a delay. It could be found in the
Continuous time systemstag as VARIABLE_DELAY. The block has three ports: two inputs and one output. The first input is the signal in question and the second is the variable delay, although, in our case, it will be a constant delay, it's why we are going to need the CONST_f block that we have already chosen before.

After organizing and wiring components your system scheme should look like in figure 6. Note that each block has its own equivalent in the system shown in figure 1.
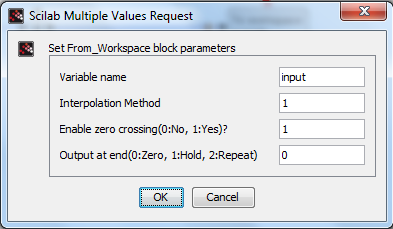
Before we proceed to the workspace, we are going to set parameters of block FROMWSB as shown in figure 7. In the Variable name field,let's write the name of the variable where we're going to store data, I'm going to name it input and it will be a structure type variable with two fields as I've mentioned. Don't change other values.
Read sound files from Scilab workspace
Now, let's define the input.
As we said in the previous section , Xcos will receive a variable called ```input´´´, it is a structure type variable made up two vectors: data vector and time vector. In data vector, we're going to store the sampled data obtained from the sound file.
The sound file that we're going to use is provided below:
To read the sound file from workspace we're going to use wavread function. Check its syntax:
[Y, FS, NBITS]=wavread("file address")
FS is the sampling frecuency and NBITS is the number of bits per sample used to encode the data in the file. The sampled data is returned in Y.
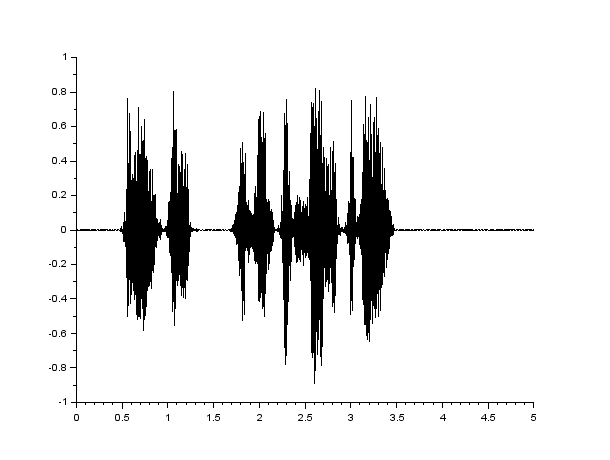
On the other hand, we need to define a time vector which will be part of input. This vector should start from zero and reach the final time of the sound file (in this case 5 seconds) less 1/FS seconds, in steps of 1/FS seconds. In this way, we ensure that the vector time has the same samples than Y.
If you want to check the shape of the signal, you may use command plot2d.
You can check plot2d documentation in this tutorial.
Once we have read the sound file, let's define input as follow:
input.values=Y';
input.time=t';
It's important that vectors Y and t have the same number of samples, otherwise, you'll got errors.
The code that performs previous instructions is provided below:
//Define the input signal

[Y, FS, NBITS]=wavread("C:\Users...");

t=0:1/FS:5-1/FS;

plot2d(t,Y);

input.values=Y';
input.time=t';
Set simulation parameters.
Once we have the data defined in the workspace, let's proceed to Xcos to set simulation parameters.
Parameters of FROMWSB Block have already been set.
Adjust the gain value to 0.25 by double-clicking on the GAINBLK_f block.
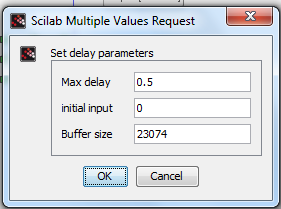
For the VARIABLE_DELAY block, first we have to adjust Max delay to 0.5 seconds and Buffer size to 23074. Also, set the constant value (Delay value) to 0.5 seconds.
Max delay is a parameter used to control the delay maximum values when it is a variable delay.
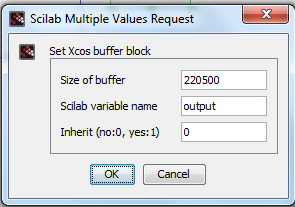
- For the TOWS_c block, set the
Size of bufferto the number of samples of the data, in this case: 220500. I'm going to call the Variable nameoutput, and it will receive the output data. Remember thatoutputis a structure.
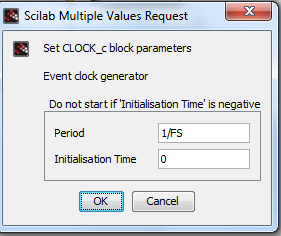
- Now, let's set Clock block. Set Period to 1/FS, you can use FS instead of the numerical value, and set Initialisation time to zero.
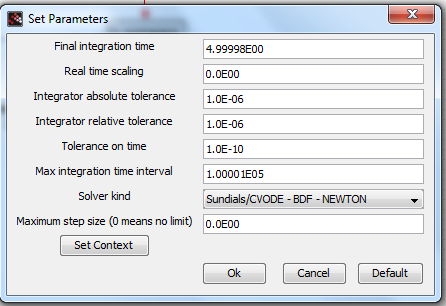
- Now, go to Simulation tab and click on Setup, then set Final simulation time to 4.9999773 seconds, which is the result of 5-1/FS.
Finally, you can press Start and run the simulation.
Save a sound file
Once the simulation is finished, the processed signal is stored in output.
Now, of course, we want to listen the resulting sound. In order to do this, we're are going to write a new sound file from the workspace by using wavwrite function. Check its syntax:
wavwrite(Y, FS, NBITS, "C:\...address")
Where Y contains the processed data to be recorded, FS is the sampling frequency, NBITS is the number of bits per sample to be recorded, and the fourth field is for the address where you want to save the file.
After the simulation has finished, execute the next code to create the new sound file.
wavwrite(output.values, FS, NBITS, "C:\...");
My resulting sound file, after processing the original one, is provided below:
I hope you've completed this tutorial and help you to go further in Scilab and Xcos. For more tutorials have a look below.
References
All pictures are created by me or, otherwise, they are screen captures taken from my laptop.
Sound files are created by me.
Curriculum
- Scilab Tutorial | Approximating an integral by adding rectangular bands
- Scilab Tutorial | Transformation of Control Systems Mathematical Models
Posted on Utopian.io - Rewarding Open Source Contributors
Thank you for the contribution. It has been approved.
You can contact us on Discord.
[utopian-moderator]
Hey @miguelangel2801 I am @utopian-io. I have just upvoted you!
Achievements
Community-Driven Witness!
I am the first and only Steem Community-Driven Witness. Participate on Discord. Lets GROW TOGETHER!
Up-vote this comment to grow my power and help Open Source contributions like this one. Want to chat? Join me on Discord https://discord.gg/Pc8HG9x