(en) PyCheckers — #3 Dynamic board with turns and selectable pieces
PyCheckers is series of articles in which I describe my process of creating a checkers board game (also known as English draughts) in Python programming language. This is a project for my studies and I still learn to code in Python, therefore I invite you all to follow up and learn with me.

PyCheckers series logo.
Background image by Paul Brennan (Public Domain).
Python logo by Python Software Foundation
Introduction
In the last episode of this series we created a very basic web app in Flask—a Python micro framework for the web. Today we will use what we have accomplished before.
I will write shortly about the front-end-part of the PyCheckers app and then we will jump straight back into things: we will finally create a board, put players' pieces on it and allow them to select pieces. We'll also implement turns.
Things that you'll learn:
- Loading additional modules into a Python app and Flask, specifically.
- Creating classes, adding attributes and methods to them and then utilizing them.
- Creating static methods and what are they for.
- Generating a statis chess-board using few loops and many
ifs. - Allowing player to select a piece (and checking for the validity of a selection).
Requirements
In this part we will start programming some things in Python, so a basic knowledge about algorithms and programming is required. I'll try to explain as much as possible, however, I will not go into details on things such as types (boolean, lists, sets), loops etc.
You will need:
- PyCheckers development environment set up (see Part 2 of this series to follow up).
- Basic knowledge of any programming language.
- Basic knowledge of HTML and CSS.
Difficulty
Today we will do some programming, although not so complicated on its own. Harder part will be to understand the underlying logic and algorithms.
- Basic/Intermediate
Contents
1. Interface
Here I'll write briefly about how I'll create PyCheckers interface in HTML and CSS, and how that'll play with Python and Flask.
2. Basic starting board
In this second chapter we will write our first own Python code, that will allow us to generate a chess-board filled with pieces of both players on their starting positions.
3. Implementing turns
Checkers is a turn-based game, and our game still lacks this crucial functionality! It's high time to implement turns into our game and test it out!
4. Selecting a piece
We will allow user to select one of the pieces, so in the next step we can allow him/she to move it to other position on the board.
Interface
The main concern of this project is not visual candy, so I'll not put a lot of time into developing a fancy, cutting-edge and ultra-useful interface for the game—even though I am more of a front-end developer than I am a programmer. These are called priorities, as the mid-year exam session is coming along.
As mentioned in the previous article, I'll be using Kube framework to handle interface efficiently. Kube is really easy to use and elegant, just what we need for our game.
This is how the landing page looks for now:
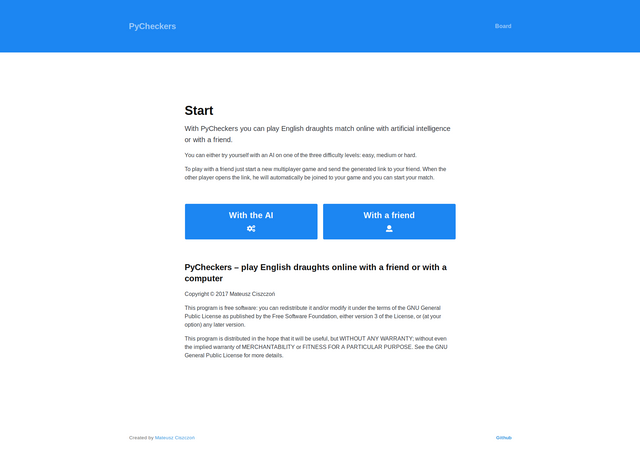
I will not go into details, as it's not important. What matters is the chess board.
Chess board
My initial idea for the chess board was to create it using good old tables. This is probably the first thing that comes to mind. A <table> already has got rows and columns—just like a chess board.
This is a HTML idea I came up with:
<table class="board unstyled">
    <tr id="row-0">
        <td id="box-0,0 prohibited"></td>
        <td id="box-0,1">
            <div class="player2 piece piece--king"></div>
        </td>
        <td id="box-0,2 prohibited"></td>
        <td id="box-0,3">
            <div class="player2 piece piece--king"></div>
        </td>
        <td id="box-0,4 prohibited"></td>
        <td id="box-0,5">
            <div class="player2 piece piece--king"></div>
        </td>
        <td id="box-0,6 prohibited"></td>
        <td id="box-0,7">
            <div class="player2 piece piece--king"></div>
        </td>
    </tr>
    <tr id="row-1">
        <td id="box-1,0">
            <div class="player2 piece piece--man"></div>
        </td>
        <td id="box-1,1 prohibited"></td>
        <td id="box-1,2">
            <div class="player2 piece piece--man"></div>
        </td>
        <td id="box-1,3 prohibited"></td>
        <td id="box-1,4">
            <div class="player2 piece piece--man"></div>
        </td>
        <td id="box-1,5 prohibited"></td>
        <td id="box-1,6">
            <div class="player2 piece piece--man"></div>
        </td>
        <td id="box-1,7 prohibited"></td>
    </tr>
    <tr id="row-2">
        <td id="box-2,0 prohibited"></td>
        <td id="box-2,1">
            <div class="player2 piece piece--man"></div>
        </td>
        <td id="box-2,2 prohibited"></td>
        <td id="box-2,3">
            <div class="player2 piece piece--man"></div>
        </td>
        <td id="box-2,4 prohibited"></td>
        <td id="box-2,5">
            <div class="player2 piece piece--man"></div>
        </td>
        <td id="box-2,6 prohibited"></td>
        <td id="box-2,7">
            <div class="player2 piece piece--man"></div>
        </td>
    </tr>
    <tr id="row-3">
        <td id="box-3,0"></td>
        <td id="box-3,1 prohibited"></td>
        <td id="box-3,2"></td>
        <td id="box-3,3 prohibited"></td>
        <td id="box-3,4"></td>
        <td id="box-3,5 prohibited"></td>
        <td id="box-3,6"></td>
        <td id="box-3,7 prohibited"></td>
    </tr>
    <tr id="row-4">
        <td id="box-4,0 prohibited"></td>
        <td id="box-4,1"></td>
        <td id="box-4,2 prohibited"></td>
        <td id="box-4,3"></td>
        <td id="box-4,4 prohibited"></td>
        <td id="box-4,5"></td>
        <td id="box-4,6 prohibited"></td>
        <td id="box-4,7"></td>
    </tr>
    <tr id="row-5">
        <td id="box-5,0">
            <div class="player1 piece piece--man"></div>
        </td>
        <td id="box-5,1 prohibited"></td>
        <td id="box-5,2">
            <div class="player1 piece piece--man"></div>
        </td>
        <td id="box-5,3 prohibited"></td>
        <td id="box-5,4">
            <div class="player1 piece piece--man"></div>
        </td>
        <td id="box-5,5 prohibited"></td>
        <td id="box-5,6">
            <div class="player1 piece piece--man"></div>
        </td>
        <td id="box-5,7 prohibited"></td>
    </tr>
    <tr id="row-6">
        <td id="box-6,0 prohibited"></td>
        <td id="box-6,1">
            <div class="player1 piece piece--man"></div>
        </td>
        <td id="box-6,2 prohibited"></td>
        <td id="box-6,3">
            <div class="player1 piece piece--man"></div>
        </td>
        <td id="box-6,4 prohibited"></td>
        <td id="box-6,5">
            <div class="player1 piece piece--man"></div>
        </td>
        <td id="box-6,6 prohibited"></td>
        <td id="box-6,7">
            <div class="player1 piece piece--man"></div>
        </td>
    </tr>
    <tr id="row-7">
        <td id="box-7,0">
            <div class="player1 piece piece--king"></div>
        </td>
        <td id="box-7,1 prohibited"></td>
        <td id="box-7,2">
            <div class="player1 piece piece--king"></div>
        </td>
        <td id="box-7,3 prohibited"></td>
        <td id="box-7,4">
            <div class="player1 piece piece--king"></div>
        </td>
        <td id="box-7,5 prohibited"></td>
        <td id="box-7,6">
            <div class="player1 piece piece--king"></div>
        </td>
        <td id="box-7,7 prohibited"></td>
    </tr>
</table>
Yes, this is a lot of HTML to generate a fairly simple chess board. What we're doing here is we create a table with exactly 8 rows, and each row has got 8 cells. This results in a 8x8 table, which is equal to 8x8 chess board.
Each box has got its unique id created, based on this formula: box-{row number},{column number}. Note that we're counting from 0 up, thus it only goes up to 7 and not 8. Also, each box that can not be stepped on (i.e. whites ones) should have a class of .prohibited—it's just that in my example I mistakenly have put it into the id field. Sorry about that.
Now, in each table cell we can generate something if we want, or just leave it empty. In the example below we fill some of the cells with pieces of both players. Each piece is a <div> with some additional classes, like .player1, .player2 (indicates which player's piece it is) and piece—this is a basic class added to every piece, so we can apply styles. A piece can also have a class of .piece--king, and that will add a nice crown icon to it.
Along with corresponding CSS styles, the code above generates as this:
That looks good to me! We can move on and implement this in Flask and Python.
Basic starting board
We need a lot of HTML code to generate our board, but that's not a problem when we have loops! The situation is just perfect, since our board is a rectangle, i.e. it has equal number of rows and columns. To generate our board we will use exactly two loops: the outer one will iterate rows, and the inner one will iterate columns inside this row.
But before we do that: we will store most of the informations in separate modules of our app. For that purpose, we will create a Utils module inside pycheckers/ folder. This file will sit alongside the views.py. The name of the file should be utils.py.
We name it utils, because it will store some utilities for our app. This name is not perfect and we will break up this file into many others in future, but just for now we let it be.
Board class
The Board class is the very basic one. For now we will store in it information about the number of rows and columns.
class Board:
    """
    Stores the basic board setup, i.e. the dimensions.
    """
    columns = rows = 8

    def __init__(self):
        self.columns = 8
        self.rows = 8

    def get_rows(self):
        """
        Returns an iterable list of rows.
        :return list:
        """
        return range(self.rows)

    def get_columns(self):
        """
        Returns an iterable list of columns.
        :return list:
        """
        return range(self.columns)
The code above should be placed inside the utils.py file that we just created. Let's break it up.
columns = rows = 8
We first create two properties to store the number of desired rows and columns of our board. They should both be 8, so we assign this number straight away.
def __init__(self):
    self.columns = 8
    self.rows = 8
This line is redundant somewhat. __init__() is a built-in method, a constructor of the class. It is executed each time that a new instance of an object is created. self is a magic keyword that means the current instance of the class (something like this in JavaScript and PHP).
As you can see, we also have two additional methods: get_rows() and get_columns(). You may wonder why we need them, but it's fairly simple. What they do is they take the number of rows or columns that the board has got, and they return an array of numbers. The length of this array is equal to the number of rows/columns, and is filled with integers starting from 0 and incrementing by one. You can read more about the range() function in the documentation: 2. Built-in Functions — Python 3.6.4 documentation.
We need these arrays, because they are an iterable type, i.e. we can make a loop iterate its items.
Board class available in views.py
We created a class for our board, but how to make it available to our app? We have to load the Utils module into the views.py file, and then we will be able to create a new instance of the Board class.
Before, our views.py file looked like this:
from pycheckers import app
from flask import render_template

@app.route('/')

def index():
    return render_template('index.html')
We will now extend it:
from pycheckers import app, utils
from flask import render_template

board_initialized = utils.Board()
rows = board_initialized.get_rows()
columns = board_initialized.get_columns()


@app.route('/')
def index():
    return render_template('index.html')


@app.route('/board')
def board():
return render_template('board.html', board={'rows': rows, 'columns': columns})
As you can see, we also import utils module alongside the app. If we now refer to utils in our code, the app will know that we want to use code from the utils.py file.
We initialize a new instance of the Board class with utils.Board(). We'll save this instance in the board_initalized variable. We also create two additional variables: rows and columns. They will store the arrays returned by get_rows() and get_columns() methods we discussed earlier. We could theoretically just use board_initalized.get_rows() everywhere, but to create other variables is just the faster way.
We then define a new routing path: @app.route('/board'), where we will display our board. For that we will render a new template, called board.html. We also have to inject our iterable rows and columns to the template, so we can use them in the loops there. To do so, we inject the board variable into the board.html template—this variable is a dictionary, but we could also inject two different variables. That's up to us.
Now, onto the board.html template:
{% extends "base.html" %}
{% block title %}Board demo{% endblock %}
{% block content %}
        <div class="container">
            <h2>Board demo</h2>

            <table class="board unstyled">
                {% for row in board.rows %}
                    <tr id="row-{{ row }}">
                    {% for column in board.columns %}
                        <td id="box-{{ row }},{{ column }}"></td>
                    {% endfor %}
                    </tr>
                {% endfor %}
            </table>

        </div>
{% endblock %}
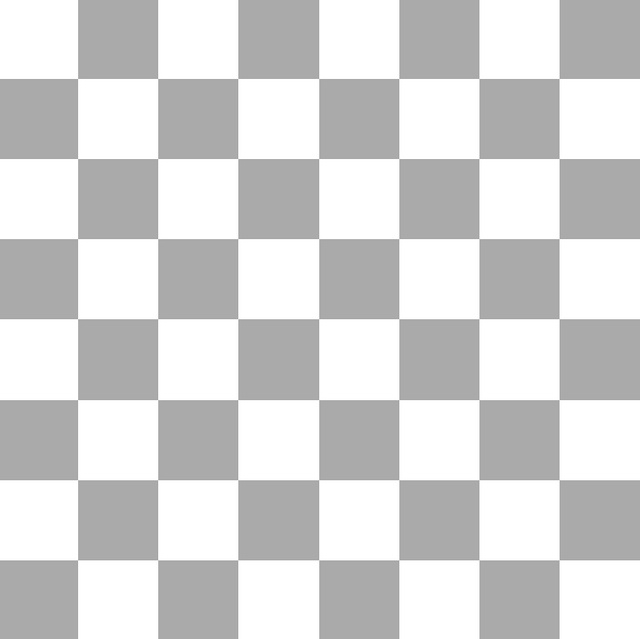
As you can see, the code to generate the board has shrunk a lot. Let's break it up: we first create a <table> like before, but then, inside it we use loops. The first one iterates rows, so inside it we create a new table row: <tr id="row-{{ row }}">. Note, that we now use Jinja to dynamically print the current row number inside the id attribute. This way each row will get its own, unique number automatically.
The inner loop is similar, only that we iterate board.columns and not rows. Note, that we also have the access to the temporary row variable, so we can dynamically generate those ids like box-0,0.
This is our generated board:
Player class and its children
It's nice to have the board, but let's fill it with pieces of both players. For that purpose we'll go back to the utils.py module, and then we will create a new class Player along with two other classes that inherit it: PlayerWhite and PlayerBlack.
class Player:
    """
    A basic object that stores data about a single player,
    i.e. where he has got his pieces and which of them are kings.
    """
    positions = set()
    kings = set()
    pieces = len(positions)

    def __init__(self):
        self.pieces = len(self.positions)


class PlayerWhite(Player):
    """
    Inherits from Player class.
    Stores data about a player playing white pieces.
    """
    positions = {
        (0, 1), (0, 3), (0, 5), (0, 7),
        (1, 0), (1, 2), (1, 4), (1, 6),
        (2, 1), (2, 3), (2, 5), (2, 7)
    }

    kings = set()


class PlayerBlack(Player):
    """
    Inherits from Player class.
    Stores data about a player playing black pieces.
    """
    positions = {
        (5, 0), (5, 2), (5, 4), (5, 6),
        (6, 1), (6, 3), (6, 5), (6, 7),
        (7, 0), (7, 2), (7, 4), (7, 6)
    }

    kings = set()
In the base class Player we define three attributes: positions, kings and pieces.
positions is a set that stores all of the player's pieces. They are stored as pairs for row and column they are in. For example, a (0, 0) piece would be in a box that's first on the left in the uppermost row (although it's not a valid cell for a piece to be in).
kings is also a set, and inside we'll store the coordinates of pieces that were turned into kings. Those coordinates will duplicate with those from positions.
You can read more about set type in Python documentation: 4. Built-in Types — Python 3.6.4 documentation. I have chosen this type, because it's easy to check whether an element is present inside such a set, it's also simple to add elements to it, or remove them from the set.
Lastly, the pieces attribute simply counts how many elements there are in positions. We will use that later to count how many pieces a player has lost.
PlayerWhite and PlayerBlack classes inherit from the Player class. Inside them we can finally fill positions with the default, starting positions of pieces.
Generating pieces
We can now use the new classes to generate players' pieces on our board. Let's modify our views.py:
from pycheckers import app, utils
from flask import render_template

board_initialized = utils.Board()
rows = board_initialized.get_rows()
columns = board_initialized.get_columns()

player_black = utils.PlayerBlack()
player_white = utils.PlayerWhite()


@app.route('/')
def index():
    return render_template('index.html')


@app.route('/board')
def board():
return render_template('board.html', board={'rows': rows, 'columns': columns}, player_black=player_black, player_white=player_white)
As you can see, we have created instences of PlayerBlack and PlayerWhite classes, and we then injected them into board.html template, so we can now use them inside it.
The idea is simple: inside our loops, for every cell we should check if any player has got a piece in it. If yes, then render it, adding according classes.
{% extends "base.html" %}
{% block title %}Board demo{% endblock %}
{% block content %}
        <div class="container">
            <h2>Board demo</h2>

            <table class="board unstyled">
                {% for row in board.rows %}
                    <tr id="row-{{ row }}">
                    {% for column in board.columns %}
                        <td id="box-{{ row }},{{ column }}">
                            {% if (row, column) in player_white.positions %}
                                <div class="player2 piece {% if (row, column) in player_black.kings %}piece--king{% endif %}"></div>
                            {% elif (row, column) in player_black.positions %}
                                <div class="player1 piece {% if (row, column) in player_black.kings %}piece--king{% endif %}"></div>
                            {% endif %}
                        </td>
                    {% endfor %}
                    </tr>
                {% endfor %}
            </table>

        </div>
{% endblock %}
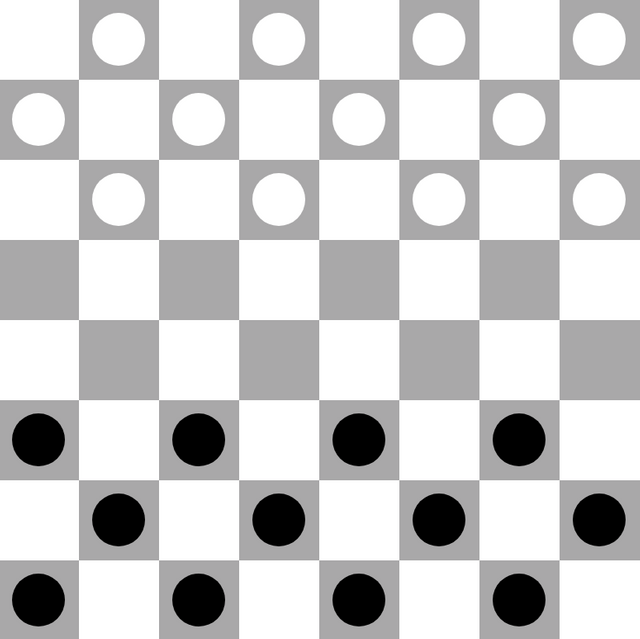
Where previously we had empty <td>s, we now have ifs that check whether current (row, column) pair is present in either black's or white's positions. If yes, then we should add a <div> there.
We also check whether the piece is a king, and add the corresponding class if so. For now there'll be no kings, of course.
Implementing turns
Now we should implement turns, so that we can later base on that which player can select and move a piece. For that we'll edit our Board class, and inside it we'll add a turn attribute, and also a change_turn() method for changing the turn.
The idea here is to have a turn variable that is either 0 (Black Player's turn) or 1 (White Player's turn). The change_turn() is a convenient way to... change the turn. We'll want to do it that way, just by invoking this method, and not changing the value of turn attribute manually.
class Board:
    turn = 0

    def change_turn(self):
        """
        This method changes the turn from 0 to 1 or from 1 to 0.
        It returns False if something's wrong and the turn is neither 0 or 1. Should not happen.
        :return boolean:
        """
        if self.turn == 0:
            self.turn = 1
            return True
        elif self.turn == 1:
            self.turn = 0
            return True

        return False
We should now pass on the turn into the board.html template, since we'll be using this information there to generate the board accordingly.
@app.route('/board')
def board():
return render_template('board.html', board={'rows': rows, 'columns': columns}, player_black=player_black, player_white=player_white, turn=board_initialized.turn)
We will use turns to determine which player can select his/her pieces, and we'll extend the use of turns in the next episodes of the series.
Selecting a piece
This is another huge feature that we have to implement. The idea on how to make it work is simple. We can utilize powerful routing engine of Flask for this.
Firsly, we'll generate pieces as links, and not <div>s, and they will lead user to an address like this: /board/select/row/column. Both row and column will be in fact numbers—coordinates of the piece that player selected. This will lead to URLs like this: /board/select/0/1.
We can then grab those coordinates from the URL address and make use of them inside our app.
Creating a new route
The first part is to create a new route select inside views.py. That's how the file will look like in its entirety:
"""
This is Views module.
It allows Flask to run properly, as it stores its routing and template rendering settings.
"""
from pycheckers import app, utils
from flask import render_template, redirect, url_for

# TODO: Move variables from below to a new Game object.
# TODO: Allow to create multiple instances of the Game object (store as objects in array).
board_initialized = utils.Board()
rows = board_initialized.get_rows()
columns = board_initialized.get_columns()

player_black = utils.PlayerBlack()
player_white = utils.PlayerWhite()


@app.route('/')
def index():
    """
    A view that displays the homepage.
    :return render_template():
    """
    return render_template('index.html')


@app.route('/board')
def board():
    """
    A basic view that just generates the board.
    :return render_template():
    """
    return render_template('board.html')


@app.route('/board/select/<int:coordinate_x>/<int:coordinate_y>')
def select(coordinate_x, coordinate_y):
    """
    A view that handles player selecting one of his pieces.
    :param int coordinate_x: This is a x coordinate of the piece that player selected.
    :param int coordinate_y: This is a y coordinate of the piece that player selected.
    :return render_template() or redirect():
    """

    if board_initialized.turn == 0 and (coordinate_x, coordinate_y) in player_black.positions\
            or board_initialized.turn == 1 and (coordinate_x, coordinate_y) in player_white.positions:
        return render_template('board.html', coordinate_x=coordinate_x, coordinate_y=coordinate_y)
    else:
        return redirect(url_for('board'))


@app.context_processor
def inject_variables():
    """
    Injects variables into every view.
    Right now it is a very ugly workaround, but just for now.
    :return dict:
    """
    return dict(
        board={'rows': rows, 'columns': columns},
        player_black=player_black,
        player_white=player_white,
        turn=board_initialized.turn
    )
Again, let's break it up, so it's easier to understand.
Firstly, look at the new route: '/board/select/<int:coordinate_x>/<int:coordinate_y>'. As you can see, we tell Flask to mount this route under /board/select URL address, and we also define two variables that follow it. They take form of <type:name>. In our case, the type is int, since it will be a number in range from 0 to 7. As for the name, I have chosen coordinate_x and coordinate_y, as they seem intuitive for me.
Those two arguments from the URL address we pass onto the select(coordinate_x, coordinate_y) function, so we can utilize them in it.
Inside the function you can see a really long and seemingly complicated if. But it's easy once we put it into words:
IF it is black player's turn AND selected piece BELONGS TO black player:
        Everything is ok, it's black's turn
        and selected piece belongs to him.
        He can select it to move it, for example.

IF it is white player's turn AND selected piece BELONGS to white player:
        Everything is ok. It's white's move
        and selected piece belongs to him.
        He can select it to move it, for example.

IF NOT the first one AND NOT the second one:
        This means that something's wrong.
        (1) It's black's turn, and selected piece belongs to white,
            or vice versa.
        (2) None of the players has got a piece with such coordinates.
            Most probably, someone entered a URL address
            with coordinates of non-existent piece.
In the first two cases we can allow such a selection, as it's a valid one. What we do, then, is we generate the same board.html template, but now we pass on two additional variables to it: coordinate_x and coordinate_y.
If the selection is invalid (the third if part), then we simply redirect to the default board page, where no piece is selected and player has to select again. For that we use redirect() and url_for() functions. Remember to import them: from flask import redirect, url_for.
url_for() is especially interesting, as it allows us to dynamically create links to various subpages, and even inject variables into these links.
You may have also noticed, that we removed all the previously injected variables (like board, players and turn) from the render_template() functions. We did that not to repeat the same code in both board and select routes, because both of them need these variables.
Instead, we will automatically insert these variables into every single template using a Context Processor. The way I did it is not the best solution and is only temporary, but it will do for now.
Modifying the template
We now have a route that allows us to select a piece, but we won't be doing it by manually typing a URL address. Instead, we will use links.
Previously, we were rendering all the pieces as static <div>s. We not have to change it, so if it's Black Player's move, his pieces are actually selectable. It means that his piece should in fact be link that leads to an URL address of select route, and it also informs the route of its coordinates. That's when url_for() function comes in handy!
That's what is happening inside board.html template now:
<table class="board unstyled">
    {% for row in board.rows %}
        <tr id="row-{{ row }}">
        {% for column in board.columns %}
            <td id="box-{{ row }},{{ column }}">
                {% if (row, column) in player_white.positions %}
                    {% if turn == 1 %}
                        <a class="player2 piece {% if (row, column) in player_white.kings %}piece--king{% endif %} {% if row == coordinate_x and column == coordinate_y %}piece--selected{% endif %}" href="{{ url_for('select', coordinate_x=row, coordinate_y=column) }}"></a>
                    {% elif turn == 0 %}
                        <div class="player2 piece {% if (row, column) in player_white.kings %}piece--king{% endif %}"></div>
                    {% endif %}
                {% elif (row, column) in player_black.positions %}
                    {% if turn == 0 %}
                        <a class="player1 piece {% if (row, column) in player_black.kings %}piece--king{% endif %} {% if row == coordinate_x and column == coordinate_y %}piece--selected{% endif %}" href="{{ url_for('select', coordinate_x=row, coordinate_y=column) }}"></a>
                    {% elif turn == 1 %}
                        <div class="player1 piece {% if (row, column) in player_black.kings %}piece--king{% endif %}"></div>
                    {% endif %}
                {% endif %}
            </td>
        {% endfor %}
        </tr>
    {% endfor %}
</table>
Looks like a lot, but it's fairly simple. Just as before, inside every cell we check whether any player has got a piece there. Let's say, that we find out that the White Player has got a piece in the (0, 1) cell. Now we also check if it's White Player's turn. If it is, we generate this (0, 1) piece as a link. Inside the href attribute we use: {{ url_for('select', coordinate_x=row, coordinate_y=column) }}. This way Jinja will render a URL address generated by the url_for() function. In our example, this would render as: href="/board/select/0/1".
If we find a white piece, but it's a Black Player's turn, then we will render it as a <div>, just as before.
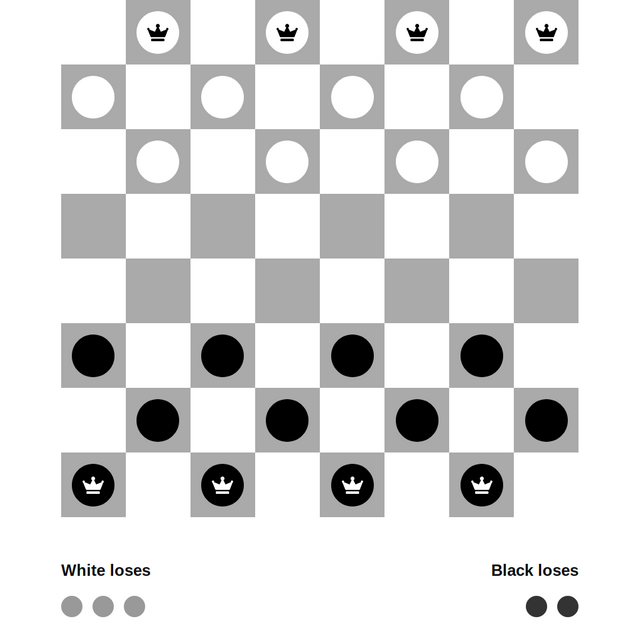
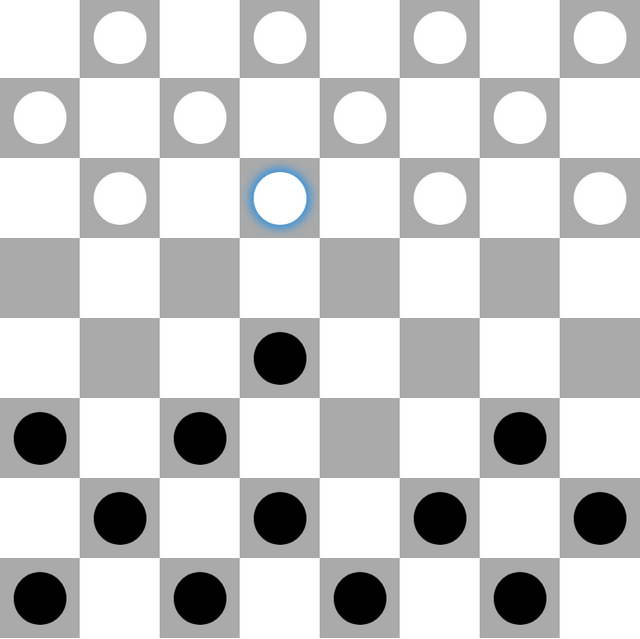
We should also add a style to indicate that a piece is selected. I have added a delicate blue shadow to a piece that is currently selected. That's how it looks like:
Summing it up
Today we accomplished quite a lot! We created a chess-board filled with players' pieces and implemented selecting. We also took care of validating everything, so we can be sure that only allowed moves are possible to make (and no cheating!). We also implemented turns for our turn-based game, which will play a huge role in moves implementation.
We are good to go, so next time we will implement moves and captures (finally). We will also create the possibility to start multiple games (and not a single one like now), and these instances we will be dumping into files (so that restarting the app will not erease them).
Also, next time I'll post a link to the PyCheckers project on Github, so you can easily clone all the changes. I can't do it now, because the repo is ahead of these articles and it's more trouble than it's worth. With the next fourth part of the series, I'll be even with the repo. Sorry for the inconvenience.
I encourage you to follow my PyCheckers series if you're interested in technology, programming and artificial intelligence or any similar field. PyCheckers will get into algorithmic thinking and learn some new programming skills.
Also, feel free to comment articles in this series. I am not a professional programmer, so there for sure will be some bugs, mistakes and things that could be done better. If you spot anything like that, have got something else to add or want to ask some questions—feel free to do it!
Thank you for your attention and see you next time!
PyCheckers Series (Curriculum)
This is the third post in the PyCherckers series, in which I write about an English-draughts-game I develop in Python 3 and Flask web-framework for my classess at university. Below you can find links to previous posts:
#1 — Introduction (on Steemit)
Here I talk about the origin of the project, why I do it, how I plan to do it and so on. I also describe English draugts rules extensively for those who do not know them.
#2 — Creating a base application
In this part I write about setting up an environment in which I'll be creating my game. I also show how to create a very basic web application in a Flask framework, which I'll be using.
Posted on Utopian.io - Rewarding Open Source Contributors
Thank you for the contribution. It has been approved.
You can contact us on Discord.
[utopian-moderator]
Hey @mciszczon I am @utopian-io. I have just upvoted you!
Achievements
Suggestions
Get Noticed!
Community-Driven Witness!
I am the first and only Steem Community-Driven Witness. Participate on Discord. Lets GROW TOGETHER!
Up-vote this comment to grow my power and help Open Source contributions like this one. Want to chat? Join me on Discord https://discord.gg/Pc8HG9x