Building an Online Store that Accepts Steem, SBD and Other Crypto as Payment - UPDATE
We Have Progress!
A couple of days ago I posted a guide for building an online store that accepts Steem and other cryptocurrency as payment. This all came about after I built an online store (Steemit Shop Australia) to sell Steem merchandise to our rapidly growing Australian audience.

The code that I was using from this guide had a couple of issues with it:
- The value of SBD wasn't being checked via www.coinmarketcap.com and assumed that SBD would be kept to USD $1.
- The code that inserted a little Steem logo at the checkout wasn't working
The good news is that @ausbitbank provided his ingenious services and has fixed the code for all to use! So read on for the updated code and how to implement it in your online store.
Accepting SBD as Payment in your Shopify store
My previous post describes the steps to follow in order to accept Steem as payment in your online store. Refer to this post for direction however use the code below, which will ensure the value of SBD is correct at all times in your online store:
<script> var steem = new XMLHttpRequest(); steem.open("GET", "https://api.coinmarketcap.com/v1/ticker/steem/", false); steem.send(); steem = parseFloat(JSON.parse(steem.response)[0].price_usd); var sbd = new XMLHttpRequest(); sbd.open("GET", "https://api.coinmarketcap.com/v1/ticker/steem-dollars/", false); sbd.send(); sbd = parseFloat(JSON.parse(sbd.response)[0].price_usd);
window.onload = function () { total = parseFloat(document.getElementsByClassName('payment-method-list__item__amount')[0].innerHTML.replace("$","")); order = document.getElementsByClassName('os-order-number')[0].innerHTML.replace("Order #", "").replace(/\s/g, '');
steemTotal = total / steem; sbdTotal = total / sbd;
steemitAccount = "yourshopname" \\ don't forget to update with your Steemit username (minus the @)
steemURL = "https://v2.steemconnect.com/sign/transfer?to=" + steemitAccount + "&memo=" + order + "&amount=" + steemTotal.toFixed(3).toString().split(".")[0] + "%2E" + steemTotal.toFixed(3).toString().split(".")[1] + "%20STEEM"; sbdURL = "https://v2.steemconnect.com/sign/transfer?to=" + steemitAccount + "&memo=" + order + "&amount=" + sbdTotal.toFixed(3).toString().split(".")[0] + "%2E" + sbdTotal.toFixed(3).toString().split(".")[1] + "%20SBD";
instructions = "<span><button class='btn btn-success' style='display: block;width: 100%;' onclick=\"window.open('" + steemURL + "','_blank')\">Pay " + steemTotal.toFixed(3) + " STEEM</button></span><br><br>"; instructions += "<span><button class='btn btn-success' style='display: block;width: 100%;' onclick=\"window.open('" + sbdURL + "','_blank')\">Pay " + sbdTotal.toFixed(3) + " SBD</button></span>";
if (document.getElementsByClassName('payment-method-list__item__info')[0].innerHTML === 'Pay with STEEM or Steem Dollars —') { Shopify.Checkout.OrderStatus.addContentBox( '<h1>Select Payment Method</h1>', instructions
)};
};
</script>
Don't forget to alter the Steemit username in the above code to your own Steemit username.
Getting that Little Steem Logo to Appear at Checkout
It seems unnecessary to add this little image however it really does make your checkout look a lot more professional if you do.

To add the little Steem logo to your Checkout, under Shopify admin you'll need to navigate to sales channels in the menu bar on the left of your screen. From there select "preferences".
Under preferences, scroll down until you see the section for Google Analytics. To enter the next block of code, you'll need to make sure you've set up your Google analytics in your Shopify store. If you haven't done this, you won't be able to enter the code required to add the Steemit logo to your checkout.
Setting up your Google analytics is pretty straight forward, Shopify provides some directions as to how to do this. I'd recommend taking a look. It's quite a useful tool to use if you're wanting to track where your store traffic comes from, especially if you're paying for traffic.
Once you've set up your Google Analytics, you'll have the "Additional Google Analytics JavaScript" field available as per the image below:
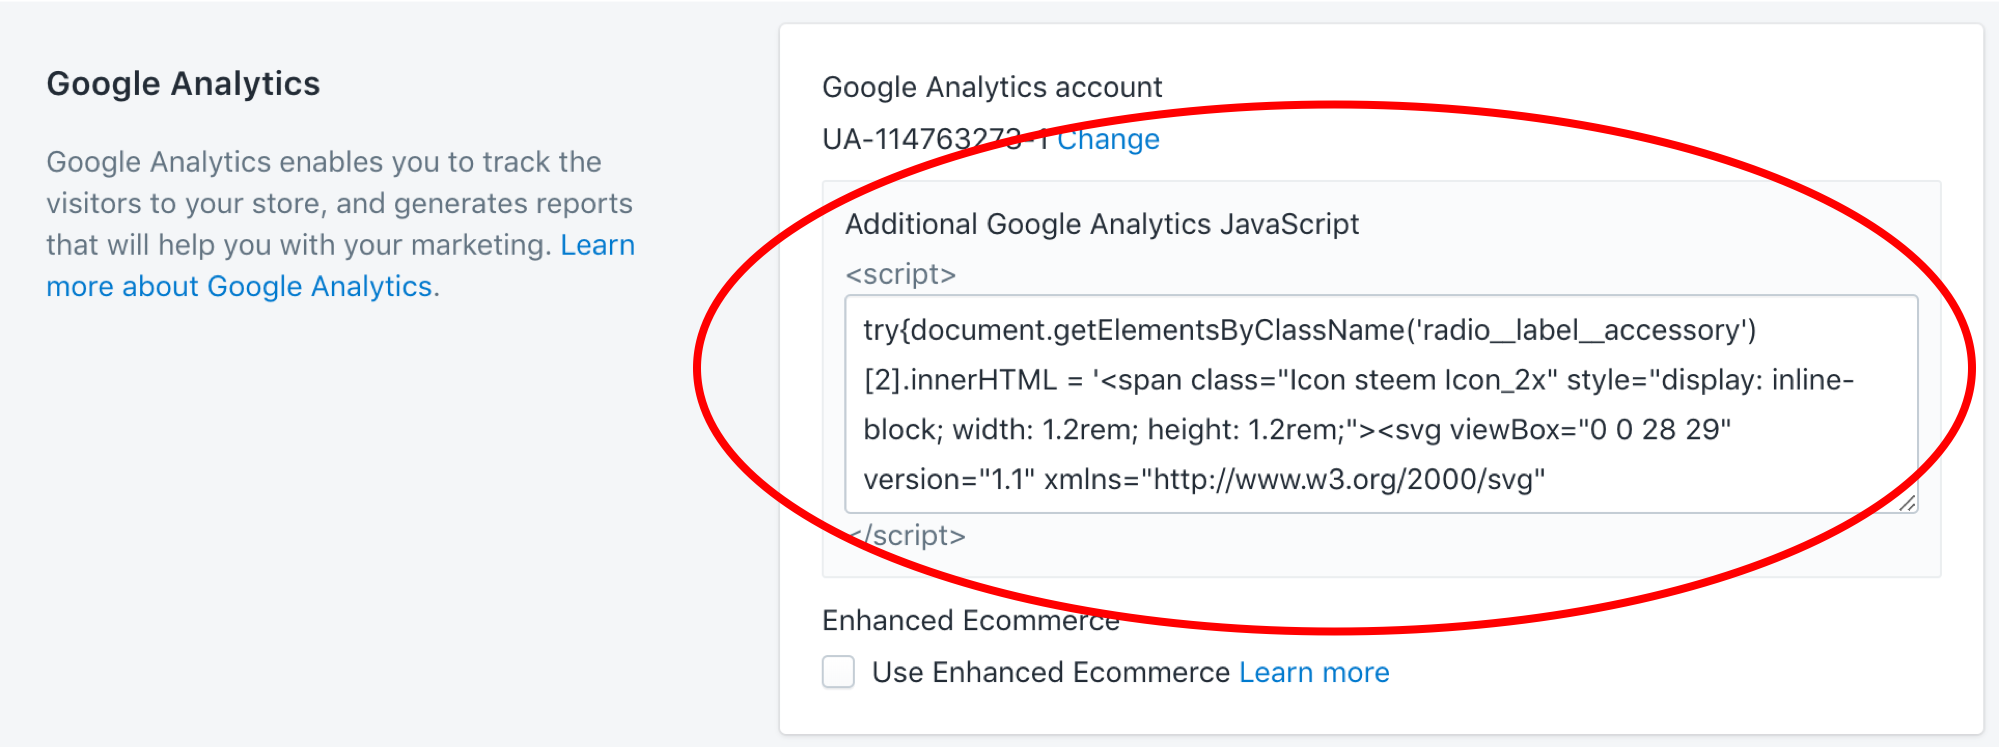
Once your Google Analytics is set up and you have the additional Javascript field is available, enter the following code:
try{document.getElementsByClassName('radio__label__accessory')[2].innerHTML = '<span class="Icon steem Icon_2x" style="display: inline-block; width: 1.2rem; height: 1.2rem;"><svg viewBox="0 0 28 29" version="1.1" xmlns="http://www.w3.org/2000/svg" xmlns:xlink="http://www.w3.org/1999/xlink"><g stroke="none" stroke-width="1" fill="none" fill-rule="evenodd"><g id="steem"><path d="M4.22924444,3.23195745 C3.94488889,3.09004255 0.337866667,6.07148936 0.337866667,8.265 C0.332888889,11.2631064 4.54533333,18.0552766 5.25466667,20.6825532 C5.86506667,22.9359149 4.21928889,25.6403191 4.67164444,25.7631064 C5.0848,26.0284255 9.01475556,22.0486383 9.16782222,20.3518298 C9.36506667,17.6498936 4.57893333,9.77114894 4.19751111,7.73682979 C3.75511111,5.36253191 4.54782222,3.28502128 4.22924444,3.23195745 L4.22924444,3.23195745 L4.22924444,3.23195745 Z" id="Fill-1" fill="#1A5099"></path><path d="M13.2321778,0.130191489 C12.8700444,-0.0505957447 8.26871111,3.74778723 8.26871111,6.54844681 C8.26373333,10.3715106 13.6353778,19.0338723 14.5394667,22.3812128 C15.3172444,25.2546809 13.2197333,28.7038298 13.7934222,28.8580851 C14.3235556,29.1949787 19.3324444,24.1242979 19.5296889,21.9573191 C19.7823111,18.5131064 13.6764444,8.46738298 13.1904889,5.86910638 C12.6267556,2.84878723 13.6353778,0.197446809 13.2321778,0.130191489 L13.2321778,0.130191489 L13.2321778,0.130191489 Z" id="Fill-2" fill="#4BA2F2"></path><path d="M22.5238222,3.23195745 C22.2419556,3.09004255 18.6324444,6.07148936 18.6324444,8.265 C18.6280889,11.2631064 22.8399111,18.0552766 23.5498667,20.6825532 C24.1596444,22.9359149 22.5144889,25.6403191 22.9662222,25.7631064 C23.3818667,26.0284255 27.3124444,22.0486383 27.4630222,20.3518298 C27.6596444,17.6498936 22.8741333,9.77114894 22.4920889,7.73682979 C22.0503111,5.36253191 22.8424,3.28502128 22.5238222,3.23195745 L22.5238222,3.23195745 Z" id="Fill-3" fill="#1A5099"></path></g></g></svg></span>';}catch(e){};
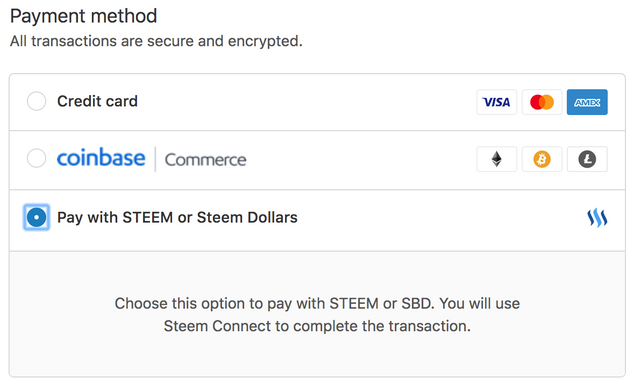
It's one massive wall of text I know. But it works, which is excellent. Once you've hit save, you'll now have a little Steemit logo appearing in your Checkout. Just like the image below!
And that's it! If you've followed both of the guides that I've posted this week your Shopify store now does the following:
- Accepts Steem, SBD, Bitcoin, Litecoin and Ethereum as payment; and
- Checkout now has a Steemit logo, which matches all other payment options
Finally your store looks professional and everything works! Happy days!
Don't Forget to Enter Our Steem Australia T-Shirt Design Competition! Details Here!
As always, if you have any questions, comments or ideas, let me know in the comments!


Posted on Utopian.io - Rewarding Open Source Contributors
This sounds promising, well done mate. Where are you based?
Thanks! I'm south of Melbourne, near Mordialloc. How about you?
Mate that's awesome. I'm in Deer Park Melbourne's West.
Right over the other side. You'll have to come to one of the Steem meet-ups that we have. The next one is in early March. :)
Great post, @mazzle. I see ausbitbank as one of those ninja/stagehand guys in black at the theatre.
They don't draw attention to themselves but they're always waiting in the wings, for a chance to dart over and fix any new issue.
The show must go on :)
I completely agree. He’s been so incredibly helpful with this little project.
I will definitely have to check out the online store, cheers for the post!
Take a look. I’m pretty happy with the response so far. :)
Congratulations! This post has been upvoted from the communal account, @minnowsupport, by mazzle from the Minnow Support Project. It's a witness project run by aggroed, ausbitbank, teamsteem, theprophet0, someguy123, neoxian, followbtcnews, and netuoso. The goal is to help Steemit grow by supporting Minnows. Please find us at the Peace, Abundance, and Liberty Network (PALnet) Discord Channel. It's a completely public and open space to all members of the Steemit community who voluntarily choose to be there.
If you would like to delegate to the Minnow Support Project you can do so by clicking on the following links: 50SP, 100SP, 250SP, 500SP, 1000SP, 5000SP.
Be sure to leave at least 50SP undelegated on your account.
Your contribution cannot be approved because it does not follow the Utopian Rules.
Hi. According to the blog post rules:
Your post does not fit the Blog post category, and it is more in line with the tutorials category. Also, in the blog post category we need very good looking post.
According to the rules:
Please avoid to ask for upvotes, reestem and followers.
The linked repository is Shopify_api, but your post is about how to integrate Steem/SBD payments into a Shopify store. Be careful when choosing the repository, I think shopify_api is not a valid repository for your tutorial.
You can contact us on Discord.
[utopian-moderator]
Thanks @kit.anres. I'm quite new at the Utopian thing.
I was considering placing it under tutorials but it seemed to fit the blog category in my mind. Happy to stand corrected. I also discovered that I had to link it to an API regardless as to whether or not one was applicable. In this case an API wasn't really applicable so I chose the one that was most relevant.
Hey is this working? I have been trying to take Steem on my store Futurebong.com but I can't get the code to work.