Steem-JS Following Feed Voting Bot, featuring html GUI and dynamic blacklist #1
Preface
Within this particular tutorial, I'm going to go over the creation of an html GUI which could be used in a website or as a simple interface for a personal bot. A disclaimer, I do not endorse fully automated voting but it is a great way to explore Steem-JS and get real results out of scripting quickly, as well as providing a stepping stone to analytics and more advanced concepts. I have seen several tutorials on utopian regarding upvote bots specifically, but I have yet to see an html GUI so unless there is a great one I am unaware of, here's part one of my take on the subject.
What Will You Learn?
- How to create an html and CSS graphical user interface for a Steem-JS based upvote bot.
- How to make a dynamic html list and store the values inputted in a JavaScript array.
Requirements
- Steem-JS library, install instructions found at https://github.com/steemit/steem-js/tree/master/doc#install
- A web browser.
- A text editor of your choice.
Difficulty
- Basic
Tutorial Contents
Because upvote functionality is covered in several tutorials here, I'd like to keep this tutorial separate so people can fill the JavaScript with whatever they deem best. I will continue this short tutorial series with my full bot so my particular design and decisions on important stuff to display should portray where I'm going with this. It is also meant to be modular to fit further parametric additions to the html and fit with other pure bot tutorials. Anyways, on to the tutorial:
First of all, you should:
- create an index.html file.
- create a main.js file.
- create a main.css file.
- Either download the Steem-JS library or use the cdn link found at the link above. I use a downloaded copy, the general setup I use can be found in Step one of: my Steem-JS to dMania tutorial
- Put all of these files within one folder, names do not matter as long as references are correct.
Now to start on the html:
index.html
<!DOCTYPE html>
<html>

    <head>

        <meta charset="utf-8">
        <meta name="viewport" content="width=device-width,initial-scale=1">
        <script src="steem.min.js"></script>
        <script src="main.js"></script>
        <link rel="stylesheet" href="main.css">

    </head>

    <body>

    </body>

</html>
To start everything off, the above code includes the main necessary html elements as well as loading in our Steem-JS library before our main.js file. To skip downloading Steem-JS and if the cdn works for you, you can replace <script src="steem.min.js"></script> with <script src="//cdn.steemjs.com/lib/latest/steem.min.js"></script>
Next, I'm going to use the <fieldset>, <legend>, <ol>, and <li> elements to set up an easy to read, reference, and format interface. Below will be my completed index.html
index.html
<!DOCTYPE html>
<html>

    <head>

        <meta charset="utf-8">
        <meta name="viewport" content="width=device-width,initial-scale=1">
        <script src="steem.min.js"></script>
        <script src="main.js"></script>
        <link rel="stylesheet" href="main.css">

    </head>

    <body>

        <fieldset>
            <legend>
                Main Display:
            </legend>
            <ol>
                <li>
                    <input id="timerStarter" class="timerb" type="button" value="Voting System Off"></input>
                </li>
                <li>
                    <input id="timerStopper" class="timerb" type="button" value="Stop Voting System" disabled></input>
                </li>
                <li>
                    <label>True Voting Power:</label>
                    <input id="TrueVPower" value="Voting Power" disabled></input>
                </li>
                <li>
                    <label>Timestamped VP for Previous Vote:</label>
                    <input id="VPower" value="TimeStamped VP" disabled></input>
                </li>
                <li>
                    <label>Total Votes Cast since Start:</label>
                    <input id="TotalVotes" value="Total Votes - 0" disabled></input>
                </li>
                <li>
                    <label>Total API Full Iterations:</label>
                    <input id="TotalIts" value="Total Iterations - 0" disabled></input>
                </li>
                <li>
                    <label>Total API Errors since Start:</label>
                    <input id="TotalErrs" value="Total Errors - 0" disabled></input>
                </li>
                <li>
                    <label>Current Log:</label><br>
                    <p id="Log">None</p>
                </li>
                <li>
                    <label>HardFork Version:</label>
                    <input id="Hfv" value="HF" disabled></input>
                </li>
                <li>
                    <label>HardFork Live Time:</label>
                    <input id="Hft" value="Schedule" disabled></input>
                </li>
                <li>
                    <label>Error Log:</label><br>
                    <p id="ErrLog"></p>
                </li>
            </ol>
        </fieldset>

        <fieldset>
            <legend>
                Control Panel:
            </legend>
            <ol>
                <li>
                    <label>Account:</label>
                    <input id="Account" value="Account Name"></input>
                </li>
                <li>
                    <label>Voting Power Threshold:</label>
                    <input id="VPT" value="8000"></input>
                </li>
                <li>
                    <label>Lower Limit Maturity in Minutes:</label>
                    <input id="LowLim" value="25"></input>
                </li>
                <li>
                    <label>Upper Limit Maturity in Minutes:</label>
                    <input id="UpLim" value="35"></input>
                </li>
                <li>
                    <label>Upvote Resteems:</label>
                    <input id="UpResteems" type="checkbox">
                </li>
                <li>
                    <input id="AddBlacklist" type="button" value="Add Account to Blacklist"></input>
                </li>
                <li id="BLzone">
                    <label>Blacklisted Accounts:</label>
                    <br><br>
                    <input class="Blacklist" value=""></input><br><br>
                </li>
            </ol>
        </fieldset>

    </body>

</html>
The fieldset creates a container, mostly visually with the <legend> element declaring the name of the container. <label> simply denotes visually what an input field is for. <input> without a type is a text field, otherwise I also use the button and checkbox types. Writing disabled in an input element makes it so the element is not usable, and I use this for easy to display text information and in buttons to keep strict control over functionality as well as easy CSS referencing. Also, the 8000 VPT value or Voting Power Threshold is 80.00% standardized to the way it is returned by the blockchain. If you opened this page in a browser though, it wouldn't look very good so lets use CSS to make things pretty:
main.css
fieldset {
  float: left;
  clear: left;
  width: 100%;
  margin: 0 0 1.5em 0;
  padding: 0;
}

legend {
  margin-left: 1em;
  color: #000000;
  font-weight: bold;
}

fieldset ol {
  padding: 1em 1em 0 1em;
  list-style: none;
}

fieldset li {
  float: left;
  clear: left;
  width: 100%;
  padding-bottom: 1em;
}

label {
  float: left;
  width: 14em;
  margin-right: 1em;
}

#timerStarter {
    background-color: firebrick;
    color: white;
    border: 2px solid darkslateblue;
    margin-left: 7.7em;
}

#timerStarter:disabled {
    background-color: forestgreen;
    color: white;
    border: 2px solid darkslateblue;
}

#timerStopper {
    margin-left: 7.5em;
}
Here I use # if I want to reference the id attribute of a specific html element, referencing a class would be . I use :disabled to make easy visual feedback for if this particular button is disabled and if that means the voting system is on or not as we will see soon.
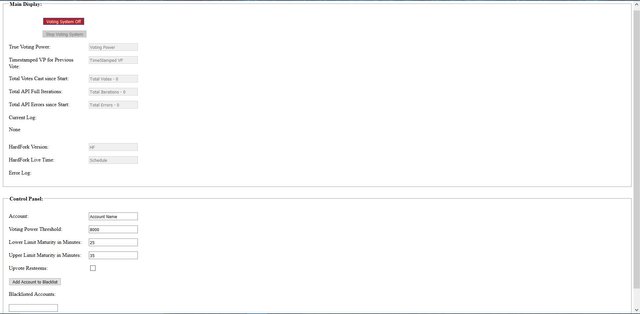
This together should give you a page that looks like this after the html file is double clicked and opened in a browser:
Now onto my setup for the JavaScript:
main.js
steem.api.setOptions({ url: 'https://api.steemit.com' });

let voteQualifiers,
    voteIteration = Number(0),
    totalVotes = Number(0),
    totalIts = Number(0),
    totalErrs = Number(0),
    timerRef;

window.addEventListener('DOMContentLoaded', function () {

    document.getElementById('timerStarter').onclick = function() {
        document.getElementById('timerStarter').disabled = true;

        checkVotingPower();
        timerRef = setInterval(checkVotingPower, 55000); // 60000 = one minute

        document.getElementById('timerStarter').value = 'Voting System On';
        document.getElementById('timerStopper').disabled = false;
    };

    document.getElementById('timerStopper').onclick = function() {
        document.getElementById('timerStopper').disabled = true;

        window.clearInterval(timerRef);

        document.getElementById('timerStarter').value = 'Voting System Off';
        document.getElementById('timerStarter').disabled = false;
    };

    document.getElementById('AddBlacklist').onclick = function () {
        var blzoneRef = document.getElementById("BLzone");
        blzoneRef.insertAdjacentHTML('beforeend', '<input class="Blacklist" value=""></input><br><br>');
    }

    steem.api.getNextScheduledHardfork(function(err, result) {
        if (!err) {
            document.getElementById('Hfv').value = result.hf_version;
            document.getElementById('Hft').value = result.live_time;
        }
    });

}, false);
To break this down, the steem.api.setOptions({ url: 'https://api.steemit.com' }); Steem-JS function makes it so my outdated version of Steem-JS connects to a working and current RPC node and my calls get broadcast. If you are using the latest version or the cdn link, don't worry about this.
The next part declares global variables which can be referenced anywhere including other js files as long as the reference is used after this file gets loaded into the html/browser. voteQualifiers will be used to store all the posts that qualify for a vote after our requirements are checked. voteIteration is where I'll store the index used to make successive votes. The next three are just for visual reference in our GUI page as the voter runs and I use Number() just to show how to make sure a variable's type equals a number. The final variable will store the reference to a time interval on which our voter will run to check voting power, posts made in our feed, begin voting, etc.
window.addEventListener('DOMContentLoaded', function () {}, false); is the big event listener which will wait until the html page is fully loaded before executing the functionality inside the anonymous function's curly brackets. This is to make our document.getElementById('elemsID') references work, and where we will assign on-click functionality with .onclick and get and set values with .value
The steem.api.getNextScheduledHardfork Steem-JS function is so you know which HF we are in, if Steem-JS works in it, and so you don't miss the upcoming HF20. Also it's to show how easy it is to display Steem-JS returned JSON in html input elements.
checkVotingPower();
timerRef = setInterval(checkVotingPower, 55000); // 60000 = one minute
This code within the onclick function of our timerStarter button will first run a checkVotingPower() function, then create a reference and set an interval timer to run that function every so milliseconds. It is within this function that you can add your own functionality cascade seen on other tutorials or made personally and I've set mine to run every 55 seconds. window.clearInterval(timerRef); in the timerStopper onclick function will stop the intervals and thus the voter.
Dynamic Blacklist Array
document.getElementById('AddBlacklist').onclick = function () {
        var blzoneRef = document.getElementById("BLzone");
        blzoneRef.insertAdjacentHTML('beforeend', '<input class="Blacklist" value=""></input><br><br>');
    }
This part creates a reference to the BLzone <li> container, then uses the insertAdjacentHTML() function to inject pure html code at the end, after everything else with the 'beforeend' argument. The <br><br> is for visual spacing, but the class is the important thing to set here as that will be how we obtain and create an array from the values so we can cross-reference our dynamic blacklist with post authors.
To create our dynamic blacklist array in JavaScript, all you need to do is create the following array variable:
let blackListArr = Array.from(document.getElementsByClassName('Blacklist'));
blackListArr = blackListArr.map(function(elem) {
    return elem.value;
});
Storing this in whichever function you want lets you make an array of all the values returned from each element with the class of 'Blacklist'. Array.from converts an html collection into an array and the .map function returns an array of all the values of each element by referencing each element with the arbitrary 'elem' name and compiling the returned values inherent to <input>.
Postface
Hope this finds use for all those pure voting scripts so that you have an organized web interface to interact with your bot. This could also be a stepping stone for websites regarding vote bots because by using an approach such as the above, you can start and stop the bot and change parameters on the fly. By referencing html elements for function parameters you could also add whatever extra adjustable stuff you want. I will be posting a continuation of this bot tutorial soon where I fill out all the functionality denoted by my control panel, but as this is really long already, and the modularity of the info above can be applied to otherwise found bot knowledge, I'll end it here. Hope you enjoyed and have a good one!
Posted on Utopian.io - Rewarding Open Source Contributors
Thank you for the contribution. It has been approved.
You can contact us on Discord.
[utopian-moderator]
Hey @loshcat I am @utopian-io. I have just upvoted you!
Achievements
Suggestions
Get Noticed!
Community-Driven Witness!
I am the first and only Steem Community-Driven Witness. Participate on Discord. Lets GROW TOGETHER!
Up-vote this comment to grow my power and help Open Source contributions like this one. Want to chat? Join me on Discord https://discord.gg/Pc8HG9x