Jekyll: A turorial for the installation in Windows 10

Introduction
In this tutorial, besides, we will be working in a special instalation. Since Jekyll is a sofware created for using in a Linux environment, there is right now a revolution for Microsoft Wndows 10 users who want to join to the open-source wave. Microsoft Windows has launched an update that allows running the Ubuntu Console to use, prove or develope programs for Linux. Right now, Windows has a repository with that precise update. You can find it here:
Windows Subsystem for Lynux. Microsoft/WSL
By the way, this repository is right now with an intense discussion in the issues tab of the repository because this Subsystem is in fase Beta right now and Windows is working with several developers to get things ready and running. I've subscribed to the notifications and in just few days you can see how is the work there.
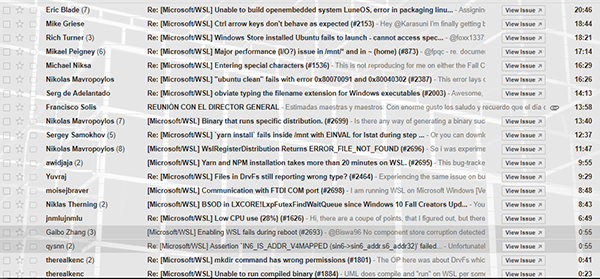
So, you need to understand that the easy way for using Jekyll is in a Linux based system. Maybe mounting a Linux Virtual Machine could be a solution but in one hand we love adventure and daring because all of this is a New World and in the other hand as a long time Microsoft Windows user it's a special excitement for me to learn new things from Linux while participating at least as witness in the development of this new facet of Microsoft as a supporter of the open-source movement. In relation to that we can read here the words of the founder of Canonical about the releasing of Ubuntu for Windows 10:
In our journey to bring free software to the widest possible audience, this is not a moment we could have predicted. Nevertheless, we are delighted to stand behind Ubuntu for Windows, committed to addressing the needs of Windows developers exploring Linux in this amazing new way, and are excited at the possibilities heralded by this unexpected turn of events.”
— Mark Shuttleworth, founder of Canonical
Jekyll
Jekyll is part of this movement of integration and in the home page they have the necessary documentation and guidance to manage to install Jekyll on Windows 10 inviting to prove the version and participate in the developing. So, thus said, the adventure of the knowledge of a new operative system and to participate in sofware development is the fuel to attempt using Jekyll in this way. But first let's know what is Jekyll in their own words. In the hompage of the project we can find the exact definition of the aplication:
So what is Jekyll, exactly?
Jekyll is a simple, blog-aware, static site generator. It takes a template directory containing raw text files in various formats, runs it through a converter (like Markdown) and our Liquid renderer, and spits out a complete, ready-to-publish static website suitable for serving with your favorite web server. Jekyll also happens to be the engine behind GitHub Pages, which means you can use Jekyll to host your project’s page, blog, or website from GitHub’s servers for free.
Since I knew about Github Pages I was seeing the deep relation with Jekyll, and that's because the first is structured by the second as it's said in the GitHub Pages section of their page:
GitHub Pages are public web pages for users, organizations, and repositories, that are freely hosted on GitHub’s github.io domain or on a custom domain name of your choice. GitHub Pages are powered by Jekyll behind the scenes, so they’re a great way to host your Jekyll-powered website for free.
During the instalation of Jekyll we will be installing two other packages and their respectives upgrades. These are Ruby and the Chocolatey programming languages needed in functioning of both Jekyll and GitHub Pages. These and other repositories will be given on the road. Let's be honest here, this is a path of knowledge that's just beginning, the documentation and the deepest of the deep it's shared in the links through the tutorial. I'm interested in developing an advertisement free web page with no need for paying rent for hosting, from GitHub Pages you administrate your own domain hosted in the repository which in my case this is: leveuf/escenika. What I can do is share my experience on this installation (I made it twice), I even will be sharing a couple of new Linux commands for me, needed on the tutorial. But you must go to the links for more information, doubts or problems of technical order. Or maybe if you are a programmer you could be interested in visitig those repositories to take a look. I'm sure in next posts I'll be sharing new information on the process. So, having in mind all of this let's begin this tutorial to install Jekyll in Windows 10.
Installing Ubuntu in Windows
The first thing is to enable the Microsoft Windows Subsystem Linux
Start PowerShell as administrator, (you can find it in Cortana typing PowerShell, right-click the icon and select the option to run as administrator. Always run PowerShell in this way for the tutorial). Once open write or copy and paste this command for install:
Enable-WindowsOptionalFeature -Online -FeatureName Microsoft-Windows-Subsystem-Linux
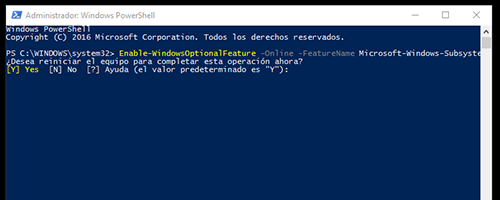
Depending on your system you will be automatically rebooted or maybe you will be asked, say yes.
Two ways
Now you will check the compilation of your Windows 10, first you need to notice that versions from 16215 and later can get the Ubuntu Linux Distribution directly from the Windows Store as these distributions by default support Linux distribution to be enabled, after the previous step, those who have these versions please go to the store and Get Ubuntu, it's a free app. You can check your version in Settings/System/About. Mine for example is an earlier version (14393.693):

In addition to that you can go to settings/updates and security/for developers and click the option: Programer mode. It will take a while.
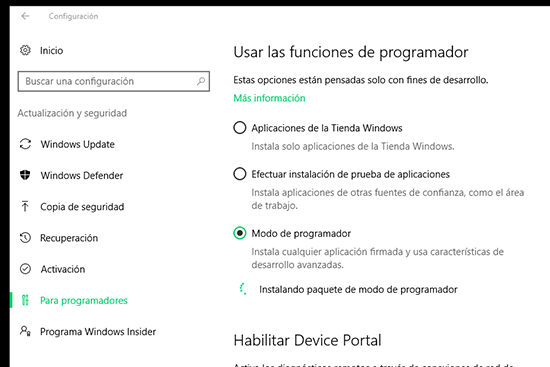
Let's check what is needed next:
Open a command prompt, you ca go to Cortana and type it. Once in the Command prompt type this (without the quotes): " cd c:\ " Hit enter and then type: " bash "

Type: "y"
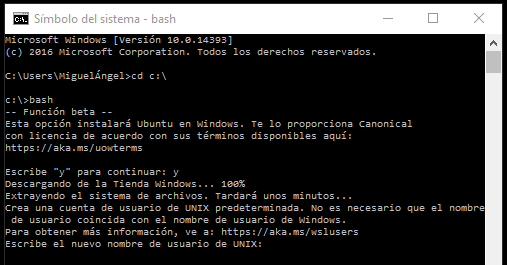
You will be asked for a Unix User. Now, type: " lxrun /setdefaultuser root " Setting "root" will make Jekyll and some of your future Linux aplications more handy. :)
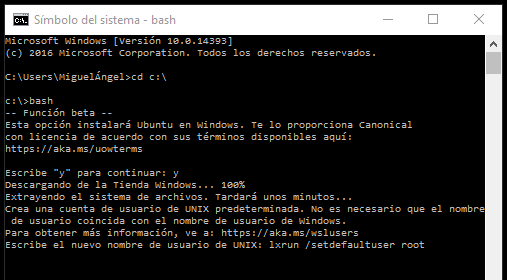
Click enter and the close the command prompt. Open again and type: " cd c:\ " Then: " bash.exe "

So far, we are done with the command prompt.
Installing Ubuntu
1.- Open Bash on Ubuntu on Windows
Search Ubuntu in Cortana and click the icon.
2.- Once in the Ubuntu console tipe bash to get a Bash Instance
3.- Update the package by typing: " sudo apt-get update -y && sudo apt-get upgrade -y "

Hit enter.
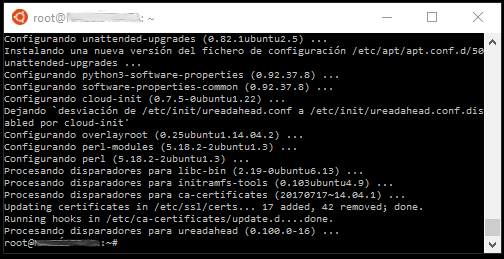
And you are already on Ubuntu. You can close your console and open again. Let's go to Ruby.
Installing Ruby
Open your Bash on Ubuntu on Windows and as we've seen it you will be giving the next command lines one by one, you need to be patient, some of these processes take a while and you will be asked to continue in some of them:
sudo apt-add-repository ppa:brightbox/ruby-ng
sudo apt-get update
sudo apt-get install ruby2.3 ruby2.3-dev build-essential
The final result of the process is this:

Now type: " sudo gem update " and we will have this result.

You can close your console.
Installing Jekyll
Open your Bash on Ubuntu on Windows and type this " gem install jekyll bundler "
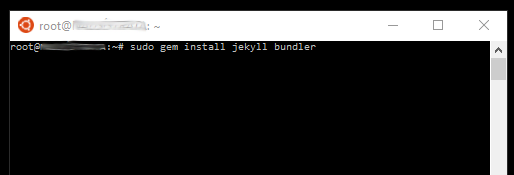
Done. Check if instaled properly. Type: " jekyll -v " hit enter.

Done. Now let's create the folder of the blog. Type using your blog's name or "my": " jekyll new my_blog "

Hit enter.

And for now close the console and let's move to GitHub Pages.
Installing GitHub Pages via Chocolatey
Please go to the web page of Chocolatey Install to see the complete references. You will need to open PowerShell as an administrator and type this or copy from the page:

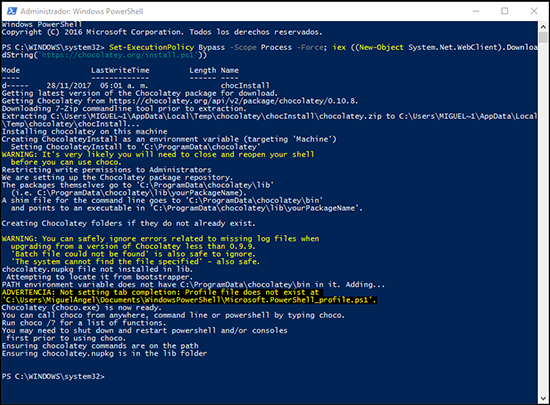
Always inPowerShell type this " choco install ruby -y "
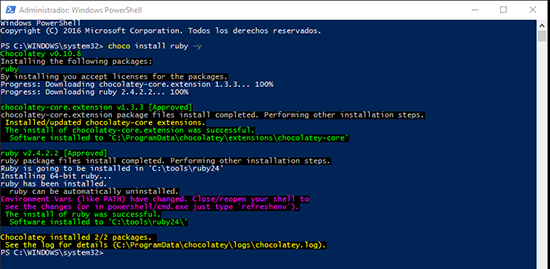
And now close the PowerShell, open your Bash on Ubuntu on Windows and type this: " gem install jekyll "

After that you will write this line in PowerShel, " choco install ruby2.devkit " you will be asked to continue a couple of times, type "y" and enter. You will see this result.

Open your command prompt and write " cd c:\tools\DevKit2 " and then: " ruby dk.rb init ".
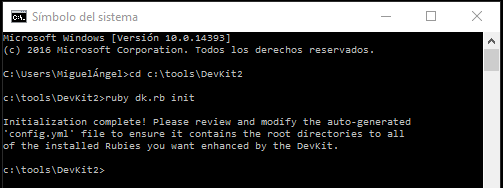
Now, using Windows browser and bloc notes open the file " c:\tools\DevKit2\config.yml " and edit it including this text: " - C:/tools/ruby22 " Save the file and close.

In PowerShell execute this lines one by one. You will be asked to continue in each one:
choco install libxml2 -Source "https://www.nuget.org/api/v2/"
choco install libxslt -Source "https://www.nuget.org/api/v2/"
choco install libiconv -Source "https://www.nuget.org/api/v2/
Copy all the lines bellow and execute at once in PowerShell as administrator by right-click on the cursor. You will be asked by Firewalls to give permission.
gem install nokogiri --^
--with-xml2-include=C:\Chocolatey\lib\libxml2.2.7.8.7\build\native\include^
--with-xml2-lib=C:\Chocolatey\lib\libxml2.redist.2.7.8.7\build\native\bin\v110\x64\Release\dynamic\cdecl^
--with-iconv-include=C:\Chocolatey\lib\libiconv.1.14.0.11\build\native\include^
--with-iconv-lib=C:\Chocolatey\lib\libiconv.redist.1.14.0.11\build\native\bin\v110\x64\Release\dynamic\cdecl^
--with-xslt-include=C:\Chocolatey\lib\libxslt.1.1.28.0\build\native\include^
--with-xslt-lib=C:\Chocolatey\lib\libxslt.redist.1.1.28.0\build\native\bin\v110\x64\Release\dynamic
Maybe the last line requires and extra enter. Now write " gem install bundler " all the process is seen here:
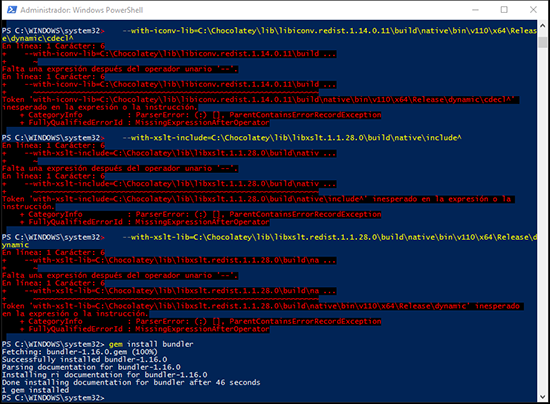
Now we are almost done. In a moment we will be using a Linux file editor called nano.
Open your Bash on Ubuntu on Windows Type the command line: " touch root\my_blog\Gemfile " This will create an empty file called Gemfile in the root of the blog.

Now write " nano root\my_blog\Gemfile " Once in nano you will write these two lines:
source 'https://rubygems.org'
gem 'github-pages', group: :jekyll_plugins

Then type Ctrl+o and hit enter, then Ctrl+x And now you have completed all the process Jekyll installation in windows. In a next Tutorial we will be proving Jekill operation and functionalities.
Posted on Utopian.io - Rewarding Open Source Contributors
Thank you for the contribution. It has been approved.
You can contact us on Discord.
[utopian-moderator]
Thank you very much!! :D
Hey @leveuf I am @utopian-io. I have just upvoted you at 7% Power!
Achievements
Suggestions
Human Curation
Community-Driven Witness!
I am the first and only Steem Community-Driven Witness. Participate on Discord. Lets GROW TOGETHER!
Up-vote this comment to grow my power and help Open Source contributions like this one. Want to chat? Join me on Discord https://discord.gg/Pc8HG9x
@driva has voted on behalf of @minnowpond.
If you would like to recieve upvotes from minnowponds team on all your posts, simply FOLLOW @minnowpond.
@originalworks
The @OriginalWorks bot has determined this post by @leveuf to be original material and upvoted(1.5%) it!
To call @OriginalWorks, simply reply to any post with @originalworks or !originalworks in your message!
@royrodgers has voted on behalf of @minnowpond.
If you would like to recieve upvotes from minnowponds team on all your posts, simply FOLLOW @minnowpond.