Creating Android Archive (AAR), publishing to jCenter and using it in android project
Repository
https://github.com/aosp-mirror
Overview
Android Archive (AAR) library is a zip archive that contains everything that normal android app can have. Android Archive (AAR) file can have source code, native code, resource files, assets and Android manifest. Output of Android Archive (AAR) module is .aar file which you can use as a dependency in an Android app.
Android Archive (AAR) can have
- Java code
- C/C++ code
- Resources in res/ folder
- Assets in assets/ folder
- Other jars in libs/ folder
- Android manifest
In this tutorial we will create Android Archive (AAR) .aar file that will include Java code, C++ code, youtube drawable and String resource and then publish to jCenter and then we will use this .aar as a dependency in an Android app and access these files.
Requirements
- Android Studio 3.0 or higher
- Android NDK
Difficulty
- Intermediate
Tutorial covers
- Creating Android Archive (AAR) library
- Creating Android Studio project
- Changing Application module to Library module
- Adding code and resources in library
- Generate Android Archive (AAR) library
- Publishing library to bintray
- Create bintray account
- Publish library to bintray from Android Studio
- Linking library to jCenter
- Importing library in Android app
- Importing .aar library file
- Importing from jCenter
- Using Android Archive (AAR) library
- Output
Guide
Creating Android Archive (AAR) library
1. Creating Android Studio project
Create new android project and change Application name, Company domain and Package name and select Include C++ support and click Next

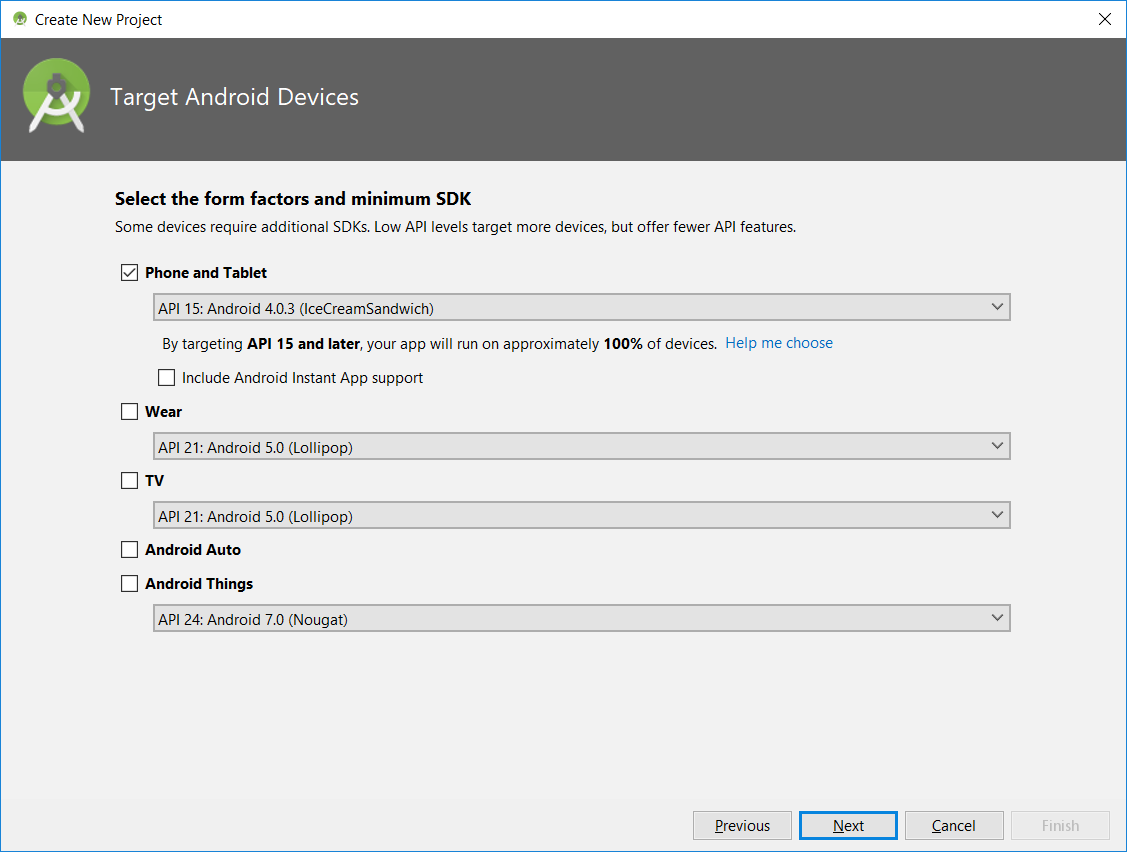
Select minimum SDK version and click Next
Select Add No Activity and click Next

Select C++ Standard as Toolchain Default and Click Finish to create project

2. Changing Application module to Library module
Open app build.gradle file and remove application plugin
apply plugin: 'com.android.application'
and replace with library plugin
apply plugin: 'com.android.library'
remove applicationId and Sync the project. To convert application project to library project here is complete build.gradle
apply plugin: 'com.android.library'

android {
    compileSdkVersion 27
    defaultConfig {
        minSdkVersion 15
        targetSdkVersion 27
        versionCode 1
        versionName "1.0"
        testInstrumentationRunner "android.support.test.runner.AndroidJUnitRunner"
        externalNativeBuild {
            cmake {
                cppFlags ""
            }
        }
    }
    buildTypes {
        release {
            minifyEnabled false
            proguardFiles getDefaultProguardFile('proguard-android.txt'), 'proguard-rules.pro'
        }
    }
    externalNativeBuild {
        cmake {
            path "CMakeLists.txt"
        }
    }
}

dependencies {
    implementation fileTree(dir: 'libs', include: ['*.jar'])
    implementation 'com.android.support:appcompat-v7:27.1.1'
    testImplementation 'junit:junit:4.12'
    androidTestImplementation 'com.android.support.test:runner:1.0.2'
    androidTestImplementation 'com.android.support.test.espresso:espresso-core:3.0.2'
}
3. Adding code and resources in library
Our library .aar file will include Java code, C++ code, youtube drawable and String resource
Java code
Java code contains one native method which will return greeting message and one method that will square the number
public class MyUtils {
    static {
        System.loadLibrary("native-lib");
    }

    public static native String greetFromJNI();

    public static int square(int num) {
        return num * num;
    }
}
C++ code
Simple JNI method to return greeting message
#include <jni.h>
#include <string>

extern "C" JNIEXPORT jstring
JNICALL
Java_com_faob_aar_MyUtils_greetFromJNI(JNIEnv *env, jobject instance) {
    std::string hello = "Hello from C++";
    return env->NewStringUTF(hello.c_str());
}
Drawable
There is youtube logo in drawable folder which you can download from here
String resource (lib_description)
<resources>
    <string name="app_name">AAR</string>
    <string name="lib_description">My awesome AAR library</string>
</resources>
4. Generate Android Archive (AAR) library
Open Gradle tool window and double click on app > Tasks > build > assembleRelease to create .aar

Output .aar will be in app > build > outputs > aar folder you can rename it

Publishing library to bintray
1. Create bintray account
Create an account https://bintray.com/, once account created and logged in then in main page click on Add New Repository

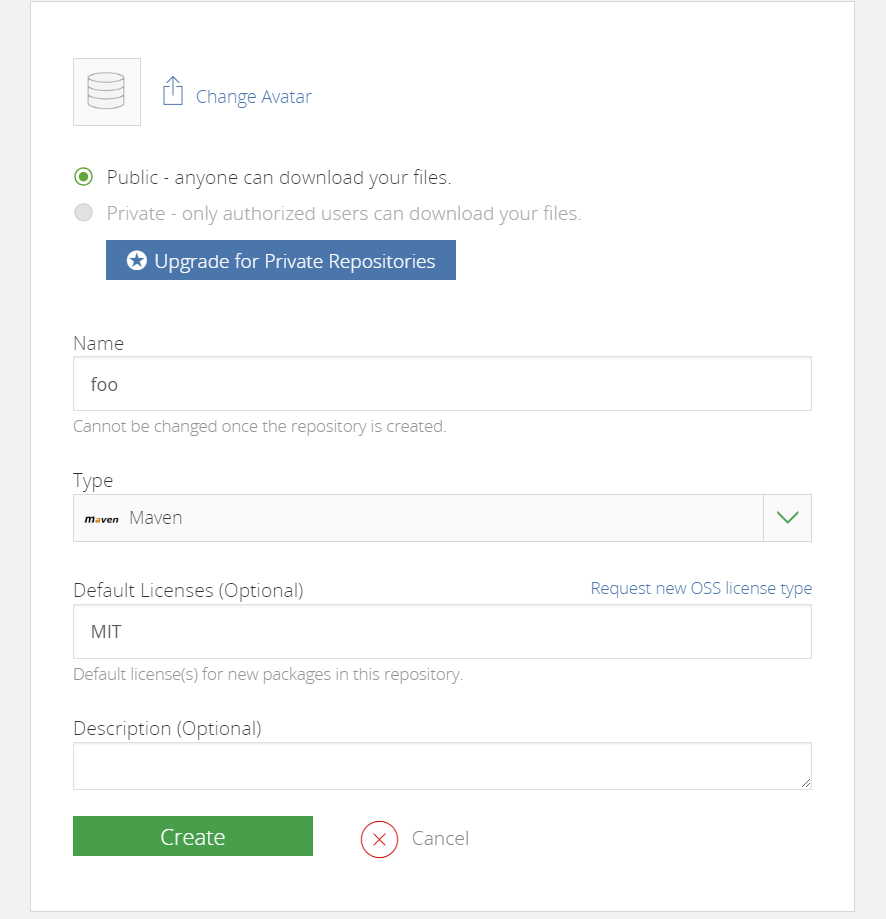
New page will gets open change Name, select Type to maven and select Default Licenses and click Create to create repo
To push our .aar library to this repo (foo) we need three pieces of information
- Account name
- API Key
- Repo name
To get API Key click on drop down menu on right side and click Edit Profile

Click on API Key menu on right side and copy the key

2. Publish library to bintray from Android Studio
open app build.gradle file and add these two plugins at top
plugins {
    id "com.jfrog.bintray" version "1.7.3"
}
apply plugin: 'maven-publish'
Next step is to add information to bintray that we collected in Creating bintray account section. I added account name and api key in local.properties for security reasons. In pkg section we assign repo name and after that we created package libs to hold our library and we added additional information to our package libs such as version and vcsUrl etc.
Properties properties = new Properties()
properties.load(project.rootProject.file('local.properties').newDataInputStream())

bintray {
    user = properties.getProperty("bintray.user")
    key = properties.getProperty("bintray.apikey")
    pkg {
        repo = 'foo'
        name = 'libs'
        licenses = ['MIT']
        websiteUrl = 'https://github.com/faob-dev/Tutorials'
        issueTrackerUrl = 'https://github.com/faob-dev/Tutorials/issues'
        vcsUrl = 'https://github.com/faob-dev/Tutorials.git'
        version {
            name = libVersion
            vcsTag = libVersion
        }
    }
    publications = ['aar']
}
Last step is to create artifact, add all necessary information such as groupId, artifactId and version and in last we added path to .aar file
publishing {
    publications {
        aar(MavenPublication) {
            groupId 'com.faob'
            artifactId archiveName
            version libVersion
            artifact("$buildDir/outputs/aar/$archiveName-release.aar")
        }
    }
}
Complete app build.gradle file contents
plugins {
    id "com.jfrog.bintray" version "1.7.3"
}

apply plugin: 'com.android.library'
apply plugin: 'maven-publish'

def archiveName = 'aar-lib'
def libVersion = '1.0.0'

android {
    compileSdkVersion 27
    defaultConfig {
        minSdkVersion 15
        targetSdkVersion 27
        archivesBaseName = archiveName
        versionCode 1
        versionName = libVersion
        testInstrumentationRunner "android.support.test.runner.AndroidJUnitRunner"
        externalNativeBuild {
            cmake {
                cppFlags ""
            }
        }
    }
    buildTypes {
        release {
            minifyEnabled false
            proguardFiles getDefaultProguardFile('proguard-android.txt'), 'proguard-rules.pro'
        }
    }
    externalNativeBuild {
        cmake {
            path "CMakeLists.txt"
        }
    }
}

dependencies {
    implementation fileTree(dir: 'libs', include: ['*.jar'])
    implementation 'com.android.support:appcompat-v7:27.1.1'
    testImplementation 'junit:junit:4.12'
    androidTestImplementation 'com.android.support.test:runner:1.0.2'
    androidTestImplementation 'com.android.support.test.espresso:espresso-core:3.0.2'
}

Properties properties = new Properties()
properties.load(project.rootProject.file('local.properties').newDataInputStream())

bintray {
    user = properties.getProperty("bintray.user")
    key = properties.getProperty("bintray.apikey")
    pkg {
        repo = 'foo'
        name = 'libs'
        licenses = ['MIT']
        websiteUrl = 'https://github.com/faob-dev/Tutorials'
        issueTrackerUrl = 'https://github.com/faob-dev/Tutorials/issues'
        vcsUrl = 'https://github.com/faob-dev/Tutorials.git'
        version {
            name = libVersion
            vcsTag = libVersion
        }
    }
    publications = ['aar']
}

publishing {
    publications {
        aar(MavenPublication) {
            groupId 'com.faob'
            artifactId archiveName
            version libVersion
            artifact("$buildDir/outputs/aar/$archiveName-release.aar")
        }
    }
}
Now to publish from Android Studio first open Gradle tool window and double click on app > Tasks > build > assembleRelease to create .aar
Now double click on app > Tasks > publishing > generatePomFileForAarPublication to create POM file

Double click on app > Tasks > publishing > bintrayUpload to push aar library to bintray

After successful upload from Android Studio open your account on https://bintray.com and click on Publish button in Notice: section to publish on bintray

Refresh page and our libs package becomes available it contains all the info we added in build.gradle

3. Linking library to jCenter
Final step is to link this libs package to jCenter, after that it becomes available to download. To link to jCenter click on Add to jCenter button and request bintray team for linkinng

After one or two days your request will be accepted and library will be linked to jCenter successful linking will look like this

Once its linked to jCenter next step will be to share gradle dependency you need to make some changes to this gradle dependency

compile should be replaced with implementation and string must end with @aar since it is aar library
implementation 'com.faob:aar-lib:1.0.0@aar'
Importing library in Android app
1. Importing .aar library file
Once you generated .aar library you can share this file with users. To use this library in your Android app click on File > New > New Module and select Import JAR/AAR Package and click Next

Select .aar file from your hard drive and change Subproject name and click Finish to import

Library will appear in Project tool window to add library to project we need one more step open app build.gradle file and add library to dependencies (Subproject name is aar-lib)
dependencies {
    implementation project(":aar-lib")
    ...
    ...
}
2. Importing from jCenter
importing from jCenter is simple just add this one line to dependencies in app build.gradle
dependencies {
    implementation 'com.faob:aar-lib:1.0.0@aar'
    ...
    ...
}
Using Android Archive (AAR) library
In previous section we included .aar file as dependency to Android app in this section we will use this library. First we will access youtube logo just drag ImageView on to main layout dialog will appear and youtube logo will appear in Project section select logo and click Ok

Once you select youtube logo it will appear in ImageView

To call library code first we will call java method then C++ method and then access string resource from .aar library
public class MainActivity extends AppCompatActivity {

    @Override
    protected void onCreate(Bundle savedInstanceState) {
        super.onCreate(savedInstanceState);
        setContentView(R.layout.activity_main);

        //calling java code from library
        int num = 4;
        int square = MyUtils.square(num);
        System.out.println("Square of " + num + " is: " + square);

        //calling C++ code from library
        System.out.println(MyUtils.greetFromJNI());

        //getting string resource from library
        String lib_description = getResources().getString(R.string.lib_description);
        System.out.println(lib_description);
    }
}
1. Output
Output is available in Logcat tool window

Github
Complete project available on github. Clone repo and open project name AAR.
Thank you for your contribution.
While I liked the content of your contribution, I would still like to extend one advice for your upcoming contributions:
Looking forward to your upcoming tutorials.
Your contribution has been evaluated according to Utopian rules and guidelines, as well as a predefined set of questions pertaining to the category.
To view those questions and the relevant answers related to your post,Click here
Need help? Write a ticket on https://support.utopian.io/.
Chat with us on Discord.
[utopian-moderator]
thanks for suggestions. code was very simple i explain it and added comments but in future tutorials i will explain more about code
Hey @kabooom
Thanks for contributing on Utopian.
We’re already looking forward to your next contribution!
Contributing on Utopian
Learn how to contribute on our website or by watching this tutorial on Youtube.
Want to chat? Join us on Discord https://discord.gg/h52nFrV.
Vote for Utopian Witness!