Pneumatic control circuit design using FluidSim: A step-by-step guide on how to design an automatic sequential motion of pneumatic double-acting cylinder
Hello fellow steemians!
This is my 1st tutorial contribution for #utopian-io. In this contribution, I will show you how to design a pneumatic circuit for automatic sequential motion of two pneumatic double-acting cylinder.
If you want to take a look of what i would be discussing below feel free to go to my YouTube channel link:
Let’s start with the materials and software that we will be using in this topic.
Materials
3/2 way directional control valve, normally close push button, spring-returned
3/2 way directional control valve, normally open limit switch, with roller, spring-returned
5/2 way directional control valve, pneumatically actuated.
Double-acting cylinder
#Software
FuidSim PneumaticDesired output
Our desired output will be an automatic sequential/ alternating retraction of piston in two pneumatic double-acting cylinder. So, both cylinder will not retract at the same time, but the double-acting cylinder #2 will be depend on the position of double-acting cylinder #1, either at 0 mm or at 100 mm (full retraction).
Step-by-step Guide
Step 1: Open FluidSim

Step 2: Create a NEW Project
Locate FILE on the menu bar, and a drop-down option appears. Select NEW or you can directly use shortcut key CRTL + N.
Then, a new project workplace appears. (the same as the picture shown below.)

Step 3: Select the Materials to be used
To select the materials to be used, you click the symbol of material as indicated in the left pane in the worksheet. After clicking the material, you simply drag it to the new project workplace.
Do it until you selected all the necessary listed materials. And, arrange the materials according to the picture shown below.

Step 4: Configure and connect equipment
Configuring the 5/2 way directional control valve, simply follow the steps as indicated in the figure.

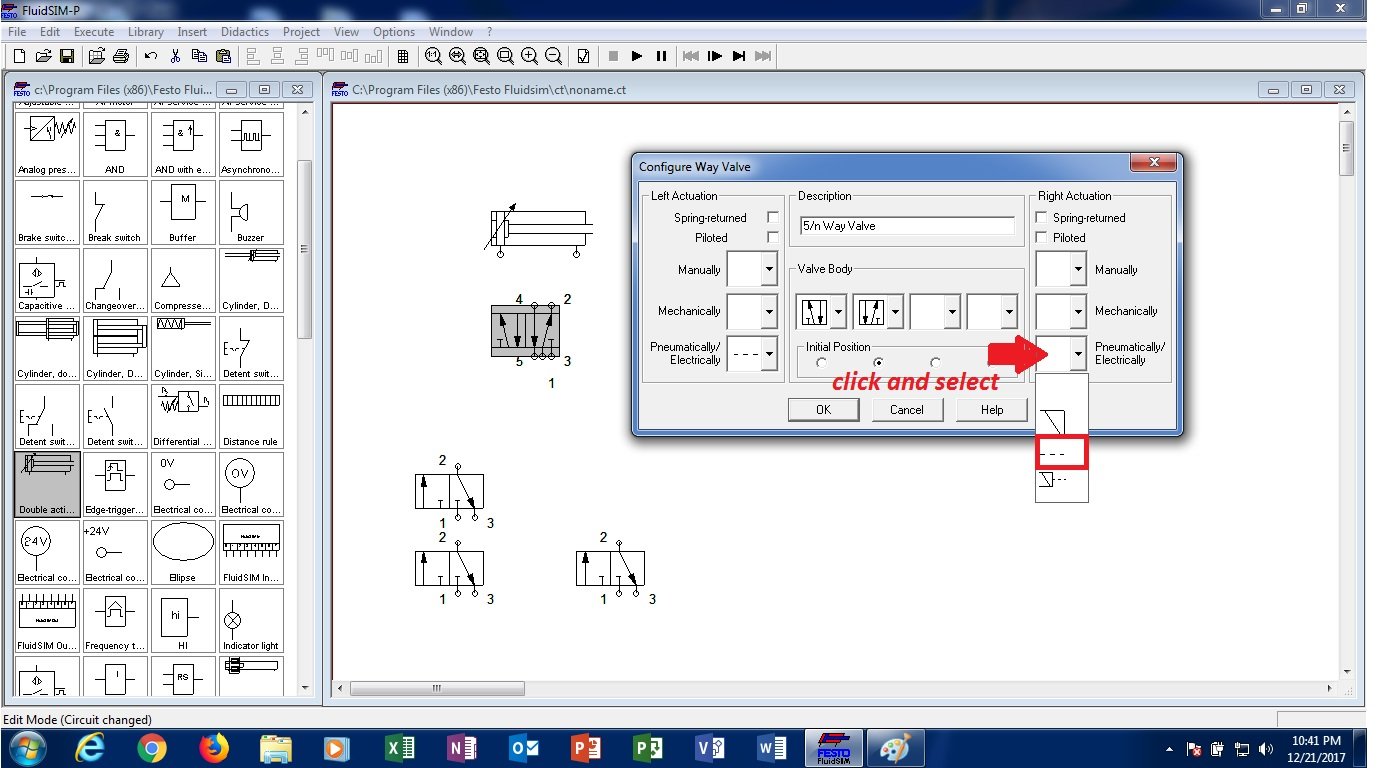

After following the procedure as indicated in the figure above. The result will look the same with the figure below.

To finish the configuration of the 5/2 way DCV, put the terminal designation number for the pneumatic actuation of the 5.2 way DCV. Follow the procedure as indicated in the figure below. Double click the 5/2 way DCV first before a dialog box appears.


Connecting the 5/2 way DCV to the 3/2 way DCV. Click first the terminal designation, hold then drag to the next terminal. Do this step for all equipment, as shown in figure.

Configuring the 3/2 way DCV. Follow the steps as indicated in the figure below. But, first, double click the 3/2 way DCV so that a dialog box will appear.

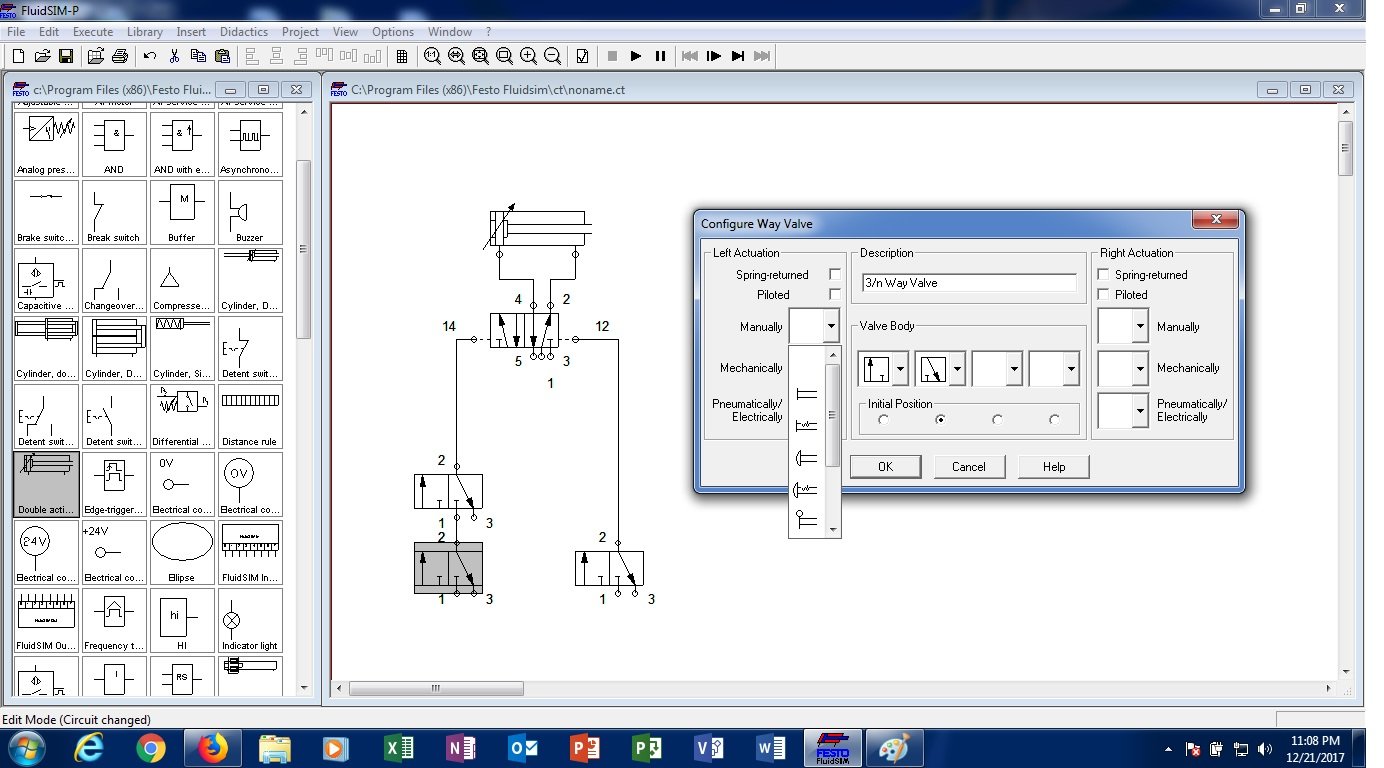


Configure all exhaust terminal as designated to terminal no. 3 and no. 5 for all directional control valve.

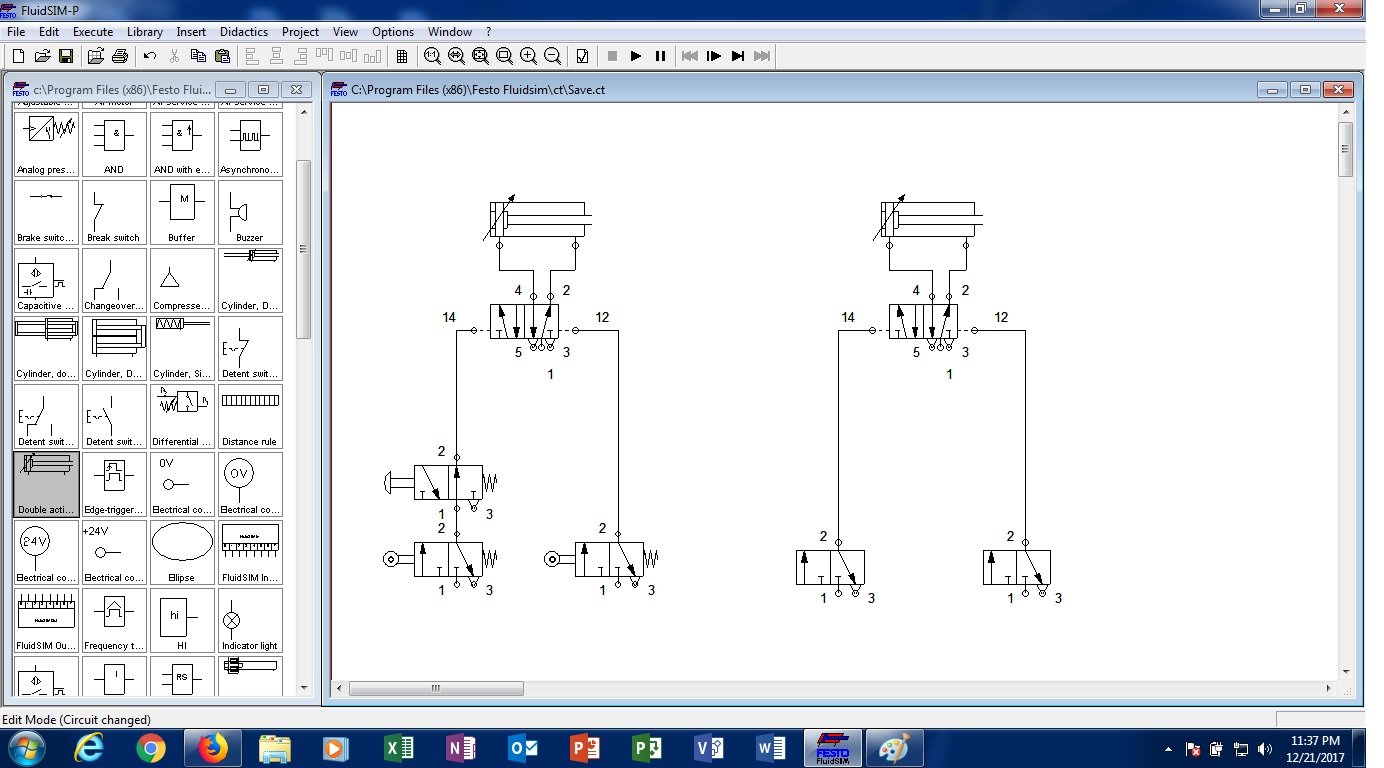
Step 5: Creating the secondary control circuit. (Duplicate the set-up made)
In this part, we will copy the whole set-up created so far. This is for the configuration of the second double-acting cylinder control circuit.Discussion: Since the aim of the project is to design and simulate an automatic sequential motion for pneumatic double-acting cylinder, we need two set-up of control circuit for the system. By which the primary double-acting cylinder depending on the secondary double-acting cylinder's position, as sense by the limit switch. The movement is either 0 mm or 100 mm.


After, clicking the paste, you need to delete the 3/2 way DCV, NC push button since it is not part on the second control circuit.

So, the secondary circuit will be the same with the figure below

Step 6: configure exhaust terminal for the the secondary control circuit.
Click the terminal designated as exhaust. In this project, the exhaust terminal are no. 3 and no. 5. So, do the procedure as indicated in the figure below.
Step 7: configure 3/2 way DCV for the the secondary control circuit.
DO the following procedure for both 3/2 way DCV present in the secondary control circuit as shown in the figure.
Step 8: configure distance limit for both pneumatic control circuit.
Follow the procedure as indicated in the figure below. The distance is between 0 mm to 100 mm. In this project, designate A0 and B0 at 0 mm, and A1 and B1 at 100 mm.
before configuring the distance, connect first all terminal no. 1 to air supply, as indicated in the figure below.

Edit the distance rule by clicking the distance symbol above the double-acting cylinder, as shown in figure. Do the procedure for both set-up.


Step 8: configure limit switches for both pneumatic control circuit.
The aim of this part is to provide the logical sequence for both pneumatic control circuit in this project.To do it, simply double click on the limit switches attached to the 3/2 way DCV for both set-up, as shown in the figure.


Step 9: Simulate the #Pneumatic control circuit.
To simulate or RUN the project, click the play button on the toolbar.
RESULT.
This is the per frame cut of the actual simulation. A video is attached if you want an interactive simulation result. CLICK HERE >>> interactive simulationSTEP-BY-STEP SIMULATION


(return to frame 1).
As shown, It is the frame-by-frame of the actual simulation cut by 1 ms per frame. if you want the actual interactive simulation, visit this link
Application of the activity
The activity can be applied to basic automatic closing and re-closing of doors in malls for example. Other could be in industrial manufacturing plants such as box segregation in a conveyor belt system.If you want to know if the pneumatic control circuit is constructed physically, feel free to click the link below.
This is the actual operation of the circuit being simulated. CLICK HERE:"Once you stop learning, you start dying"
by Albert Einstein. Thank you for dropping by everyone and fellow steemians!Truly yours,
@juecoree
(video and photo by @juecoree)
Posted on Utopian.io - Rewarding Open Source Contributors
very cool post series, and that video is also as crazy as it is kewl! :D
Thanks @alexpmorris !
Congratulations @juecoree! You have completed some achievement on Steemit and have been rewarded with new badge(s) :
Click on any badge to view your own Board of Honor on SteemitBoard.
For more information about SteemitBoard, click here
If you no longer want to receive notifications, reply to this comment with the word
STOPThanks @steemitboard
Hey @juecoree I am @utopian-io. I have just upvoted you!
Achievements
Suggestions
Get Noticed!
Community-Driven Witness!
I am the first and only Steem Community-Driven Witness. Participate on Discord. Lets GROW TOGETHER!
Up-vote this comment to grow my power and help Open Source contributions like this one. Want to chat? Join me on Discord https://discord.gg/Pc8HG9x
Thanks @utopian-io
Resteemed your article. This article was resteemed because you are part of the New Steemians project. You can learn more about it here: https://steemit.com/introduceyourself/@gaman/new-steemians-project-launch
Very much appreciated @gaman ! Thank you!
Thank you for Using #promo-steem tag, Promote steemit by inviting your friends and your family!
Congratulations! This post has been upvoted from the communal account, @minnowsupport, by juecoree from the Minnow Support Project. It's a witness project run by aggroed, ausbitbank, teamsteem, theprophet0, someguy123, neoxian, followbtcnews/crimsonclad, and netuoso. The goal is to help Steemit grow by supporting Minnows and creating a social network. Please find us in the Peace, Abundance, and Liberty Network (PALnet) Discord Channel. It's a completely public and open space to all members of the Steemit community who voluntarily choose to be there.
If you would like to delegate to the Minnow Support Project you can do so by clicking on the following links: 50SP, 100SP, 250SP, 500SP, 1000SP, 5000SP. Be sure to leave at least 50SP undelegated on your account.
Thank you for the contribution. It has been approved.
You can contact us on Discord.
[utopian-moderator]
Well appreciated @syedumair !
https://steemit.com/utopian-io/@juecoree/pneumatic-control-circuit-design-using-fluidsim-a-step-by-step-guide-on-how-to-design-an-automatic-sequential-motion-of
#untalented
Take a look @OriginalWorks thanks!
The @OriginalWorks bot has determined this post by @juecoree to be original material and upvoted it!
To call @OriginalWorks, simply reply to any post with @originalworks or !originalworks in your message!
Thanks @OriginalWorks