Build a Shopping List App with Electron #2: Create Menu Template
What Will I Learn?
In this tutorial we gonna use a main menu template and overwrite the default template as well as we gonna add click events and hot keys also we gonna use a ternary operator to define Mac or Linux and Windows. I will explain all the technical details to make everything clear.
- Create a Main Menu Template
- Add Labels to Main Menu
- Add Sub Menus to Labels
- Add Hot keys
- Create HTML File for Add Item
Requirements
- Any Modern OS (Windows - Mac - Linux)
- Text Editor (VSCode eg.)
- Node.js (8.9.4) or above
Difficulty
- Intermediate
Create a Main Menu Template
in our previous tutorial I have explained how to create a new window as well as adding HTML file to the main window so now we have created app, BrowserWindow Objects.
now I'm going to create a new template menu that will be the actual menu as the previous menu was the electron default.
First we have to create a variable and call it mainMenuBar or whatever you like also when we create a main menu template in electron it basically it just an array of object so the first object is gonna be the file. then we gonna create a new label and add to that label a value called File
The following is an example
const mainMenuBar = [{
    label: "File"
}];
For now the variable of Main Menu Template is not linked to electron menu bar. so we have to create a new variable and call it for example mainMenu that will be used to link mainMenuBar as template to the electron main menu also the will replace the default main menu.
So inside app.on() the previous function that we already created before we will add a new variable and call it mainMenu as I said before
app.on('ready', function () {
    mainWindow = new BrowserWindow({});
    mainWindow.loadURL(url.format({
        pathname: path.join(__dirname, 'mainWindow.html'),
        protocol: 'file:',
        slashes: true
    }));

    // Our new main menu
    const mainMain = Menu;
});
For now the mainMenu variable will be undenfied as we have not defined Menu variable it self.
So we will go to our previous object that we have created before to define app, BrowserWindow simply add a new property and call it Menu
const {
    app,
    BrowserWindow,
    Menu
} = electron;
Now we have defined Menu and menu object has a method called buildFromTemplate now we will added that method to our previous variable Menu and that method will contain our template mainMenuBar like the following example:
const mainMenu = Menu.buildFromTemplate(mainMenuBar);
Now we have to set our application menu from after using buildFromTemplate by using Menu then method setApplicationMenu
Menu.setApplicationMenu("mainMenu");
Final Result for now:
const electron = require('electron');
const url = require('url');
const path = require('path');

const {
    app,
    BrowserWindow,
    Menu
} = electron;

let mainWindow;

app.on('ready', function () {
    mainWindow = new BrowserWindow({});
    mainWindow.loadURL(url.format({
        pathname: path.join(__dirname, 'mainWindow.html'),
        protocol: 'file:',
        slashes: true
    }));

    //Custom Main Menu
    const mainMain = Menu.buildFromTemplate(mainMenuBar);
    //Set Application Menu From Template
    Menu.setApplicationMenu(mainMenu);

});

const mainMenuBar = [{
    label: "File"
}];
Let's Test it
Type npm start then hit Enter.
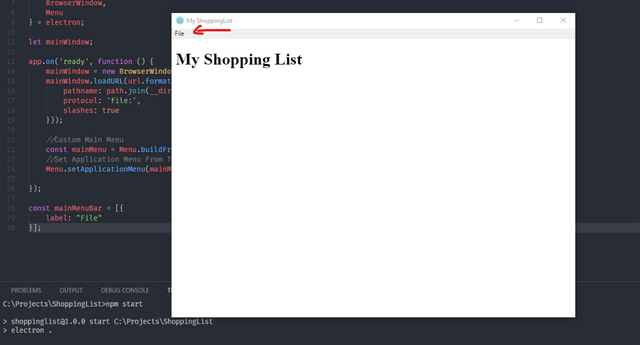
That is our template it overwrite the default template for electron. so now can Customize it by adding more labels and sub menu for every label.
Add Labels & Sub Menus
const mainMenuBar = [{
    label: "File"
}];
By using a comma we will be able to add a new sub menu in that sub menu it's gonna be an array of objects:
- Add Item
- Clear Items
- Quit
const mainMenuBar = [{
    label: "File",
    submenu: [{
        label: 'Add Item'
    }, {
        label: 'Clear Items'
    }, {
        label: 'Quit'
    }]
}];
To quit command we gonna add a function that is a click event by using app.quit() that will cut the and quite the application like the following:
Also we gonna add a hot key for quit from app by using property called accelerator by basically using a ternary operator because we need to see on what are the platform where we are.
if we are on Linux or Windows we need to use CTRL and if we are on a Mac we need to use Command. so we gonna use process.platform
The following is an example:
const mainMenuBar = [{
    label: "File",
    submenu: [{
        label: 'Add Item'
    }, {
        label: 'Clear Item'
    }, {
        label: 'Quit',
        accelerator: process.platform == 'darwin',
        click() {
            app.quit();
        }
    }]
}];
darwin is gonna be the value for process.platform if you are on Mac.
Let's clarify this a bit
Open a command prompt Terminal then type node then hit Enter
Then type process then hit Enter which have a bunch of stuff.
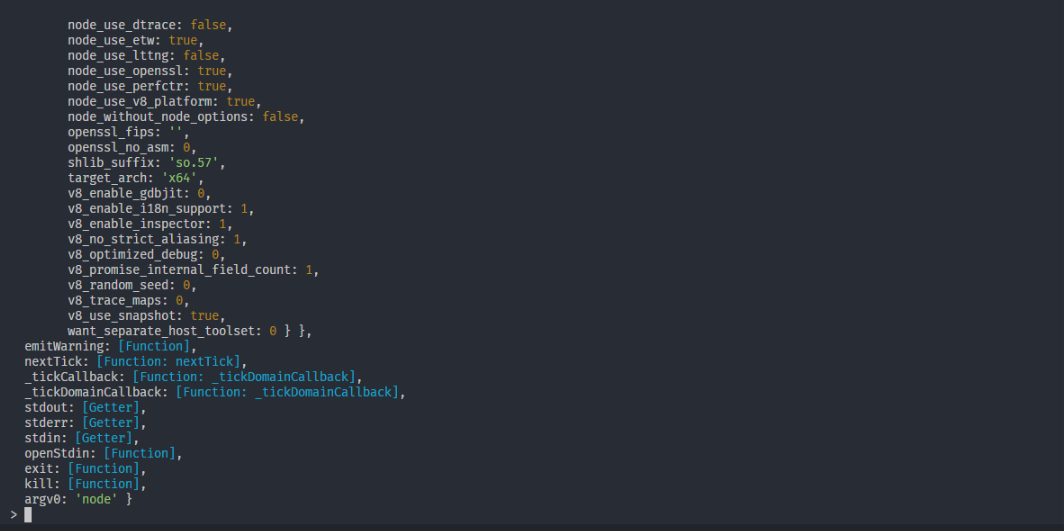
Type again process.platform and you will see the following if you are on windows. else if Mac you gonna see darwin I hope that is clear now.

by using ternary operator we gonna adjust which is Mac and which is Windows or Linux.
The following is an example:
const mainMenuBar = [{
    label: "File",
    submenu: [{
        label: 'Add Item'
    }, {
        label: 'Clear Item'
    }, {
        label: 'Quit',
        accelerator:process.platform == 'darwin'? 'Command+E' : 'Ctrl+E',
        click() {
            app.quit();
        }
    }]
}];
Now if darwin is true use CMD + E if else use Ctrl + E.
Click Event for Add Item
as we have did before now I will added a click event for add item so when we click add item another window will open. by using a comma after add item label.
const mainMenuBar = [{
    label: "File",
    submenu: [{
        label: 'Add Item',
        click() {
            createAddWindows()
        }
    }, {
        label: 'Clear Item'
    }, {
        label: 'Quit',
        accelerator: process.platform == 'darwin' ? 'Command+E' : 'Ctrl+E',
        click() {
            app.quit();
        }
    }]
}];
now inside the click a function called createAddWindows() that is doesn't exist. so we need to create another function to handle add window.
also beside the previous variable mainWindow we gonna add ``addWindow```
let mainWindow;
let addWindow
Then we gonna create a new function inside it we will use the same function that inside electron objects that is BrowserWindow also you need to set the width and height and title also we gonna useLoadUrl() to include a new HTML file addWindow.html as a method for addWindow by using protocol file and slashes. also we gonna use a method to handle the garbage collection on close.
function createAddWindow(){
  addWindow = new BrowserWindow({
    width: 300,
    height:200,
    title:'Add Shopping List Item'
  });
  addWindow.loadURL(url.format({
    pathname: path.join(__dirname, 'addWindow.html'),
    protocol: 'file:',
    slashes:true
  }));
  addWindow.on('close', function(){
    addWindow = null;
  });
}
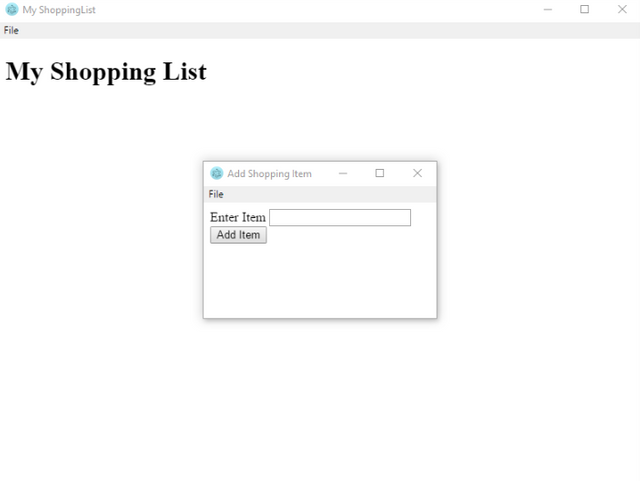
Create addWindow.html
Create a basic html file for addWindow.html then set title Add Shopping Item and then add tags like the following
body > form > div inside that div create a label as well as input has an autofocus then create a submit button to add an Item.
<!DOCTYPE html>
<html lang="en">
<head>
  <title>Add Shopping Item</title>
</head>
<body>
    <form>
      <div>
        <label>Enter Item</label>
        <input type="text" id="item" autofocus>
      </div>
      <button  type="submit">Add Item</button>
    </form>
</body>
</html>
The final result for Index.js
const electron = require('electron');
const url = require('url');
const path = require('path');

const {
    app,
    BrowserWindow,
    Menu
} = electron;

let mainWindow;
let addWindow;

app.on('ready', function () {
    mainWindow = new BrowserWindow({});
    mainWindow.loadURL(url.format({
        pathname: path.join(__dirname, 'mainWindow.html'),
        protocol: 'file:',
        slashes: true
    }));

    //Custom Main Menu
    const mainMenu = Menu.buildFromTemplate(mainMenuBar);
    //Set Application Menu From Template
    Menu.setApplicationMenu(mainMenu);

});

const mainMenuBar = [{
    label: "File",
    submenu: [{
        label: 'Add Item',
        click() {
            createAddWindow()
        }
    }, {
        label: 'Clear Item'
    }, {
        label: 'Quit',
        accelerator: process.platform == 'darwin' ? 'Command+E' : 'Ctrl+E',
        click() {
            app.quit();
        }
    }]
}];


function createAddWindow(){
    addWindow = new BrowserWindow({
      width: 300,
      height:200,
      title:'Add Shopping List Item'
    });
    addWindow.loadURL(url.format({
      pathname: path.join(__dirname, 'addWindow.html'),
      protocol: 'file:',
      slashes:true
    }));
    addWindow.on('close', function(){
      addWindow = null;
    });
  }
Now type npm start in the command prompt or terminal then click File > Add Item
A known issue that you will notice if you closed the main window for the app. the add item window will stay open.
The solution
Go to the first function inside app.on() that we have already created before. inside that function add the following:
mainWindow.on('closed', function () {
        app.quit();
});
Example:
app.on('ready', function () {
    mainWindow = new BrowserWindow({});
    mainWindow.loadURL(url.format({
        pathname: path.join(__dirname, 'mainWindow.html'),
        protocol: 'file:',
        slashes: true
    }));


    const mainMenu = Menu.buildFromTemplate(mainMenuBar);

    Menu.setApplicationMenu(mainMenu);


    mainWindow.on('closed', function () {
        app.quit();
    });

});
So when you try again and close the main window the rest of the sub windows will be closed.
What's Next?
In the next part we will complete the rest of the File Menu and all its windows as well as we will add more and more features/functions.
Previous Tutorials
All Images/GIF has been created by @jinzo for an open source project.
Posted on Utopian.io - Rewarding Open Source Contributors
Very Nice Tutorial I liked it.
Thank you for the contribution. It has been approved.
You can contact us on Discord.
[utopian-moderator]
Awesome Tutorial.
WOW!
Very Good Tutorial!
Hey @jinzo I am @utopian-io. I have just upvoted you!
Achievements
Suggestions
Get Noticed!
Community-Driven Witness!
I am the first and only Steem Community-Driven Witness. Participate on Discord. Lets GROW TOGETHER!
Up-vote this comment to grow my power and help Open Source contributions like this one. Want to chat? Join me on Discord https://discord.gg/Pc8HG9x