Create a Local Chat Server using NodeMCU devkit v1.0 board via Telnet
What Will I Learn?
- You will learn how to make a chat server that operates within the local area network using NodeMCU devkit v1.0 board.
- You will learn how devices can connect to the created chat server using a telnet client application.
- You will learn some possible applications of this tutorial on the society.
Requirements
Materials Needed
- NodeMCU devkit v1.0
- USB Cable (Type A to Mini B)
- Computer
Software Applications
- Open-Source Arduino Software (IDE) / Arduino IDE
- For testing: Any Existing Telnet Client Applications for computers, tablets, or mobile phones. Example: Simple Telnet Client, ConnectBot and etc.
Difficulty
- Intermediate
Description:
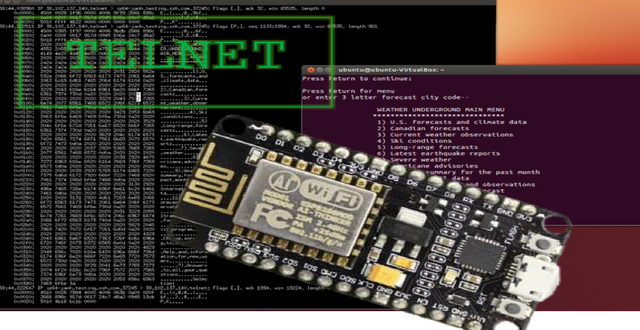
Image References: 1, 2
A chat server refers to a computer which is committed for giving processing power to deal with and maintain chatting and it clients. Utilizing telnet to run charges on remote PCs is a brisk method to administrate servers and different workstations.
Telnet is a convention utilized on the Internet or local area network to give a bidirectional intelligent text-based facility that is utilizing virtual terminal connection. Telnet client applications are accessible for all platforms of computer, virtually.
In this tutorial, we will create a simple telnet server that could manage basic chatting functionality using NodeMCU devkit v1.0 board. The server should support various associated clients. Messages sent to the server are communicated to all associated clients' facility that is utilizing a virtual terminal association. For testing, we will just need to implement a conversation between two devices in our network to test our chat server. But the number of clients on the chat server can be easily adjusted, afterwards. We will need to use the Wi-Fi capabilities of our NodeMCU devkit v1.0 to support the local chat server using telnet.
For further research about NodeMCU devkit v1.0. Here is its official website
Tutorial Contents
Step 1:
and its Necessary Files"
Open Arduino IDE then, check if you have the ESP8266 library from your installed libraries . This is necessary to configure the NodeMCU to run on Arduino IDE.
Note: Make sure that you have already downloaded and installed the boards and the necessary files to run the NodeMCU devkit v1.0. If you haven't install or download them, kindly click here. And follow the first step of my tutorial there.
After the installation of ESP8266, go to the Tools tab and change the board to NodeMCU 1.0 (ESP-12E Module)
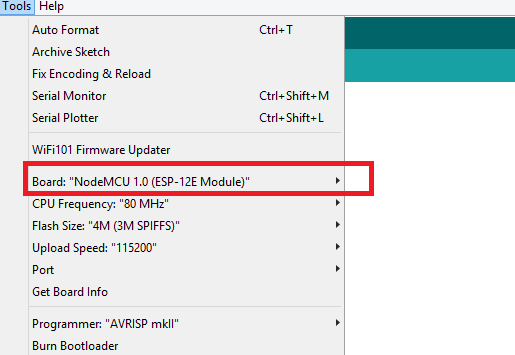
When you have finished downloading and installing the necessary files to run ESP8266 boards like the NodeMCU devkit v1.0 board, it would be required to close the Arduino IDE then, open it after a minute. It is good practice to do, so as to allow the new libraries to be loaded for setup when you open the Arduino IDE again, in some instances to avoid errors.
After, click on File> New, to create a new sketch in Arduino IDE.

Actual Photo
On your new sketch in Arduino IDE, input this program:
#include <ESP8266WiFi.h>
//how many clients should be able to telnet to this ESP8266
#define MAX_SRV_CLIENTS 1
const char* MY_WIFI_SSID = "HUAWEI Y5 2017";
const char* MY_WIF_PASSWORD = "12345678";
WiFiServer server(23);
WiFiClient serverClients[MAX_SRV_CLIENTS];
void setup() {
Serial1.begin(115200);
WiFi.begin(MY_WIFI_SSID, MY_WIF_PASSWORD);
Serial1.print("\nConnecting to ");
Serial1.println(MY_WIFI_SSID);
uint8_t i = 0;
while (WiFi.status() != WL_CONNECTED && i++ < 20) delay(500);
if(i == 21){
Serial1.print("Could not connect to"); Serial1.println(MY_WIFI_SSID);
while(1)
delay(500);
  }
//start UART and the server
Serial.begin(115200);
server.begin();
server.setNoDelay(true);
Serial1.print("Ready! Use 'telnet ");
Serial1.print(WiFi.localIP());
Serial1.println(" 23' to connect");
}
void loop() {
uint8_t i;
//check if there are any new upcoming clients
if (server.hasClient()){
for(i = 0; i < MAX_SRV_CLIENTS; i++){
//find those free/disconnected spot
 if (!serverClients[i] || !serverClients[i].connected()){
if(serverClients[i]) serverClients[i].stop();
serverClients[i] = server.available();
Serial1.print("New client: "); Serial1.print(i);
continue;
 }
}
//no free/disconnected spot so reject
WiFiClient serverClient = server.available();
serverClient.stop();
}
//check clients for data
for(i = 0; i < MAX_SRV_CLIENTS; i++){
if (serverClients[i] && serverClients[i].connected()){
if(serverClients[i].available()){
//get data from the telnet client and push it to the UART
while(serverClients[i].available()) Serial.write(serverClients[i].read());
}
}
}
//check UART for data
if(Serial.available()){
size_t len = Serial.available();
uint8_t sbuf[len];
Serial.readBytes(sbuf, len);
//push UART data to all connected telnet clients
for(i = 0; i < MAX_SRV_CLIENTS; i++){
if (serverClients[i] && serverClients[i].connected()){
serverClients[i].write(sbuf, len);
delay(1);
}
}
}
}
The program simply create a Wi-Fi server at port 23 which is the default port assigned to Telnet by the codeWiFiServer server(23);. The number of maximum clients that could access the server at a time too is determined by the code#define MAX_SRV_CLIENTS 1. This could be changed afterwards.
The IF condition on the codeif (server.hasClient())simply check for the presence upcoming clients. I a client sends a data to the server, these data will be displayed thru the Serial Monitor thru the codeSerial.write(serverClients[i].read());.
On the other hand, if a data is sent from the serial monitor to all the connected clients, it will be broadcasted to the connected clients thru the codeserverClients[i].write(sbuf, len);.
In order for the chat server to have wireless connection to the clients, the board must connect to a wireless access point or to a hotspot. The SSID and the password of the access point it would connect is defined by the codeconst char* MY_WIFI_SSID = "HUAWEI Y5 2017";andconst char* MY_WIF_PASSWORD = "12345678";. This should be changed based on the configuration of the wireless access point, you are using.
Now, connect your NodeMCU devkit v1.0 to your computer using the USB cable (Type A to Mini B).
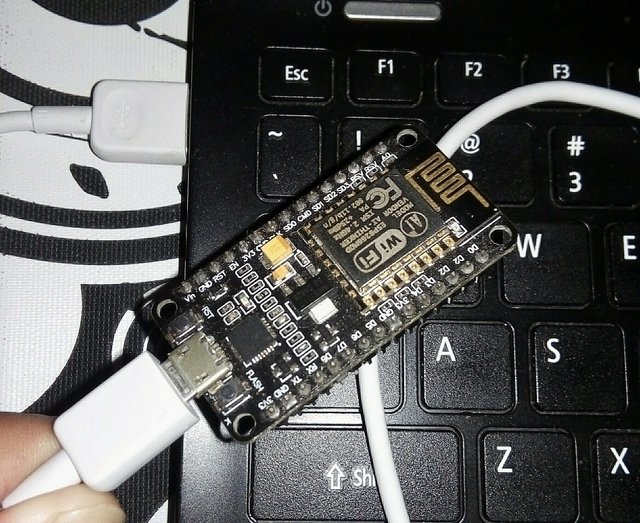
Actual Photo
Go to the device manager then, identify its port number if it is your first time to use this board. Now, go the Arduino IDE and click Tools > Port and look for the port of your NodeMCU devkit v1.0.

Actual Photo
Input the program above properly. And click Verify/Compile when you are done with the program to check for errors.I have already compiled this program and it has no errors based on my screenshot. If compiling your code is unsuccessful, try comparing your program to my program in this tutorial. You may have missed something.
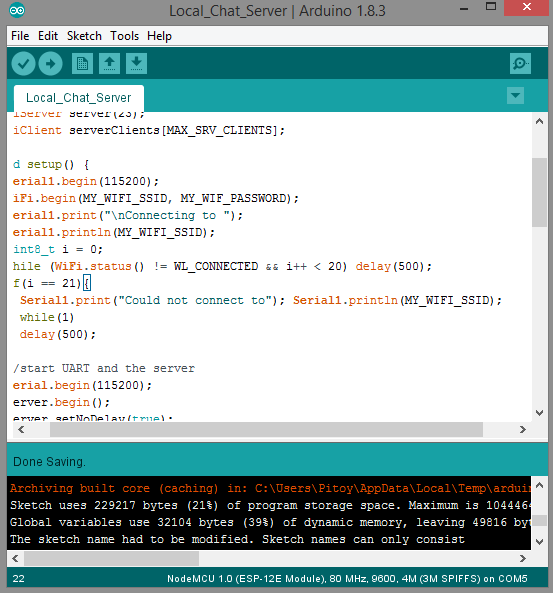
Actual Photo
If your program has no errors after you compiled, click on Upload. If uploading your code is unsuccessful, check if you are using the right port.
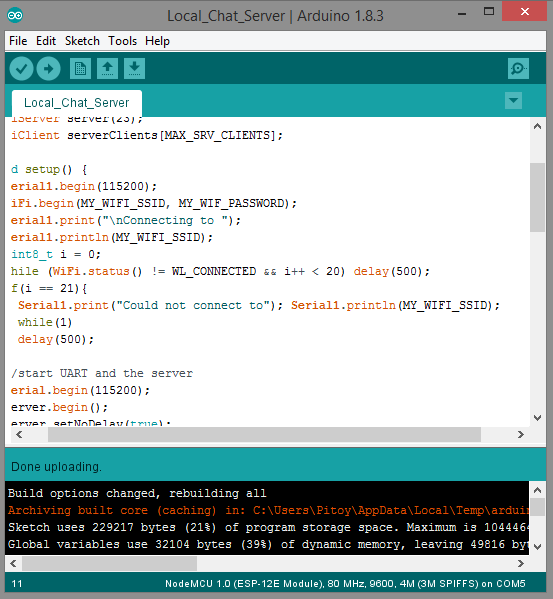
Actual Photo
Now, click on the Serial Monitor to get ready for testing, as shown below.

Actual Photo
Step 4:
1. Before testing, make sure that you have already turned on the Wi-Fi hotspot which the NodeMCU board connects as specified on the program above. I am using mobile tethering or portable hotspot from my phone as a wireless access point so it would be easier for me to find the IP address of my board.
Click on the connected devices and look for the NodeMCU board. Normally, it is usually preceded by a prefix of "ESP" or "THINKER". And take note of its IP address.
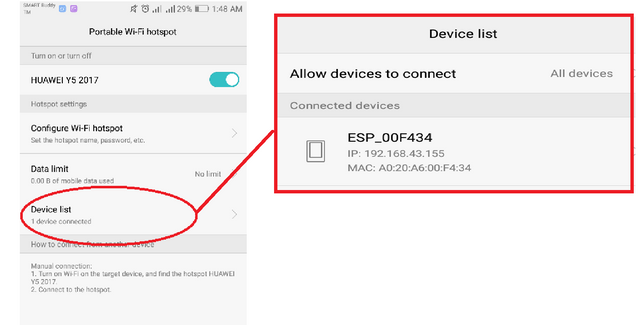
Actual Photo
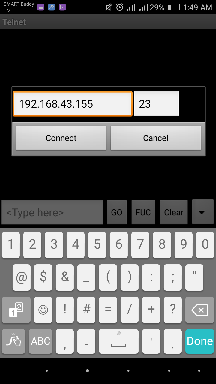
Actual Photo
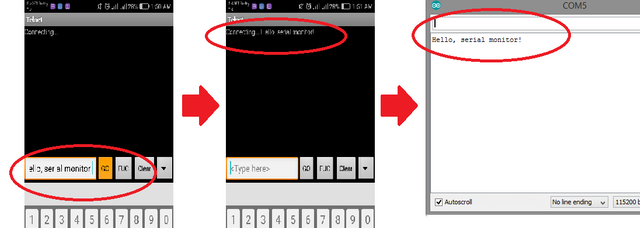
Actual Photo
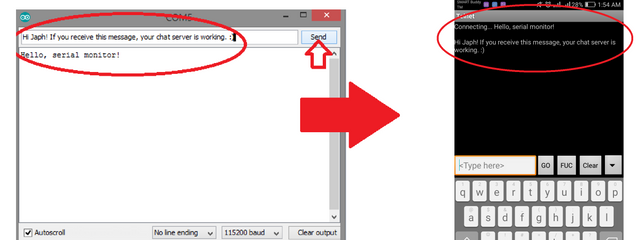
4. Now, you can send your reply by typing on your serial monitor and click on SEND button when you are done with your message. Then, go back to your telnet client app and the message you have sent through your serial monitor should be there now.
Actual Photo
Now, we have successfully created a local chat server using NodeMCU devkit v1.0 via telnet.
Curriculum
• Auxiliary Wireless TV Power Remote Control using NodeMCU devkit v1.0
• Make Your Own Web Server using NodeMCU devkit v1.0
• External GPIO Pin State Monitoring using HTTP Client Request for NodeMCU Devkit v1.0 Boards
• Web-controlled Servomotor using NodeMCU devkit v1.0 board
• Intruder Alarm System with Automatic Online Updates using NodeMCU devkit v1.0
• Online Temperature Monitor using NodeMCU devkit v1.0
• Water Overflow Alarm with Online Updates using NodeMCU devkit v1.0
• Set up Your Own Wireless Access Point using NodeMCU devkit v1.0 This tutorial is very useful when you want to implement a simple text-oriented wireless communication, thru Wi-Fi technology, on the physical topology of your local area network, at a lesser cost of setting up a local chat server.
Your contributor, @japh
Posted on Utopian.io - Rewarding Open Source Contributors
Thank you for the contribution. It has been approved.
You can contact us on Discord.
[utopian-moderator]
Thank you, sir @shreyasgune.
Hey @shreyasgune, I just gave you a tip for your hard work on moderation. Upvote this comment to support the utopian moderators and increase your future rewards!
Hey @japh I am @utopian-io. I have just upvoted you!
Achievements
Suggestions
Get Noticed!
Community-Driven Witness!
I am the first and only Steem Community-Driven Witness. Participate on Discord. Lets GROW TOGETHER!
Up-vote this comment to grow my power and help Open Source contributions like this one. Want to chat? Join me on Discord https://discord.gg/Pc8HG9x