(Part 2) Decentralized Exchange - Storing Buy Orders, Using The Linked Lists And Queues(PT 2)
Repository
https://github.com/igormuba/DEX/tree/master/Class2
What Will I Learn?
- Working with linked lists in Solidity
- Working with queues in Solidity
Requirements
- Internet connection.
- Code editor.
- Browser.
Difficulty
- Advanced.
(We will start working with linked lists of multiple structs.)
Tutorial Contents
On [the previous tutorial] we have implemented the basic structure of what is going to be a simple decentralized exchange. Those structures will, now, be used to create the linked lists and queues we have talked about before.
This tutorial will teach how to implement the function to place a buy order and how to create the linked lists and queues for the structures we have defined before. We will not, on this tutorial, implement the logic to fill a sell order. We are building the buy order placement right now considering it does not fill any sell order. In a future tutorial, after the lists and queues are implemented, we will see how to work with them to fill the buy requests.
We will cover 3 scenarios, considering the scenario above already:
- The new order is the highest buy order on the book.
- The new order is in the middle, so, not the highest nor the lowest.
- The new order is the lowest price.
And in all 3 scenarios described above, we will consider the possibility that there are other orders on that price that were placed first. In that case, we will add the new order to the "queue", to respect the traditional "first in, first out"(FIFO) stack, that every exchange respects.
The storeBuyOrder function
This function will be called when either one:
- No sell order matches our limit price, so the order will be placed on the market as a maker (stored to be filled with a future selling demand)
- There were sell orders that matched (we were takers), but we have filled them and there is a "leftover", and the remaining of the order has to be stored.
The function looks like this, without any logic yet:
function storeBuyOrder(address _token, uint _price, uint _amount, address _maker) public{
}
It should receive as arguments:
address _tokenaddress of the contract of the token our user wants to trade. We are allowing the users to trade any token they want, without the need for us to "list" the token.uint _pricethe limit price (highest) the user wants to buy at (exchange does the "best effort" to match with the lowest price).uint _amountamount of tokens the user wants to buy.address _makerthe address of the buyer, to send tokens to. We call him a "maker" because he is "making"(storing) an order, who takes (fills) an already stored order is called a "taker".
Storing on the queue of that price
If you don't know what a stack(or queue) is, first, you will have a quite hard time with this tutorial. But don't give up, I have found this youtube video that can be really useful for you to understand the abstracted concept behind the queue:
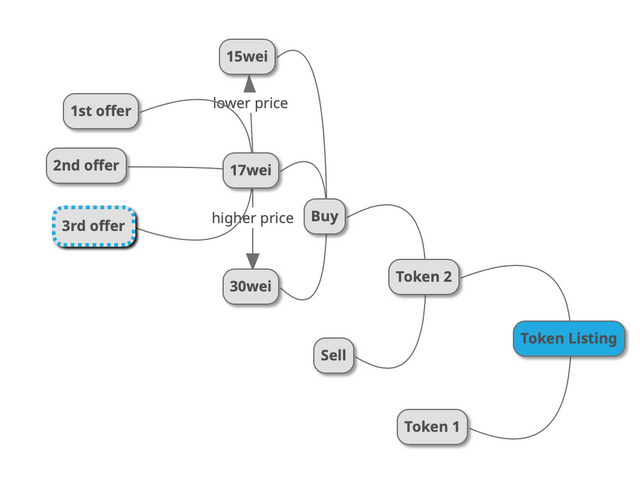
And remember this image form the last class of how the structure works, you can see the queue of orders on the price of 17wei:

So, we will make a queue on that said price, like the 17wei queue orders on the illustration above.
The order will be stored in that queue, as described before, of FIFO (First In First Out), and the code to do that is:
function storeBuyOrder(address _token, uint _price, uint _amount, address _maker) public{
//not loading the token from storage to avoid reaching compiler stack limit
//as this function can (and will) be called from other functions, it can easily fill the stack
    tokenList[_token].buyBook[_price].offerLength++;
    tokenList[_token].buyBook[_price].offers[tokenList[_token].buyBook[_price].offerLength]=Offer(_amount, _maker);
tokenList[_token].buyBook[_price].offerLength++; increases the length of the queue by one, let us break it down so you can more easily understand what is happening here:
tokenList[_token]loads the token from the mapping of addresses to "token market".buyBook[_price]loads the buybook queue for the given price..offerLength++;increases the size of the queue for us add our order to it.
The second line is bigger and scarier, but not that hard to understand.
tokenList[_token].buyBook[_price]loads the buybook at that price, just like before.offers[]is used because we will set the offer at this position of the queue, in the next line is what is inside this.tokenList[_token].buyBook[_price].offerLengththe length of the queue passed as "argument" to the previous line.=Offer(_amount, _maker);sets the last (lines above) place of the queue as the current order.
Are we the first in the queue?
If we are the first item in the queue, then, we must insert the "new" price, that is, the new item on the linked list, to keep track of all the prices that have orders in them.
Here is a nice video omg how linked lists work:
Because on a mapping all values are "set" by default, there is no way to "iterate through the values", because we would have to go over ALL values, 1 Wei at a time! Totally not feasible, would costs thousands or millions to do that! This is why we have designed the data structure of the linked list, linked one price to the other.
If we are not the first price in the queue, then the item is already initialized and we don't really have to do anything.
This is how we check if we are the first item:
if(tokenList[_token].buyBook[_price].offerLength==1){
}
In this case, we already initiate that "price queue" with:
//sets the pointer to start here
tokenList[_token].buyBook[_price].offerPointer=1;
tokenList[_token].amountBuyPrices++;
Saving the "extremes" of the book for later
Now we need to save the extremes of the buybook, that means, the highest buy and the lowest buy.
We do that with:
uint currentBuyPrice = tokenList[_token].maxBuyPrice;
uint lowestBuyPrice = tokenList[_token].minBuyPrice;
The 3 scenarios
We have here 3 possible scenarios:
- The new order is the highest in the price book
- The order is between the highest and the smallest (anywhere)
- The order is the "cheapest" one
And for this we have a 3 way if/else:
//if lowest price is zero or the lowest buy price is bigger than order price
if(lowestBuyPrice==0 || lowestBuyPrice>_price){
//will check if the price list is empty or we are the lowest one
}else if(currentBuyPrice<_price){
//checks if we are the biggest price
}else{
//if we are in the middle
}
The first, the if statement, checks if we are on, either, an empty list, with no prices yet, or if we are the lowest price. The logic will be implemented later, because working with linked lists, mainly in Ethereum, is a bit complicated, mainly because we are trying not to create variables to save the stack of the compiler.
The second, the else if, will run in case the first statement is not met (to save computing time) and but the second one is met. In this case, we are the lowest.
The last, the else, just checks if we are the biggest price.
The logic for those conditions will be implemented later, as in the last tutorial we have set the base of the data structure we have set how will we work with it and the conditions to do so, in the next we will implement the logic to work with those linked lists. Add "nodes" and change their relations.
Curriculum
Beneficiaries
This post has as beneficiaries
- @utopian.pay with 5%
- @steempeak with 1%
using the SteemPeak beneficiary tool

Thank you for your contribution @igormuba.
After analyzing your tutorial we suggest the following:
Was the flowchart made by you? If the image wasn't made by you, I suggest you put the source of the image.
It was also interesting to put some videos explaining the concepts.
We suggest that your contribution put the results of what you are developing.
Again to bring good content to your tutorials. Good job!
Your contribution has been evaluated according to Utopian policies and guidelines, as well as a predefined set of questions pertaining to the category.
To view those questions and the relevant answers related to your post, click here.
Need help? Chat with us on Discord.
[utopian-moderator]
The mindmap/flowchart was made by me using this free tool
https://www.mindmup.com
Posted using Partiko Android
Thank you for your review, @portugalcoin! Keep up the good work!
Nice visuals demonstrating the concept.
As a CS student personally I'm already familiar with the concept and some pseudo code using it but it's always better to see actual examples.
I also liked the visuals! Will try to ue them more. I case you ever need to draw, the tool I used is
https://www.mindmup.com
is free and does not require registration
Posted using Partiko Android
Hi, @igormuba!
You just got a 0.26% upvote from SteemPlus!
To get higher upvotes, earn more SteemPlus Points (SPP). On your Steemit wallet, check your SPP balance and click on "How to earn SPP?" to find out all the ways to earn.
If you're not using SteemPlus yet, please check our last posts in here to see the many ways in which SteemPlus can improve your Steem experience on Steemit and Busy.
Hi @igormuba!
Your post was upvoted by @steem-ua, new Steem dApp, using UserAuthority for algorithmic post curation!
Your post is eligible for our upvote, thanks to our collaboration with @utopian-io!
Feel free to join our @steem-ua Discord server
Hey, @igormuba!
Thanks for contributing on Utopian.
We’re already looking forward to your next contribution!
Get higher incentives and support Utopian.io!
Simply set @utopian.pay as a 5% (or higher) payout beneficiary on your contribution post (via SteemPlus or Steeditor).
Want to chat? Join us on Discord https://discord.gg/h52nFrV.
Vote for Utopian Witness!