Tutorial Image Processing operations using Opencv and Visual Studio
What Will I Learn?
This is a tutorial about Image processing functions and in this first tutorial you will learn:
- Configure and run an opencv project in visual studio
- Read and show image
- Subtract two images
- Resize
- Accessing pixel values
- Change pixel values
- Create Region of interest or ROI
Requirements
- Opencv
- Visual Studio IDE
Difficulty
- Intermediate
Tutorial Contents
Configuration
In this tutorial I will show you some of the main functions of Opencv using VisualStudio 2015 IDE and C++ programming language.
So after you Installed Visual Studio and opencv and added related environment variables, just open visual studio and create new project then select Visual C++ and Win32 Console application like the picture below:
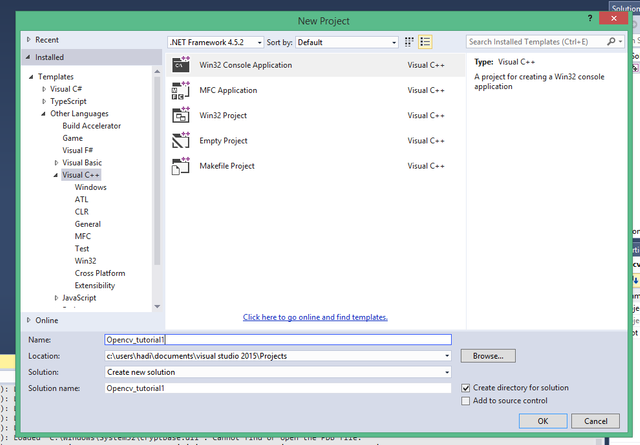
I named the project as opencv_tutorial1, then click next and choose empty project and finish. from solution platform select x64.
Then right-click on Source Files and add new item:
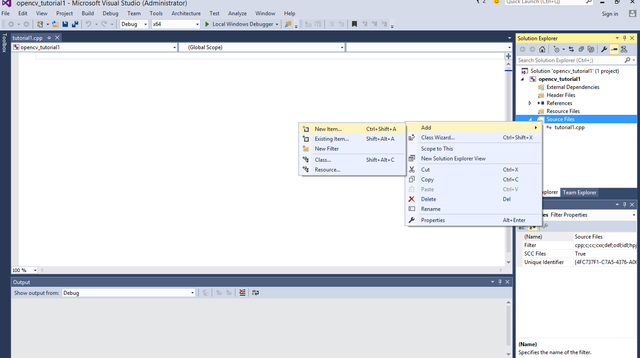
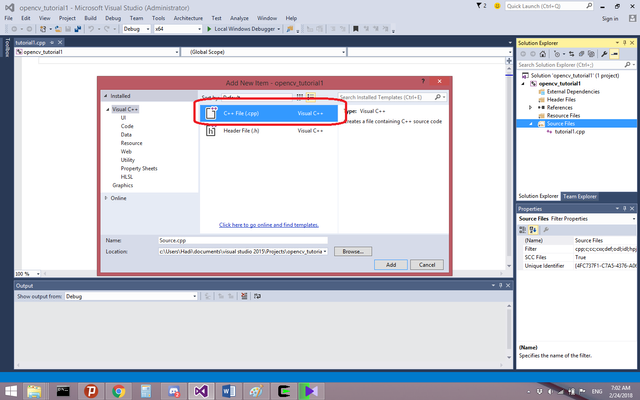
Select C++ and create a cpp file:
Next you must select required libraries in order to use opencv libraries in your example project, so just right click on the project folder in solution explorer and select properties:
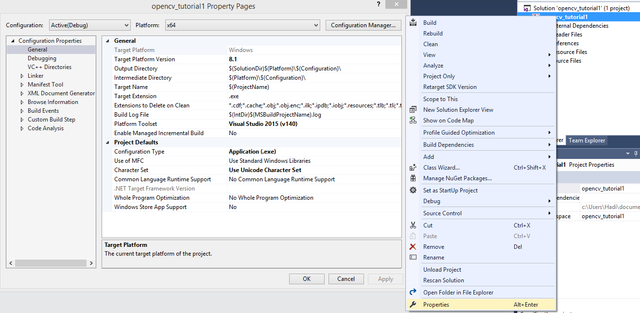
Here you must add opencv libraries from where you extracted the opencv folder, go to c/c++ -> general and in the additional include directories insert your opencv include address:
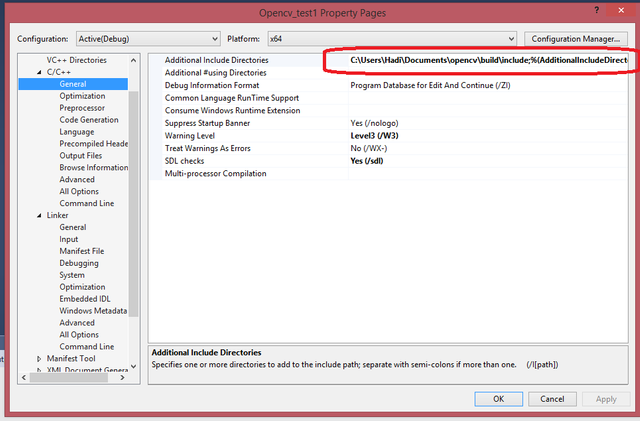
like: OPENCV_ADDRESS\build\include
Next in linker -> General add Additional libraries directory like this:
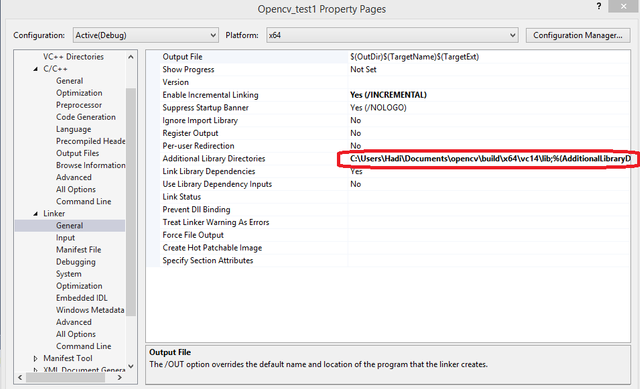
The address is: OPENCV_ADDRESS\x64\vc14\lib
Note: for Visual Studio 2015 you must select vc14
Now from OPENCV_ADDRESS\build\x64\vc14\lib select opencv_world340d.lib and copy the name like the picture below:
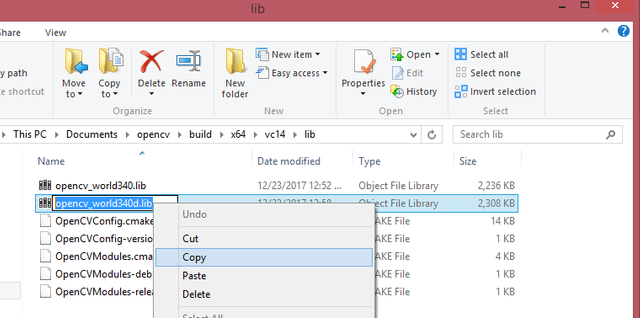
Then in Visual Studio paste it in linker -> input -> Additional Dependencies:
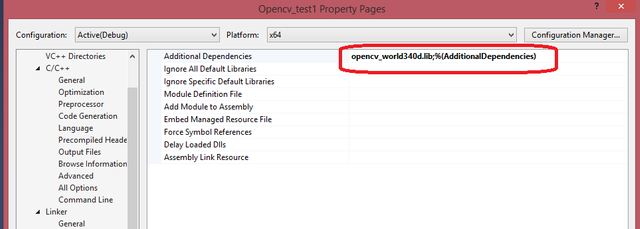
We chose opencv_world340d.lib D for debug mode.
Then press apply and Ok.
Code Examples
Now that our configuration is done in this first tutorial lets start with some basic Image processing operations using opencv libraries in c++ programming language.
First you must include opencv libraries in the first line of your code:
#include<opencv2/opencv.hpp>
Read and Show Image
For the first example we're going to read and show an image. so we also need iostream libraries and we should include it to our code:
#include<opencv2/opencv.hpp>
#include<iostream>
using namespace std;
using namespace cv;
void main()
{
    Mat img = imread("1.jpg");
    namedWindow("image", WINDOW_NORMAL);
    imshow("image", img);
    waitKey(0);
}
If you don't add this line of code: using namespace cv;
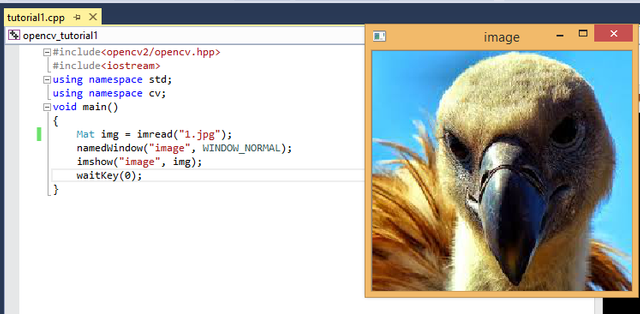
Then you must use cv functions like this: cv::function. so in the above code we read an image using imread and show it using imshow and here is the result after build and running the code:
Subtract
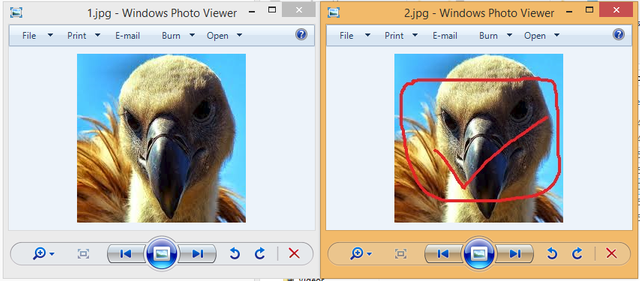
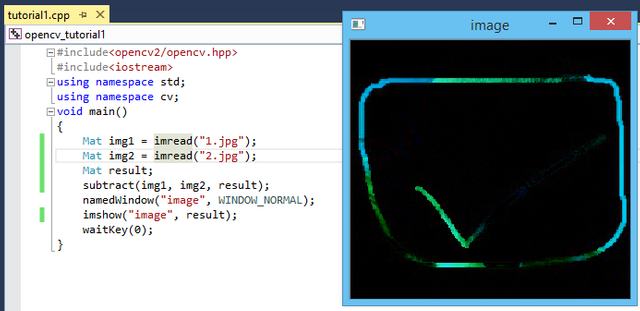
Now i duplicated this image and made some changes on it to do subtract example:
#include<opencv2/opencv.hpp>
#include<iostream>
using namespace std;
using namespace cv;
void main()
{
    Mat img1 = imread("1.jpg");
    Mat img2 = imread("2.jpg");
    Mat result;
    subtract(img1, img2, result);
    namedWindow("image", WINDOW_NORMAL);
    imshow("image", result);
    waitKey(0);
}
Resize
Here is the resize example code:
#include<opencv2/opencv.hpp>
#include<iostream>
using namespace std;
using namespace cv;
void main()
{
    Mat img1 = imread("1.jpg");
    Size size(200, 200);
    Mat dest;
    resize(img1, dest, size);
    imshow("image1", img1);
    imshow("image2", dest);
    waitKey(0);
}
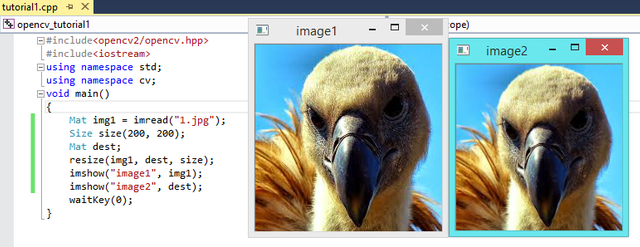
The result(original image size is 512*512):
Accessing pixel values
In this example because the original picture size is too big, first we will resize it to 20 by 20 then we print the pixel values like this:
#include<opencv2/opencv.hpp>
#include<iostream>
using namespace std;
using namespace cv;
void main()
{
    Mat img1 = imread("1.jpg");
    Size size(10, 10);
    Mat dest;
    resize(img1, dest, size);
    imshow("image2", dest);
    print(dest);
    waitKey(0);
}
Change pixel values
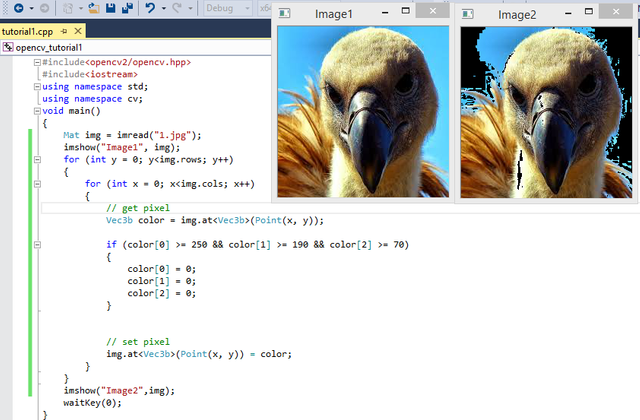
To change pixel values I provide an example here in this example first I get RGB color values for the blue sky in background like this:
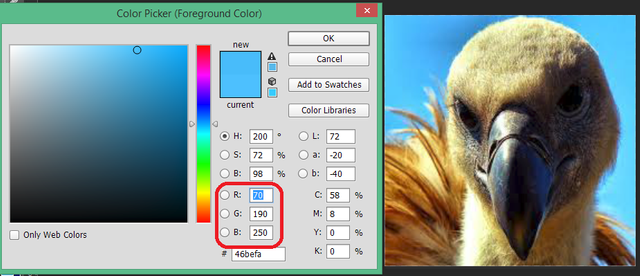
Then I want to change the light blue colors to black color using this code:
#include<opencv2/opencv.hpp>
#include<iostream>
using namespace std;
using namespace cv;
void main()
{
    Mat img = imread("1.jpg");
    imshow("Image1", img);
    for (int y = 0; y<img.rows; y++)
    {
        for (int x = 0; x<img.cols; x++)
        {
            // get pixel
            Vec3b color = img.at<Vec3b>(Point(x, y));

            if (color[0] >= 250 && color[1] >= 190 && color[2] >= 70)
            {
                color[0] = 0;
                color[1] = 0;
                color[2] = 0;
            }
            // set pixel
            img.at<Vec3b>(Point(x, y)) = color;
        }
    }
    imshow("Image2",img);
    waitKey(0);
}
Vec3b is the abbreviation for "vector with 3 byte entries" which is RGB but in BGR order so in the above example color[0] is blue. and here is the result:
Region of interest or ROI
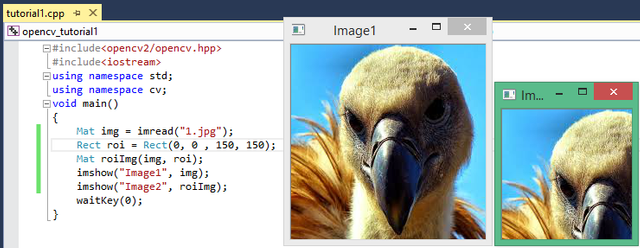
To select a ROI from original image we can do it like this:
#include<opencv2/opencv.hpp>
#include<iostream>
using namespace std;
using namespace cv;
void main()
{
    Mat img = imread("1.jpg");
    Rect roi = Rect(0, 0 , 150, 150);
    Mat roiImg(img, roi);
    imshow("Image1", img);
    imshow("Image2", roiImg);
    waitKey(0);
}
Rect(0, 0 , 150, 150); is Rect(X, Y, WITH, HEIGHT);
And here is the result:
Curriculum
This is my first tutorial contribution in Image processing using OpenCV, in next contributions I'm going to do better examples and maybe solve some Image processing problems.
Posted on Utopian.io - Rewarding Open Source Contributors

Great dude, you can make it episodic and more project based, in a way that everyone can follow...
Thanks I'm actually looking for some image processing challenges which I may solve and share it here.
Alternatively you can also use python shell , install opencv , numpy and matplotlib to play around with images....
Thank you for the contribution. It has been approved.
You can contact us on Discord.
[utopian-moderator]
Thanks
Hey @hadif66 I am @utopian-io. I have just upvoted you!
Achievements
Suggestions
Get Noticed!
Community-Driven Witness!
I am the first and only Steem Community-Driven Witness. Participate on Discord. Lets GROW TOGETHER!
Up-vote this comment to grow my power and help Open Source contributions like this one. Want to chat? Join me on Discord https://discord.gg/Pc8HG9x
Thanks @hadif66! You solved my problem and clearly stated the procedure. Keep it up!