Home Automation With Alexa (Amazon) [ESP Project]
Introduction
We all know about Alexa, a smart assistant of Amazon. So today I would like to share a project about Home Automation which is worked by Alexa. I will present you a way on how to control a microcontroller outputs of Alexa which allows us, for example, to verbally turn on / off the lights of a corridor.
What Will I Learn?
- how to control lights using WiFi and Smartphone
- how to use microcontroller with Arduino IDE
- how to use Alexa to control light/lights (on/off)
- how to write a program code on Arduino IDE
- how to connect all the components connection using diagram
Step 1: Gather all the Requirements
Requirements
- Mod-WiFi-ESP 8862 (Microcontroller)
- ESP-8268 Network Relay WiFi Module
- Alexa App (Amazon)
- Breadboard /optional
- jumper wires
- Type B USB cable
- PC
- Power Source
Difficulty
- basic project. a beginner can easily do this project.
Tutorial Contents
- Information about the main components
Mod-WiFi-ESP 8862

For this Project, we have to program our ESP Wifi Relay. This is ESP 8266 Mod converter. basically, it is a microcontroller which can receive data from WiFi. But In This Project, we only use it for storing Data to relay module. You can buy it from Amazon(link included). ESP8266 Mod Converter is very highly integrated SoC which includes Tensilica's L106 32-bit core processor; SRAM; power management unit; RF front end. The chip allows the implementation of a WIFI TCP-IP stack with just few extra components beside the ESP8266EX. To Know more you can Click Here.
ESP 8268 Network Relay WiFi Module
.jpg)
In this tutorial, ESP 8266 WiFi Module is being used for connecting with Alexa (Amazon). It will receive data and process it as it is programmed. so it is a simple process. You can buy it from Amazon(link Included). The device requires a power supply between 7 and 30V DC. Even though the onboard MP2303 buck converter is rated down to 4.8V. I did get it to operate successfully using a 9VDC wall-wort. If you want to know more Click Here.
Alexa App

Amazon Smart Assistant is known as Alexa. It's a free version app for Android and iOS. It will control the light (one/off).
Alexa can download from Amazon || Android || iOS
Step 2: Build the circuit
- Breadboard Diagram
First of all, we have to programme our WiFi Relay Through ESP Module. For that, we have to connect it.
Connection
- Vcc: 7 Volt (Relay) & 3.3 Volt (Converter)
- GND: common in power source
- Cross: Tx Pin goes to Rx.
For you, I share the Breadboard Diagram photo below. To Creating this sketch I use Fritzing Apps on PC. If you want, you can Download it from Here.

Here we can see, A power source (on the bottom right side) is connected to the common power port of BreadBoard. On the left side, we can see the serial converter (ESP-8266 module) which will be connected to the pc for storing data to the WiFi Relay (on the right side).
here is th schematic diagram to see in details

sometimes you will not find the accurate relay that I have mentioned. In the electronic market, you will find that Relay which you have to solder some pins. it's not a big deal. in below, you can see the pin port with names.


So Simple!!!
Step 3: Download the Software and Libraries
Arduino IDE
It's time to upload the program to WiFi Relay Module. For that, we have to use Arduino IDE for pc. It's an emulator that is based on c and c++ language. If you don't have that IDE, Don't worry! Here is the Download Link
Library
Before starting the program we have to copy a demo code to rewrite it, so that it will make the process easier. for this you can download the Home Automation Library from here.

Just download all of the files and let go for programming!
Wait Wait!!!
before starting, you have to add ESP Module in Arduino IDE. ESP is not arduino based Microcontroller. so, you know! Business is Business.
A. open the Arduino IDE.
B. Go to File > Preferences
C. Add this link (http://arduino.esp8266.com/stable/package_esp8266com_index.json) to the Additional Boards manager URLs
D. Then, click the “OK” button.

E. Go to Tools > Board > Boards Manager

F. Search: ESP8266 and select the ESP8266 board menu and install “esp8266 by ESP8266 Community platform”

G. Restart the IDE.
H. Choose ESP8266 board from Tools > Board > Generic ESP8266 Module.

I. Done!
Step 4: Getting API Key From Sinric
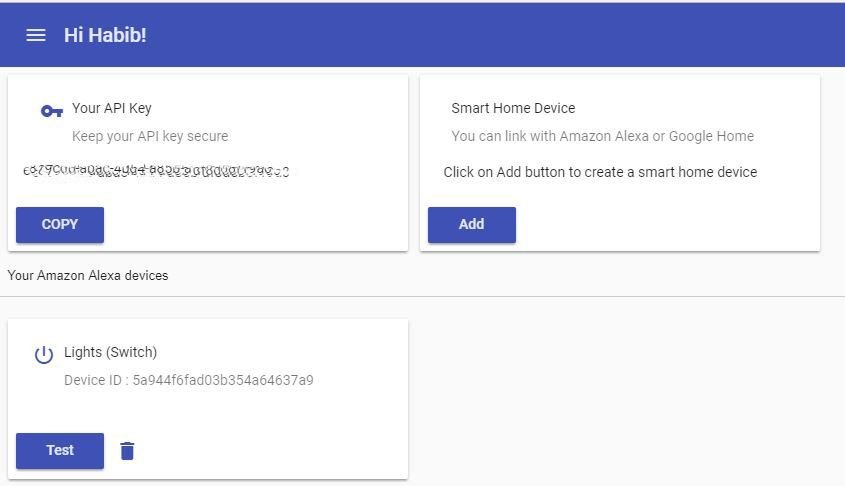
For using home automation with Alexa, you need some information, such as API key. for this thing, simply go to sinric website and register.
After registration, you will find API Key for further process. copy the API key and Click Add.

After that in the Add new device taskbar, fill up the required content that I filled in the photo which is given below.

Save it. now you get a new Device ID. It will be used in IDE Program.
Step 5: Include libraries to Arduino IDE
It's time to program for the relay module. first of all, unzip the library file that was downloaded previously.

open the "switch_example" file via Arduino IDE. Upload The code. For easier, i shorten the code. so that it will be easy to understand.
#include <ESP8266WiFi.h>
#include <ESP8266WiFiMulti.h>
#include <WebSocketsClient.h>
#include <ArduinoJson.h>


ESP8266WiFiMulti WiFiMulti;
WebSocketsClient webSocket;

#define MyApiKey "xxxxxx" // TODO: Change to your sinric API Key. Your API Key is displayed on sinric.com dashboard
#define MySSID "xxxxxxx" // TODO: Change to your Wifi network SSID
#define MyWifiPassword "xxxxxxx" // TODO: Change to your Wifi network password

#define HEARTBEAT_INTERVAL 300000 // 5 Minutes

uint64_t heartbeatTimestamp = 0;
bool isConnected = false;

void turnOn(String deviceId) {
  if (deviceId == "5axxxxxx") // Device ID of first device
  {
    Serial.print("Turn on device id: ");
    Serial.println(deviceId);
  }
  else if (deviceId == "5axxxxxxx") // Device ID of second device
  {
    Serial.print("Turn on device id: ");
    Serial.println(deviceId);
  }
  else {
    Serial.print("Turn on for unknown device id: ");
    Serial.println(deviceId);
  }
}

void turnOff(String deviceId) {
   if (deviceId == "5axxxxxxxx") // Device ID of first device
   {
     Serial.print("Turn off Device ID: ");
     Serial.println(deviceId);
   }
   else if (deviceId == "5axxxxxxxxx") // Device ID of second device
   {
     Serial.print("Turn off Device ID: ");
     Serial.println(deviceId);
  }
  else {
     Serial.print("Turn off for unknown device id: ");
     Serial.println(deviceId);
  }
}

void webSocketEvent(WStype_t type, uint8_t * payload, size_t length) {
  switch(type) {
    case WStype_DISCONNECTED:
      isConnected = false;
      Serial.printf("[WSc] Webservice disconnected from sinric.com!\n");
      break;
    case WStype_CONNECTED: {
      isConnected = true;
      Serial.printf("[WSc] Service connected to sinric.com at url: %s\n", payload);
      Serial.printf("Waiting for commands from sinric.com ...\n");
      }
      break;
    case WStype_TEXT: {
        Serial.printf("[WSc] get text: %s\n", payload);


        DynamicJsonBuffer jsonBuffer;
        JsonObject& json = jsonBuffer.parseObject((char*)payload);
        String deviceId = json ["deviceId"];
        String action = json ["action"];

        if(action == "setPowerState") { // Switch or Light
            String value = json ["value"];
            if(value == "ON") {
                turnOn(deviceId);
            } else {
                turnOff(deviceId);
            }
        }
        else if(action == "setBrightness") {

        }
        else if(action == "AdjustBrightness") {

        }
        else if (action == "test") {
            Serial.println("[WSc] received test command from sinric.com");
        }
      }
      break;
    case WStype_BIN:
      Serial.printf("[WSc] get binary length: %u\n", length);
      break;
  }
}

void setup() {
  Serial.begin(115200);

  WiFiMulti.addAP(MySSID, MyWifiPassword);
  Serial.println();
  Serial.print("Connecting to Wifi: ");
  Serial.println(MySSID);

  // Waiting for Wifi connect
  while(WiFiMulti.run() != WL_CONNECTED) {
    delay(500);
    Serial.print(".");
  }
  if(WiFiMulti.run() == WL_CONNECTED) {
    Serial.println("");
    Serial.print("WiFi connected. ");
    Serial.print("IP address: ");
    Serial.println(WiFi.localIP());
  }

  // server address, port and URL
  webSocket.begin("iot.sinric.com", 80, "/");

  // event handler
  webSocket.onEvent(webSocketEvent);
  webSocket.setAuthorization("apikey", MyApiKey);

  // try again every 5000ms if connection has failed
  webSocket.setReconnectInterval(5000);   // If you see 'class WebSocketsClient' has no member named 'setReconnectInterval' error update arduinoWebSockets
}

void loop() {
  webSocket.loop();

  if(isConnected) {
      uint64_t now = millis();

      // Send heartbeat in order to avoid disconnections during ISP resetting IPs over night. Thanks @MacSass
      if((now - heartbeatTimestamp) > HEARTBEAT_INTERVAL) {
          heartbeatTimestamp = now;
          webSocket.sendTXT("H");
      }
  }
}
Now ShowTime!!!
Step 6: Connect Apps with WiFi Relay
First of all, open the Alexa apps. click "Smart Home". Link Siniric To Alexa apps by pressing ENABLE.

Now Click "Add Device"

Wait For a While

TaDaaaaaa!!!

all are ready to roll, tap to control and edit.

you can use it in your corridor Light.

Here is the Video of the Home Automation system controlled by Voice
See the red lights going on and off !!
Here is another voice controlled Video.
That's all Folks. I hope it will help the beginners who what to show School Project. In this Content, I get helped from some websites and I'm going to share with you. hope it might help to work easily.
All of the links of the products and the apps are distributed in the Content.
Posted on Utopian.io - Rewarding Open Source Contributors
@habibrahad, I like your contribution to open source project, so I upvote to support you.
You got a 1.41% upvote from @mercurybot courtesy of @habibrahad!
Your contribution cannot be approved because it does not follow the Utopian Rules.
You can contact us on Discord.
[utopian-moderator]
Your post was selected to be included in my "Diamond in the Rough" series. It's goal is to promote high-quality posts made by new steemians (red fish and minnow) thereby helping them get the exposure they need to grow and thrive within the Steemitverse. You may check the related post Diamonds in the Rough @sandalphon.
Congratulations! This post has been upvoted from the communal account, @minnowsupport, by Habib from the Minnow Support Project. It's a witness project run by aggroed, ausbitbank, teamsteem, theprophet0, someguy123, neoxian, followbtcnews, and netuoso. The goal is to help Steemit grow by supporting Minnows. Please find us at the Peace, Abundance, and Liberty Network (PALnet) Discord Channel. It's a completely public and open space to all members of the Steemit community who voluntarily choose to be there.
If you would like to delegate to the Minnow Support Project you can do so by clicking on the following links: 50SP, 100SP, 250SP, 500SP, 1000SP, 5000SP.
Be sure to leave at least 50SP undelegated on your account.