Creating a Task List Application using the MEAN stack - 1
Repository
https://github.com/nodejs/node
What Will I Learn
This is the first tutorial in the series on how to create web applications using the MEAN stack
You will learn how to create a basic CRUD operations using MongoDB and Node.
You will learn how to use modules and frameworks like Express, Body Parser and CORS to create a functioning backend.
You will learn how to intergrate and use AngularJS in your projects to create the client side for your application.
You will learn how to create an API that sends requests and receives response from the database.
Requirements
- Latest versions of NodeJS and NPM, Angular CLI
- Text Editor
- Basic to Intermediate knowledge of JavaScript and its syntax
- Basic knowledge on how to use a terminal/command line
Difficulty
- Intermediate
Tutorial Contents
This tutorial is aimed at helping anyone get started with creating a MEAN stack application.
By the end of this tutorial the reader should have an idea on how to create a server file that will import and implement all the modules needed for the application back-end to function optimally.
Let's Start
Getting Started
To start with we'll be needing to set up the following
NodeJS and NPM(which comes with NodeJS) which allows us to build applications with a server and back-end functionalities included.
We also need to install Express which is a NodeJs framework that will be responsible for routing, HTTP requests and the API
Installing NodeJS
To Install NodeJS visit the official website and follow instructions based on the operating system you use.
The download page on NodeJS website screenshot below
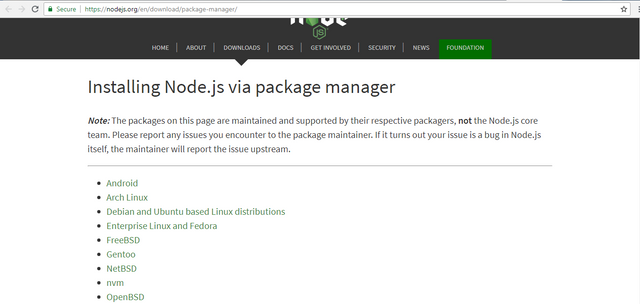
You can refer to this article for further guidance on how to install Node locally on your machine.
Initializing The Project
After installing nodejs we are now going to create a new folder for our project, to do that navigate to your desired directory in the terminal and type the following commands
mkdir mytasklist
The next step is to navigate to the newly created project folder through the terminal, run this command to make that happen
cd mytasklist
Inside this folder we need to create a package.json file which will contain a manifest for our project including information about all dependencies to be used in the project.
To create a package.json file run the following commands from your terminal
npm init
This command will help setup a new package.json file, in the process of creating the file you will be prompted to complete some questions as shown in the screenshot below
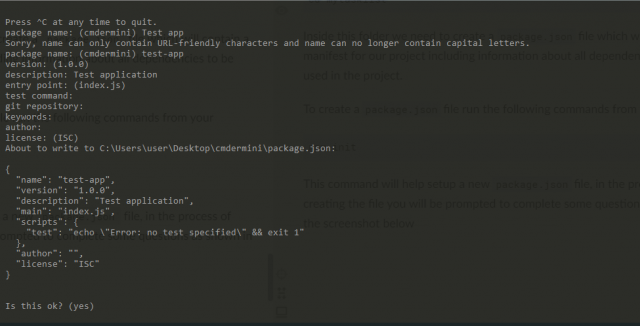
The following prompts will show up when creating a package.json file
package name: Here you will enter the name you desire to give to the project, please note that your desired project name has to be URL friendly(basically there shouldn't be space between the words and the name cannot contain an uppercase letter).
version: Here you will specify the current version of the project you are about to work on, new projects should be left at 1.0.0
description: In here you can enter in summary what the project is about
entry point: This prompt allows you specify the entry point for your project, which is basically the first file to consult every time the project is to be run
The remaining options can be left just as they are and upon completion we'll have a new package.json file newly added to our project directory.
Installing Dependencies
The next port of call would be to install the project dependencies.
In the project directory terminal(command line) run the following commands to install the project dependencies for this app
npm install express body-parser cors ejs mongojs -save
The dependencies we installed above include expressjs, body-parser, ejs and mongojs. The command --save will add all installed dependencies to our package.json file.
Upon complete installation we can now find all installed dependencies in our package.json file as shown in the screenshot below
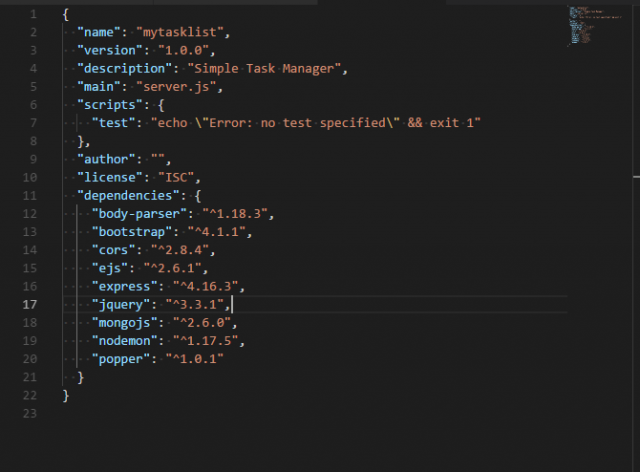
All other dependencies shown in the screenshot will be added as the tutorial moves on.
After creating package.json and adding dependencies we would then move on to create our server
Creating the Server
To create a server for our application, we need to add a new file in the root directory of our project(same location as the package.json file).
Let's create a new file and name it server.js which will contain the main configurations for our back-end and database.
The first thing to do in our server.js file would be to bring all our installed dependencies so they can be put to use in this module.
That can be done by using the JavaScript require() method to indicate the required packages to be used.
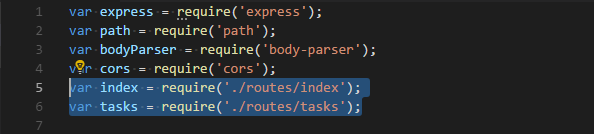
In our server.js add the following code
var  express  =  require('express');

var  path  =  require('path');

var  bodyParser  =  require('body-parser');

var  cors  =  require('cors');
We already explained what express does earlier, for the other dependencies we have
pathwhich helps to provide a way for files and directories to work together. This particular package has been pre-installed by default on every OS so we don't need to install it again in this tutorial
dbody-parserwhich helps to parse data being sent and received from the database to a form that can be worked with in the application.corsallows AJAX requests to skip the same-origin policy and access resources from remote hosts.
After setting all required dependencies, we also need to bring in the files for our routes in here. As the tutorial moves forward we'll be creating a routes folder at some point which will contain the API files for our homepage and tasklist.
To bring in the files for our routes folder we use the same method used for the dependencies, below the set of statements used to set dependencies add the following code
var  index  =  require('./routes/index');

var  tasks  =  require('./routes/tasks');
./routes/index simply points to the index.js file in the routes folder. Same goes for the ./routes/tasks which also points to the tasks.js file in the routes folder.
After pointing to all our required modules and dependencies the next thing is to add the server logic for our application.
To start with add the following lines of code in the server.js file
var  port  =  3000;

var  app  =  express();
The variable port contains the port number that will be used by the server to access the data inside the database.
The variable app is used to instantiate the express() module in our application.

We also need to create a View/Template Engine which will help combine dynamic data with the static front end components and elements.
The following code will help us setup a View Engine
app.set('views', path.join(__dirname, 'views'));

app.set('view engine', 'ejs');

app.engine('html', require('ejs').renderFile);
In creating a view engine we first of all need to let the system know the name of the folder we'll be using to create our views
app.set('views', path.join(__dirname, 'views'));will help indicate the name of the folder that will contain our template/view files.app.set('view engine', 'ejs');will set the view engine module toejs.app.engine('html', require('ejs').renderFile);will allow the application server to be able to render files with a.htmlextension

Later on we will create a folder that will contain all our Angular client side files, before doing that we need to set the directory for use in our server.js file by making a reference to that folder.
To get that done we apply the use() method and specify that the server should use the express module and in the module the server will use the static() method in addition to the path module and the join() method to specify the path to the client side folder .
The code for that is
app.use(express.static(path.join(__dirname, 'client')));
Our Angular front end folder will be given the name client as indicated in the line of code above.

Our next objective is to use the remaining required packages in our server.js file.
Again we will be using the JavaScript use() method to put these modules to use in our server.
To use the Body Parser middleware we'll add the following code in our server.js file
app.use(bodyParser.json());

app.use(bodyParser.urlencoded({extended:  false}));
By applying the use() method alongside the json() method and the urlencoded() method we are able to put to use the earlier required module body-parser

We also need to use the cors middleware and to do that we will add this in our server.js file below the code for using the body-parser module
app.use(cors());
Our required modules are now fully ready to be used which means we can move on to adding the routes that will accept and respond to all requests coming to and from the server.
At the top of the server.js file we added two required modules which both points to the routes files for the server API, we need to put to both routes to use now.
The first route added is for our homepage known as index, while the second one is for our task list page also alternatively known as tasks.
To put both routes to use we will add the following code in our server.js file
app.use('/', index);

app.use('/api', tasks);
The first use() method points to the index variable created earlier which is the route for the homepage.
The second use() method points to the tasks variable which is the route for our task list page.
In specifying the route for our task list page we use two parameters in our use(), the first parameter /api simply means that whenever the user wants to interact with the server the URL that will be used to send and receive requests will contain /api.
We'll explore this concept fully as the tutorial proceeds

The final step to complete our server is by running a callback function that will listen for an instance of our server and return an object to the server.
The code for this section is as thus
app.listen(port, function(){

console.log('Server started on port '  +  port);

});
We use the listen() method passing two parameters to it. The first parameter port has been declared earlier as a global variable var port = 3000 and the second variable is a callback function which logs the a string to the console.

That does it for the server.js file for this application and below is the full source code for this file.
var  express  =  require('express');

var  path  =  require('path');

var  bodyParser  =  require('body-parser');

var  cors  =  require('cors');

var  index  =  require('./routes/index');

var  tasks  =  require('./routes/tasks');


//Port


var  port  =  3000;


var  app  =  express();


//View Engine


app.set('views', path.join(__dirname, 'views'));

app.set('view engine', 'ejs');

app.engine('html', require('ejs').renderFile);


//Set Static Folder


app.use(express.static(path.join(__dirname, 'client')));


//Body Parser Middleware


app.use(bodyParser.json());

app.use(bodyParser.urlencoded({extended:  false}));


//CORS Middleware


app.use(cors());


// Routes


app.use('/', index);

app.use('/api', tasks);

// CORS Headers

app.use(function (req, res, next) {

res.setHeader('Access-Control-Allow-Origin', '*');

res.setHeader('Access-Control-Allow-Methods', 'GET, POST, PUT, DELETE');

res.setHeader('Access-Control-Allow-Headers', 'Content-Type');

res.setHeader('Access-Control-Allow-Credentials', true);

next();

});


app.listen(port, function(){

console.log('Server started on port '  +  port);

});
We can now go on and save the file.
Our server is not working quite yet as we have not created the routes and the views folder required in the server.
In the next tutorial in this series we will be creating both folders and adding the necessary files so we can get our server to run fully.
Curriculum
Proof of Work Done
https://github.com/olatundeee/basic-crud-app-using-mean-stack
I thank you for your contribution. Here are my thoughts;
Tutorials should teach the user something unique, shouldn't show ubiquitous functions and replicate well-documented concepts which can be found over internet with great ease. Therefore, in the voting phase, your next tutorials might not be considered.
The volume of your tutorial is too sparse. To increase it, please reduce the amount of the filler content (like including both screenshot and code block of the code) and add several (up to 4-5) substantial concepts.
Titles show what your post is about, so use them wisely. As you're teaching concepts with the examples, it is wise to write them on your titles, so keep doing that. But, positioning them is also essential. The main thing you're teaching in the tutorial is CSS concept, not the example. Instead of writing the example to the head of the title, change the position of it. So that way, you can directly catch readers/viewers attention to what you teach instead of the example. I'll give a example of what I meant;
Your contribution has been evaluated according to Utopian policies and guidelines, as well as a predefined set of questions pertaining to the category.
To view those questions and the relevant answers related to your post, click here.
Need help? Write a ticket on https://support.utopian.io/.
Chat with us on Discord.
[utopian-moderator]
Hey @yokunjon
Here's a tip for your valuable feedback! @Utopian-io loves and incentivises informative comments.
Contributing on Utopian
Learn how to contribute on our website.
Want to chat? Join us on Discord https://discord.gg/h52nFrV.
Vote for Utopian Witness!
Hey @gotgame
Thanks for contributing on Utopian.
We’re already looking forward to your next contribution!
Want to chat? Join us on Discord https://discord.gg/h52nFrV.
Vote for Utopian Witness!
Nice tutorial bro.
I have something to share with you, since you did not respond to chats on discord, kindly reach me here.
https://chat.whatsapp.com/65sBpl4K3D5IraHv4CagqP
I'll be in touch