Proximity detector with ultrasonic transducer and arduino using fritzing: Tutorial 3
What Will I Learn?
In this tutorial, the user will learn:
Design of a proximity detector, based on the ultrasonic transducer for the movement of a robot before an obstacle.
Connection of electronic devices: transducer ultrasonic, H L298N bridge and motor DC.
Connection in protobard of the circuit in fritzing for the real assembly.
Requirements
Basic knowledge of Arduino programming.
Basic knowledge of the operation of the HC-SR04 ultrasonic transducer and L298N driver.
See previous tutorials.
Driver L298N.
DC 9V motor.
9V battery.
Arduino Uno Card.
Difficulty
- Advanced
Tutorial Contents
Greetings, this is a contribution from @gasuba to Open Source Utopian. This time, a proximity detector robot will be presented, based on the ultrasonic sensor as an input sensor to activate an actuator through the Arduino electronic card, in this case the rotation control of a 9 VDC motor. This program has applications in the area of robotics, since we will assume that the robot moves in one direction until it detects an obstacle of less than 5 cm, once detected this distance will move away from the obstacle. A view on the operating principle of the ultrasonic sensor is described below.
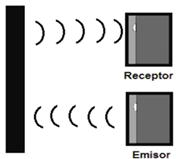
An ultrasonic pulse is generated by the transmitter and propagates through the medium, which can be air at room temperature with a sound velocity of 34.3cm/ms. The signal moves in the middle, is reflected in an object and returns to the sensor, this signal is detected by the receiver in a time T / 2 of the distance of the object. In the following figure the described principle is observed:
Own source
Step 1.
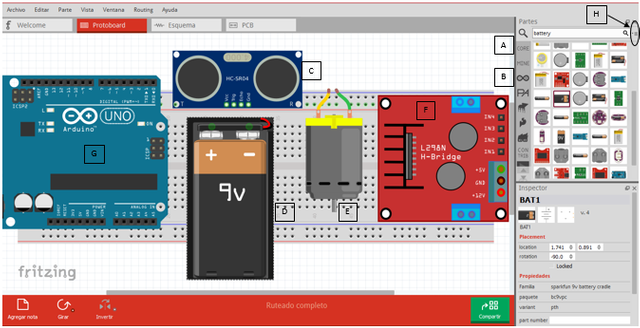
We select the electronic devices to be used, in this project the Parallax ultrasonic sensor, a 9V DC motor, a driver (also called H bridge) L298N, the Arduino Uno acquisition card and the 9V battery, the circuit is in the figure continuation.
A. It allows the search of electronic devices.
B. Family of Arduino boards.
C. Ultrasonic sensor HC-SR04.
D. 9V battery.
E. 9V DC motor.
F. Driver or bridge H L298N.
G. Arduino Uno Card.
H. Drop-down menu for importing components such as the ultrasonic sensor and L298N driver, since these devices are not considered fritzing in its component library.
Step 2.
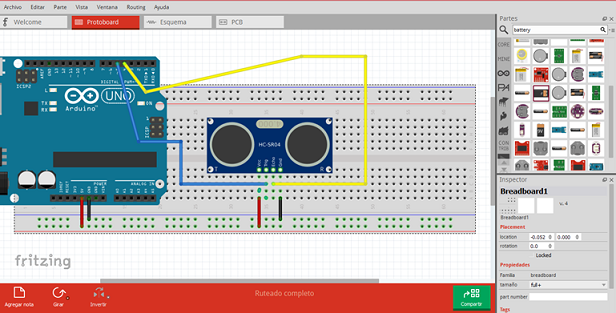
The first connection stage is made, consisting of the HC-SR04 ultrasonic sensor and the Arduino one card. This sensor consists of 4 pins: Power (Vcc), reference (GND), ultrasonic wave transmitter (Trig) and ultrasonic wave rebound receiver by object detection (Echo), the Trig pin of the sensor is connected to pin 5 of the card and the Echo pin of the sensor to pin 4. The following figure shows the connection of the ultrasonic sensor with the card:
Step 3.
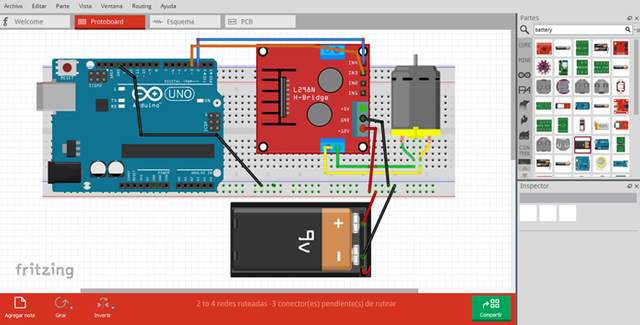
The connection stage of the driver L298N and 9V motor, consists of the action to be programmed according to the distance detected by the ultrasonic sensor, for a distance up to 5cm from the obstacle the robot moves in one direction, but less than 5 cm the robot stops and turns in the opposite direction, trying to get away from the obstacle. The connection of the L298N driver and the motor with the Arduino board is shown below:
Step 4.
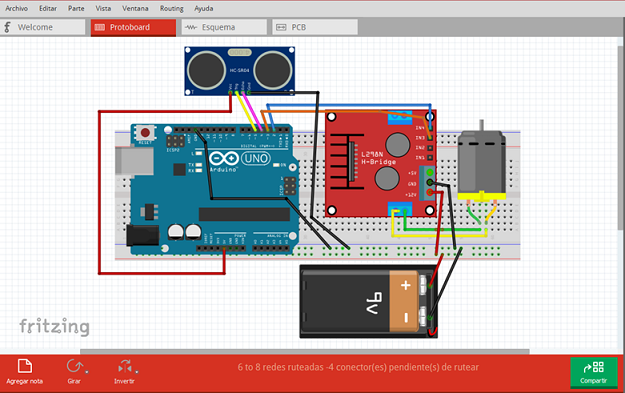
We proceed to connect the final circuit for the displacement of the robot based on the HC-SR04 ultrasonic sensor, in the following figure you can see the connection of the L298N driver with the Arduino board, this driver allows the change of rotation of the DC motor by the bridge H that it contains in its internal circuit. Pin 2 and 3 of the Arduino are used to connect the IN4 and the IN3:
Step 5
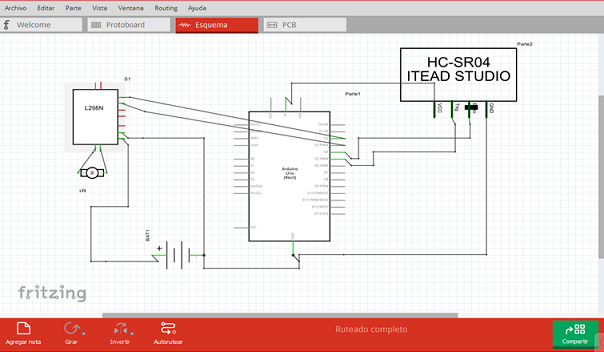
The following figure shows the schematic connection of the proximity detector circuit based on the ultrasonic sensor with drive in forward and reverse movement thanks to the L298 driver and DC motor.
Finally, the Arduino code is presented, to record it on the card and make the protoboard connection for the pilot test and observe the operation about the distances and displacement of the robot.
int t=5; //Pin Trig
int e=4; //Pin Echo
float distance;
unsigned long pulsep;
int IN3=3;
int IN4=2;

void setup()
{
  Serial.begin(9600);
}

void distanfunction()
{
 pinMode(t, OUTPUT);
 digitalWrite(t, HIGH);
 delayMicroseconds(5);
 digitalWrite(t, LOW);
 delayMicroseconds(5);
 pinMode(e, INPUT);
 pulsep=pulseIn(e, HIGH);
}

void loop()
{ distanfunction();
  distance=((float(pulsep/1000.0))*34.3)/2;
  Serial.print(distance);
  Serial.println(" cm");
  delay(500);
if(distance>5){
  digitalWrite(IN3, HIGH);
  digitalWrite(IN4, LOW);

  }
    else{
  digitalWrite(IN4, HIGH);
  digitalWrite(IN3, LOW);

   }
  }
Thank you all for your time and attention, I hope it is very useful for your robotics projects ... See you in the next tutorial.
Curriculum
- Introducción a Fritzing utilizando un circuito básico con LDR
- Control of an alarm with LEDs and the Arduino Uno card using Fritzing: Tutorial 1.
- Access control with photoelectric using fritzing with Arduino: Tutorial 2
Posted on Utopian.io - Rewarding Open Source Contributors
Hey @gasuba I am @utopian-io. I have just upvoted you!
Achievements
Community-Driven Witness!
I am the first and only Steem Community-Driven Witness. Participate on Discord. Lets GROW TOGETHER!
Up-vote this comment to grow my power and help Open Source contributions like this one. Want to chat? Join me on Discord https://discord.gg/Pc8HG9x
Congrats!!! Top 5 #steemfamilyhi
Genial!!!
Te apoyo desde el top five #steemfamilyhi
Este post es apoyado por el trial de steemfamilyhi
#jga #angeluswins #uniazul #hendersonp
Si quieres unirte al trial búscanos en steemauto / curation trial ----- steemfamilyhi
Mi apoyo desde @steemfamilyhi. Saludos y Bendiciones
Very nice. #steemfamilyhi.
Thank you for the contribution. It has been approved.
You can contact us on Discord.
[utopian-moderator]
Felicidades. Top 5 steemfamilyhi
Mi Proyecto Personal de Curación, #TopFive los cinco y otros más. [21/03/2018]