Tutorial 1: How to download, Install, Run and Use Fish-shell in Termux [Also work for non-rooted devices]
What Will I Learn?
- How to download Fish-shell in Termux
- How to install Fish-shell in Termux
- How to run Fish-shell in Termux
Today I make this Tutorial because I think there is a need for this shell for the beginners in my future post on Termux. So I make this tutorial for the facility for you. Fish-shell & hacker's keyboard makes the use of Termux easy and I hope you can easily understand this tutorial and take advantage of Fish-shell.
What is Fish-shell?
- Fish(The Friendly Interactive Shell) a Unix shell that focuses on interactive use, discoverability and friendliness. Everything that can be done in other shell languages should be done in fish. It auto-complete the commands that are pretty cool. Fish is fully scriptable, and its syntax is simple, clean and consistent. Fish is a fast, the auto-completion is amazingly helpful and it's intuitive use without too much configuration.
How it works?
- Fish suggest commands as you type, based on history and completion, just like a web browser. Complete the autosuggestion by hitting the right arrow key.
Requirements
- Termux :
- Hacker's Keyboard
- Fish-shell GitHub
https://github.com/fish-shell/fish-shell.git
Difficulty
- Intermediate
Procedure
1: Install the Termux App and Hacker's keyboard from the Requirement section, these apps are also available in Google Play Store.
How to configure the Hacker's keyboard
- Open the Hacker's keyboard by click on Open.

- Click on ENABLE KEYBOARD and Turn on the Hacker's keyboard and press back key

- Click on SELECT INPUT METHODand select Hacker's keyboard . Hacker's keyboard is now configured! Now follow the next steps carefully
.

2: Open the Termux app and wait until it starts completely until it shows a welcome note in Terminal.

- Now type you first command
pkg updateand hit enter, wait until it complete.

- Now type the command
pkg upgradeand press Enter This command installs the c language in Termux app.

- Now type the command
pkg install python2and press Enter. this command installs the Python Language that is used to run the Fish-shell.

3: Now we need to install the Fish-shell but before cloning, we need to install git in Termux.
- Type the command
pkg install gitand press Enter. This will install the use of it.

- Now type the command
pkg install pythonand press Enter.
4: There are two methods to Download and Install Fish-shell.
- 1: First, we manually clone the GitHub link and then install it by going to downloaded file directly.
- 2: Second is simple and easy it download and install Fish-shell automatically.
But, here we talk about the second method which is easy to use and if you are a beginner you can easily understand this method. In my next Termux Tutorials, I will briefly define how to clone and install a package with git clone command
- Simple type command
pkg install fishand press Enter wait until it complete the download.

- Now simple type command and press Enter. This will install and run the Fish-shell automatically.

How to use Fish-shell?
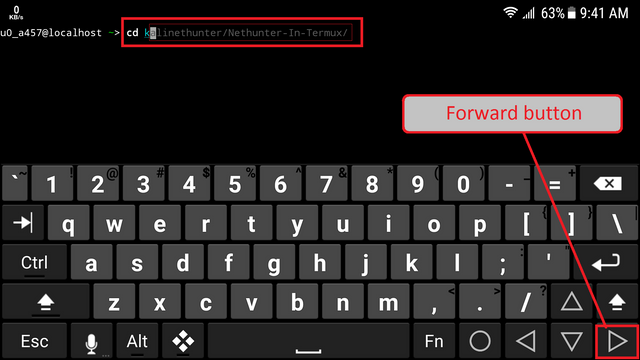
- This makes use of Termux easy and you can easily and fastly interact with it. You just need to put the first alphabet of your command it will show the full command and you can use it with the forward arrow. Press Tab and fish will attempt to complete the command, argument or path. If there are more then one possibility it will list them
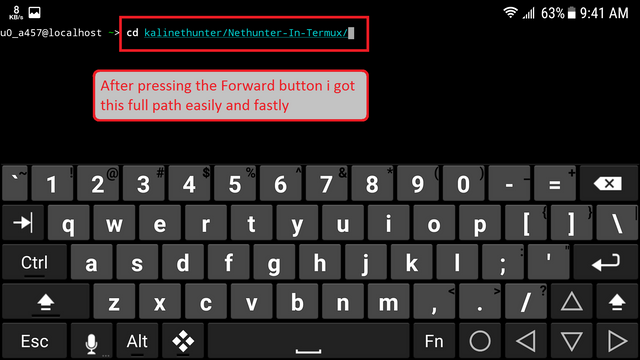
- I type the only cd and the first alphabet of any directory it shows the full path of directory now if I want to access this directory I simply press the forward button ], hit Tab again to cycle through the possibilities.

- Another Example i type cd n

- And I got the Full path easily

Curriculum
How to setup and run python and C++ in Android Termux
Posted on Utopian.io - Rewarding Open Source Contributors
Thank you for the contribution. It has been approved.
You can contact us on Discord.
[utopian-moderator]
Hey @rufans, I just gave you a tip for your hard work on moderation. Upvote this comment to support the utopian moderators and increase your future rewards!
Thanks @rufans
Your contribution cannot be approved because it does not follow the Utopian Rules.
You repeated the processes that you've already shared In Your Previous Tutorial
Utopian introduced the use of Curriculum so as to avoid this mistake.
You can contact us on Discord.
[utopian-moderator]
Congratulations @faisalamin! You have completed some achievement on Steemit and have been rewarded with new badge(s) :
Click on any badge to view your own Board of Honor on SteemitBoard.
For more information about SteemitBoard, click here
If you no longer want to receive notifications, reply to this comment with the word
STOPHey @faisalamin I am @utopian-io. I have just upvoted you!
Achievements
Suggestions
Get Noticed!
Community-Driven Witness!
I am the first and only Steem Community-Driven Witness. Participate on Discord. Lets GROW TOGETHER!
Up-vote this comment to grow my power and help Open Source contributions like this one. Want to chat? Join me on Discord https://discord.gg/Pc8HG9x