KnockoutJS can helps developers in building rich and responsive websites

KnockoutJS is basically a library written in javascript, based on MVVM pattern that helps developers in building rich and responsive websites. It was developed by Steve Sanderson as an open source JavaScript Framework and is available under license from MIT. The model separates the application’s Model (stored data), View (UI) and View Model (JS representation of model).
Why Use KnockoutJS ?
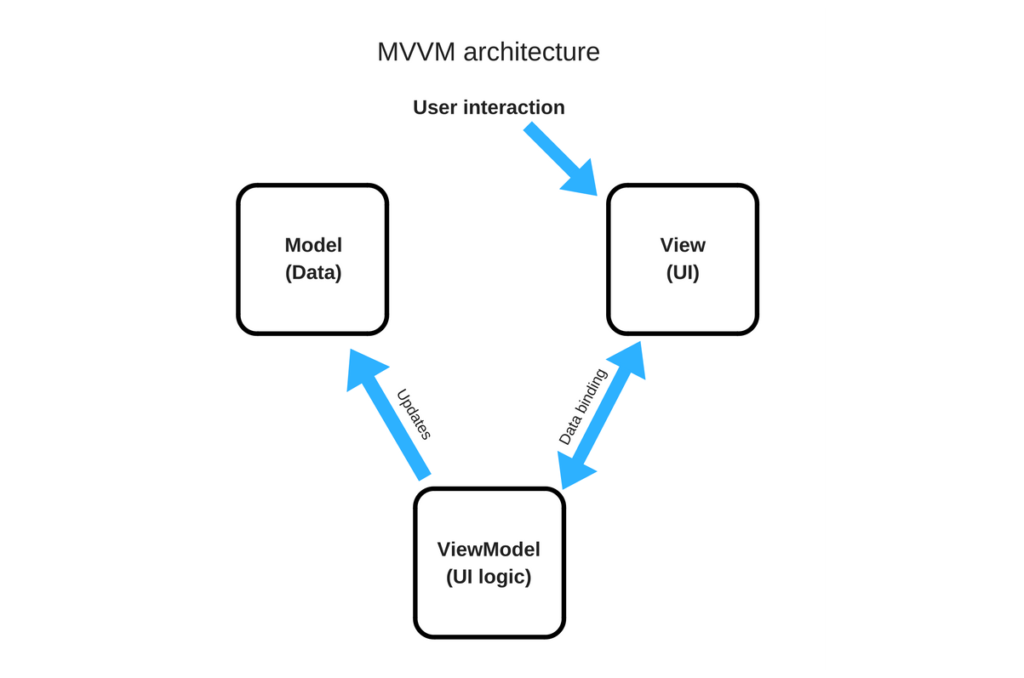
• MVVM architecture pattern
By splitting UI into three parts (Model, view and viewmodel), KO allows developers to have models that are perfectly in sync with DOM elements
• Support all browser
KO support : Firefox, Safari, Chrome, Opera and even Internet Explorer 6.
• Depedency tracking
KO detects depedencies and automatically updates the right parts of UI. It simplifies the process of organizing UI.
• Built-in templating
KO allows you to capture HTML markup existing in the element and use it as template for other items.
Basic KnockoutJS MVVM
[1]. Now let’s start implementing KnockoutJS in our project. First, we can get KnockoutJS from http://knockoutjs.com/downloads/ or https://github.com/knockout/knockout.

[2]. Create some of the following empty files and name them: index.html, style.css, and model.js and create files and folders with the structure as shown below.

[3]. Create layout UI using html, open the index.html file and add the following line of code.
<html>
<head><title>Tutorial KnockoutJS for Utopian</title>
<script type="text/javascript" src="js/knockout-3.4.2.js"></script>
<link href="style.css" rel="stylesheet">
</head>
<body>
<p>First name: <strong>fahrul</strong></p>
<p>Last name: <strong>hidayat</strong></p>
<p>User name in steemit: <strong>@fahrulhidayat</strong></p>
</body>
<script type="text/javascript" src="js/model.js"></script>
</html>
For this example, I've downloaded previously knockout-3.4.2.js and I put it in the js folder, as an alternative you also can use CDNs Knockout version 3.4.2. for DOM efficiency and speed up page load, I put the file to access model.js under the html script.
[4]. Open Model.js in JS folder. Then create a viewmodel containing the data, type the following line of code.
// This is a simple *viewmodel* - JavaScript that defines the data and behavior of your UI
function AppViewModel() {
    this.firstName = "Fahrul";
    this.lastName = "Hidayat";
    this.userName = "@fahrulhidayat";
}
// Activates knockout.js
ko.applyBindings(new AppViewModel());
here we create an object with AppViewModel name, then we need to enable Knockout so that the data-bind we create in the view can be recognized with the script ko.applyBindings(new AppViewModel());
[5]. To display data from viewmodel, we must modify elements the index.html file and adding data-bind attributes to display my steemit username. Data-bind attribute isn’t native to HTML, you must activate Knockout like what we have done in step 4 to make it take effect.
<p>First name: <strong data-bind="text: firstName"></strong></p>
<p>Last name: <strong data-bind="text: lastName"></strong></p>
<p>User name in steemit: <strong data-bind="text: userName"></strong></p>
[6]. Now run the index.html file in your favorite browser, the results shown will be as below

Input and output in KnockoutJS
After we know the basic use of KnockoutJS, let's improve by trying to implement using the input form and display the results directly.
[1]. Create new file and give the name index.html, then type the following line of code in it.
<!doctype>
<html>
<head>
<title>
Tutorial KnockoutJS for Utopian
</title>
<script type='text/javascript' src='js/knockout-3.4.2.js'></script>
<link a href='css/style.css' rel='stylesheet'>
</head>
<body>
<div class='liveExample'>
    <p>First name: <input data-bind='value: firstName' /></p>
    <p>Last name: <input data-bind='value: lastName' /></p>
    <h2>Hello, your username in steemit : <span data-bind='text: fullName'> </span></h2>
</div>
</body>
<script type='text/javascript' src='js/model2.js'></script>
<html>
We have add div with class name liveExample , and data-bind attributes for firstname, lastname and fullname.
[2]. We try to set a little view of our layout by adding the following line of code in the css file
body { font-family: arial; font-size: 14px; }
.liveExample { padding: 1em; background-color: #EEEEDD; border: 1px solid #CCC; max-width: 655px; }
.liveExample input { font-family: Arial; }
.liveExample b { font-weight: bold; }
.liveExample p { margin-top: 0.9em; margin-bottom: 0.9em; }
.liveExample select[multiple] { width: 100%; height: 8em; }
.liveExample h2 { margin-top: 0.4em; font-weight: bold; font-size: 1.2em; }
This css set the arial font to the size of 14px for body, then for the class of liveExample we set the background with the color #EEEEDD, and give a solid border type with line 1 px and maximal width 655 px, and set some margin for html input object, p, and h2.
[3]. Change our viewdata by changing the contents of the model.js file with the following line of code
// Here's my data model
var ViewModel = function(first, last) {
    this.firstName = ko.observable(first);
    this.lastName = ko.observable(last);
    this.fullName = ko.computed(function() {
        // Knockout tracks dependencies automatically. It knows that fullName depends on firstName and lastName, because these get called when evaluating fullName.
        return "@" + this.firstName() + this.lastName();
    }, this);
};
ko.applyBindings(new ViewModel("fahrul", "hidayat")); // This makes Knockout get to work
We have created a data-bind attribute for input with the name firstName, lastName and text with fullName, then we here create the object with the name ViewModel with first and last getvariabel to set the value of variable firstName, lastName and fullName, then inside ViewModel we use observable so update your UI automatically. observable are special objects that can notify about changes, and can automatically detect dependencies. now we've got an observale for firstname and lastname, to process 2 observable we need computed observables, function that dependent on one or more other observables, and will automatically update whenever these dependencies change. and in the last we activated the data-bind attribute and sent two variables containing "fahrul" and "hidayat" to be processed with ko.applyBinding (new ViewModel ("fahrul", "hidayat"))
[4]. If you run the project, the result will be like the picture below, if you enter new data into the input form then on the bottom row will display the result of word merging from both input form above.

If you fill in input firstname and lastname then observable will directly update the UI, and computed observables directly process so the results are directly displayed in the text.
List and Collections
Now you’ve got a clean, object-oriented representation of your UI’s data and behaviors (your viewmodel), next i will explain how to working with lists and collections. Very often, you’ll want to generate repeating blocks of UI elements, especially when displaying lists where the user can add and remove elements. KO lets you do that easily, using observable arrays and the foreach binding.
[1]. Start by filling the index.html file with the following line of code
<!doctype>
<html>
<head>
<title>
Tutorial KnockoutJS for Utopian
</title>
<script type='text/javascript' src='js/knockout-3.4.2.js'></script>
<link a href='css/style.css' rel='stylesheet'>
</head>
<body>
<h2>Utopian Rewarding</h2>
<table>
    <thead><tr>
        <th>Username</th><th>Category</th><th>Steem value</th><th></th>
    </tr></thead>
    (html comment removed:  Todo: Generate table body )
    <tbody>  </tbody>
</table>
<script type='text/javascript' src='js/steemmodel.js'></script>
</body>
<html>
[2]. If you run the project, for now the result of the code line above is as below

[3]. We must create a viewmodel in model.js by filling in the following line of code
function addUser(name, initialcategory) {
    var self = this;
    self.name = name;
    self.category = ko.observable(initialcategory);
}
function steemViewModel() {
    var self = this;
    // Non-editable catalog data - would come from the server
    self.availablecategorys = [
        { categoryName: "Graphic", price: 10.65 },
        { categoryName: "Tutorial", price: 34.95 },
        { categoryName: "Development", price: 87 }
    ];
    // Editable data
    self.users = ko.observableArray([
        new addUser("@brad", self.availablecategorys[0]),
        new addUser("@jhoni", self.availablecategorys[1])
    ]);
}
ko.applyBindings(new steemViewModel());
addUser, a simple JavaScript class constructro that stores a username with a category selection
steemViewModel – a viewmodel class that holds:
-availableCategorys, a JavaScript object providing category data
-users, an array holding an initial collection of addUser instances.
[4]. To display viewmodel data in UI we must modify tbody element to use foreach binding, so that it will render a copy ot its child elements for each entry in the user array.
<table>
    <thead><tr>
        <th>Username</th><th>Category</th><th>steem value</th><th></th>
    </tr></thead>
    (html comment removed: Todo: Generate table body )
    <tbody data-bind=”foreach: users”>
    <tr>
        <td data-bind=”text: name”></td>
        <td data-bind=”text: category().categoryName”></td>
        <td data-bind=”text: category().price”></td>
    </tr>
    </tbody>
</table>
Foreach binding duplicates a section of markup for each entry in an array, and binds each copy of that markup to the corresponding array item. This is especially useful for rendering lists or tables.
Because category property is an observable, it’s important to invoke category() as a function (to obtain its current value) before attempting to read sub properties. In simple just write category().price, the result data from viewmodel display.

[5]. Next we add button to add user, then implement addUsers function, making it push an extra entry into the user array.
<button data-bind=”click: addUsers”>Add another user</button>
the button we add "click" binding, adds an event handler so that your choosen JavaScript function will be invoked when the associated DOM element is clicked
[6]. To making data editable, find tbody elements, edit first column and second column with these line of code:
<tr>
        <td><input data-bind="value: name" /></td>
        <td><select data-bind="options: $root.availablecategorys, value: category, optionsText: 'categoryName'"></select></td>
        <td data-bind="text: category().price"></td>
    </tr>
We create the input and select form in the first and second columns, in the select section we add "options" bindings, controls what options should appear in a drop-down list or multi-select list, this binding can not be used with anything other than select elements.
[7]. Now lets give addUser class the ability to format its own price data using some custom logic, since the formatted price will be computed based on selected category, we can represent it using ko.computed (so it will update automatically whenever the category selection changes);
Self.addUsers = function(){
self.users.push(new addUser(“”,self.availablecategorys[0]));
}
[8]. And don’t forget to change category().price become formatedPrice
<tr>
        <td><input data-bind="value: name" /></td>
        <td><select data-bind="options: $root.availablecategorys, value: category, optionsText: 'categoryName'"></select></td>
        <td data-bind="text: formattedPrice"></td>
    </tr>
[9]. Update again addUser() in model, add these formattedPrice function.
function addUser(name, initialcategory) {
    var self = this;
    self.name = name;
    self.category = ko.observable(initialcategory);
self.formattedPrice = ko.computed(function() {
        var price = self.category().price;
        return price ? "$" + price.toFixed(2) : "None";
    });
}
If we click the button, its mean run addUser function where this function will make new object, and to formated price here we use computed observable to set the format.
[10]. If you try to run it, the result like picture below

[11]. Previously we can add user, now we continue to can delete user and display total from price list, update your view and added remove link to each item.
<td><a href=#” data-bind=”click: $root.removeUsers”>Remove</a></td>
Here we use $root.removeUser at data-bind attribute, the purpose to passing a current item as a parameter to handler function
[12]. Add removeUser function in viewmodel (model.js)
self.removeUsers = function(users) { self.users.remove(users) }
[13]. To display total price we add these function in steemModelView
self.totalRewards = ko.computed(function() {
   var total = 0;
   for (var i = 0; i < self.users().length; i++)
       total += self.users()[i].category().price;
   return total;
});
Here we use compute observable then looping users object with for, to get price and calculate the total
[14]. Don't forget adding the following
<h3 data-bind="visible: totalRewards() > 0">
    Total Steem value: $<span data-bind="text: totalRewards().toFixed(2)"></span>
</h3>
[15]. After doing many things, if you run the project the result as below

Final conclusion
You have followed the MVVM pattern and by now, you’ve got a good understanding of how KnockoutJS helps you organize the client-side code for a dynamic UI, and how KO observables, bindings, and depedency tracking make it work. The next level you can explore how to integrate client-side code with server-side code.
You can get the sourcecode from the example of the following link : DOWNLOAD
Reference:
Your contribution cannot be approved yet. See the Utopian Rules. Please edit your contribution to reapply for approval.
You may edit your post here, as shown below:
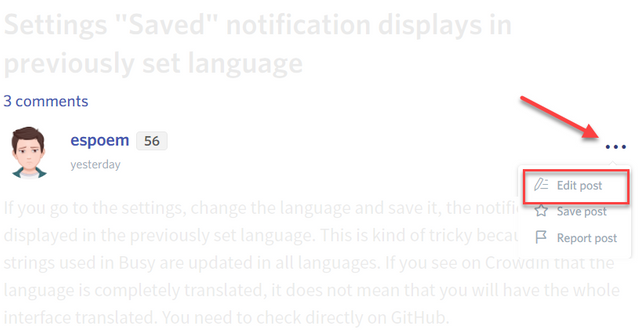
You can contact us on Discord.
[utopian-moderator]
hi @shreyasgune, thanks for the review, I have revised my article, please check it :)
Thank you for the contribution. It has been approved.
You can contact us on Discord.
[utopian-moderator]
thanks for your review
Hey @fahrulhidayat I am @utopian-io. I have just upvoted you!
Achievements
Suggestions
Get Noticed!
Community-Driven Witness!
I am the first and only Steem Community-Driven Witness. Participate on Discord. Lets GROW TOGETHER!
Up-vote this comment to grow my power and help Open Source contributions like this one. Want to chat? Join me on Discord https://discord.gg/Pc8HG9x