Butterknife library for android
Butterknife library is view injection library for android components, use @BindView to replace findViewById() and give parameter view id layout to corresponding view component in layout. From view id the butterknife will find and recognize the view component.
Besides binding view, this library also can use to binding strings, click events listener, drawable and others. In this tutorial i will explain how to use butterknife in various components.
How to add Butterknife in android studio project
To add this library in the project, open app/build.gradle file, then type following dependencies on it, after you added, sync the project.
dependencies {
    compile 'com.jakewharton:butterknife:8.8.1'
    annotationProcessor 'com.jakewharton:butterknife-compiler:8.8.1'
}
Example binding view and onClick with butterknife
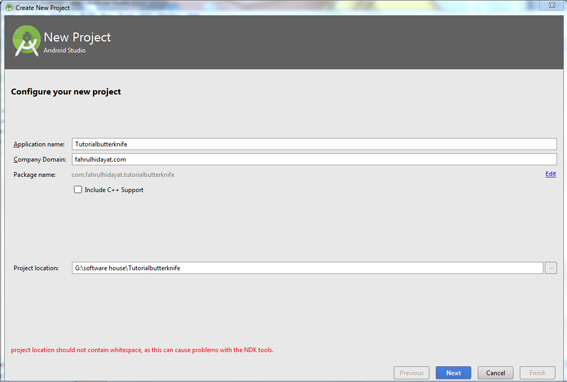
- Create new project from android studio, set the Application name, company domain and package, also don’t forget to targeted project location path. For this tutorial, i have been set my package name "com.fahrulhidayat.tutorialbutterknife". Click next button for next step.
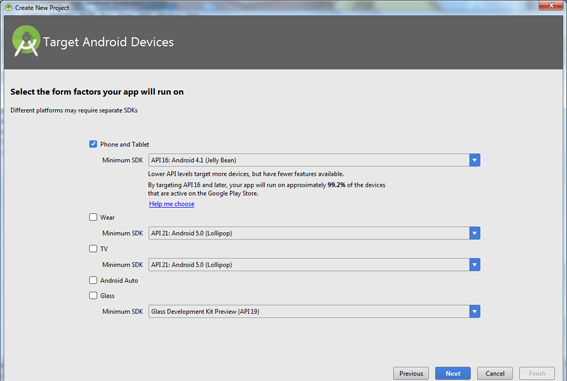
- Second step, set the project for phone and table, just check the box on it, then set Minimum SDK for minimum requirement to run the apps, for this example I choose API 16 because from the statistik it will coverage about 99.2% of the devices that are active on the google play store. Also if you want to run in other platform just check the box according to the platform you want. Click next for next step.
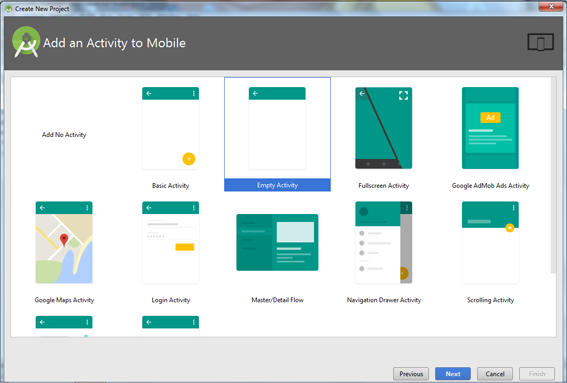
- Android studio give us various template for beginning development. if want to use map on your apps choose google map activity, or want to use drawer menu on the app, we can choose navigation drawer menu, and more options that can help us to start the project. if want to use map on your apps choose google map activity, or want to use drawer menu on the app, we can choose navigation drawer menu, and more options that can help us to start the project. For this tutorial we only need empty activity, make sure you have been selected it, click next to proceed.
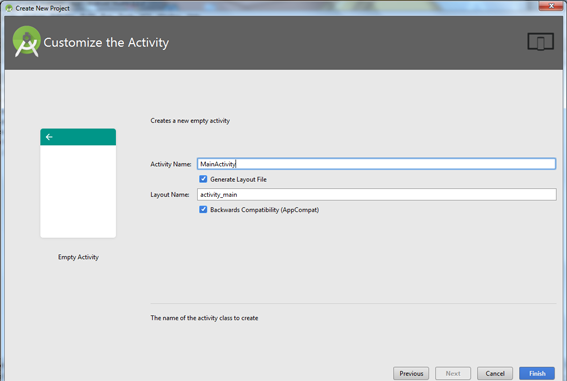
- In this step you can set your activity name and the layout name. For now we use default name that given by android studio, that is “Main activity” for activity name and “activity_name” for the layout name. If you want another name you can type as you wish. Click finish to end the process setup new project and wait until the all structure project open in the android studio IDE.
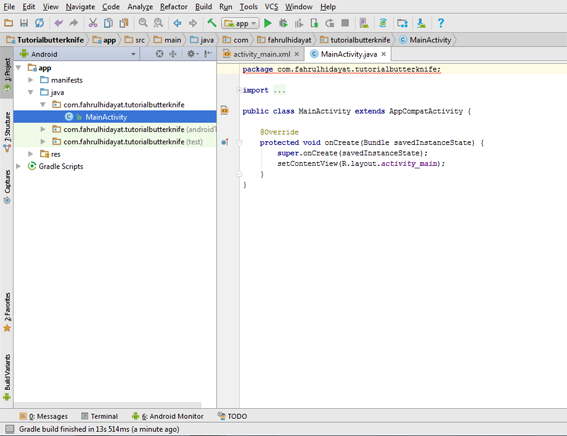
- Here is the structure of android project, the layout xml file and the main activity class is still default script from android. In the left side you can see from top there is manifest file, then directory java contain all class we use in the apps, and directory res contain drawable for picture asset, layout for xml layout file, and resource for strings, colors, dimens and styles.
- Next add the butterknife dependencies in app/build.gradle, read back the above information if you do not already know the butterknife dependencies, Another depedencies script here defaults from the new android project structure, its function for the display style of the application In the left side you can see from top there is manifest file, then directory java contain all class we use in the apps, and directory res contain drawable for picture asset, layout for xml layout file, and resource for strings, colors, dimens and styles., read back the above information if you do not already know the butterknife dependencies, Another depedencies script here defaults from the new android project structure, its function for the display style of the application, click synchronize the project again and wait until the process done, after this step done we already can use the library in our class.
dependencies {
    compile fileTree(dir: 'libs', include: ['*.jar'])
    androidTestCompile('com.android.support.test.espresso:espresso-core:2.2.2', {
        exclude group: 'com.android.support', module: 'support-annotations'
    })
    compile 'com.android.support:appcompat-v7:26.0.0-alpha1'
    compile 'com.jakewharton:butterknife:8.8.1'
    annotationProcessor 'com.jakewharton:butterknife-compiler:8.8.1'
    testCompile 'junit:junit:4.12'
}
7.Let’s change the activity_main layout file with following xml code. here we use linear layout for the parent view, in the layout we fill with 3 view components, there are : TextView with id = “mytitle”, EditText with id = “email” and Button with id = “btnsubmit”. And don't forget set some properties of the view component to make display proportional,
<?xml version="1.0" encoding="utf-8"?>
<LinearLayout
    xmlns:android="http://schemas.android.com/apk/res/android"
    xmlns:tools="http://schemas.android.com/tools"
    android:id="@+id/activity_main"
    android:layout_width="match_parent"
    android:layout_height="match_parent"
    android:paddingLeft="@dimen/activity_horizontal_margin"
    android:paddingRight="@dimen/activity_horizontal_margin"
    android:paddingTop="@dimen/activityclass _vertical_margin"
    android:paddingBottom="@dimen/activity_vertical_margin"
    android:orientation="vertical"
    tools:context="com.fahrulhidayat.tutorialbutterknife.MainActivity">
    <TextView
        android:id="@+id/mytitle"
        android:layout_width="wrap_content"
        android:layout_height="wrap_content"
        android:text="type your id here"
        android:textAllCaps="true" />
    <EditText
        android:id="@+id/email"
        android:layout_width="match_parent"
        android:layout_height="wrap_content" />
    <Button
        android:id="@+id/btnsubmit"
        android:layout_width="match_parent"
        android:layout_height="wrap_content"
        android:layout_marginTop="20dp"
        android:text="enter" />
</LinearLayout>
8.To make the views recognized by the @BindView in the Main activity class we must declare it with the view id (for now we have : mytitle, email and btnsubmit). use setContentView() to direct the main activity class to use layout which we have made before.You can see the declaration structure in these following code, dont forget to import the library for each component. Press alt+enter to automatically import classes needed by the component.
public class MainActivity extends AppCompatActivity {
    @BindView(R.id.mytitle)
    TextView myTitle;
    @BindView(R.id.email)
    EditText myEmail;
    @Override
    protected void onCreate(Bundle savedInstanceState) {
        super.onCreate(savedInstanceState);
        setContentView(R.layout.activity_main);
    }
}
9.Next we must call ButterKnife.bind(this) in onCreate() method, this code for activate the component. use setContentView() to direct the main activity class to use layout which we have made before.You can type it like these following code.
@Override
    protected void onCreate(Bundle savedInstanceState) {
        super.onCreate(savedInstanceState);
        setContentView(R.layout.activity_main);
        ButterKnife.bind(this);
    }
10.To binding the click event listener, let’s add the program with following code. Here we use @onClick to find and recognize the button component. Below the binding we add listener onButtononClick. For this example if the button is click we use toast.maketext() to display the alert and show some text.
 @OnClick(R.id.btnsubmit)
    public void onButtonClick(View view) {
        Toast.makeText(getApplicationContext(), "You have entered: " + myEmail.getText().toString(),
                Toast.LENGTH_SHORT).show();
    }
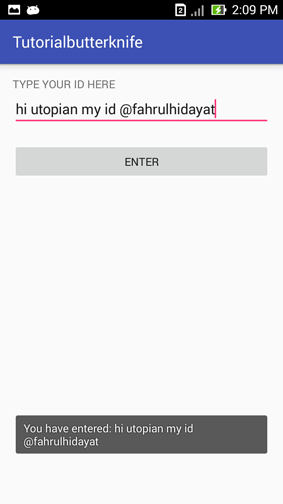
11.Let’s run this project on the phone, the result is like the following image. Here we see when the button is click, then the alert will display text according to what we type in EditText view.
Example using Butterknife in Fragment
1.In general way to use Butterknife for fragment is same with view, only here we must add inflated view as parameter for ButterKnife.bind() method. And also we need unbind the view in OnDestroyView() because the lifecycle method. First declaration variable and binding in main class of fragment. Then make fragment constructor below it.
public class fahrulFragment extends Fragment {
    Unbinder unbinder;
    @BindView(R.id.mytitle)
    TextView myTitle;
    @BindView(R.id.btnsubmit)
    Button btnSubmit;
    @BindView(R.id.email)
    EditText myEmail;
    public FahrulFragment() {
        //  constructor
    }
}
2.Then add the ButterKnife.bind() method with parameters at onCreateView() method like the following code, we use variable unbinder to save the function butterknife.bind().
@Override
    public View onCreateView(LayoutInflater inflater, ViewGroup container, Bundle savedInstanceState) {
        // Inflate the layout for this fragment
        View view = inflater.inflate(R.layout.testfragment, container, false);
        // bind view using butter knife
        unbinder = ButterKnife.bind(this, view);
        return view;
    }
3.And also we need unbind the view in OnDestroyView() because the lifecycle method of the fragment, this to make sure when the apps close, bindings that have been used before is destroy. you can type the following code
@Override
    public void onDestroyView() {
        super.onDestroyView();
        // unbind the view to free some memory
        unbinder.unbind();
    }
Example for android studio resources
We can use @BindString for strings, @BindDrawable for drawables, @BindDimen for dimensions and @BindColor for colors. See example declaration structure for android resources below to use it on your project.
@BindView(R.id.shoplogo)
ImageView imageShop;
 @BindView(R.id.your_name)
TextView yourName;
@BindDrawable(R.mipmap.ic_launcher)
Drawable applicationLogo;
@BindColor(R.color.colorPrimary)
int colorTitle;
Conclusion
In this tutorial I have been give you example to use ButterKnife for binding view, fragments and resources. With this library we can improve the efficiency of the code in the view declaration. So from now use this library on your project and see how much time you can spend for your family because your coding time is more efficient. In the end of this tutorial we must thank to the butterknife developers to make it open source.
Resources :
Homepage : jakewharton.github.io/butterknife/
Posted on Utopian.io - Rewarding Open Source Contributors
Thank you for the contribution. It has been approved.
You can contact us on Discord.
[utopian-moderator]
thanks for your review :)
Hey @fahrulhidayat I am @utopian-io. I have just upvoted you!
Achievements
Suggestions
Get Noticed!
Community-Driven Witness!
I am the first and only Steem Community-Driven Witness. Participate on Discord. Lets GROW TOGETHER!
Up-vote this comment to grow my power and help Open Source contributions like this one. Want to chat? Join me on Discord https://discord.gg/Pc8HG9x