Build a dockerized LNMP environment by portainer / 通过portainer搭建docker化的LNMP环境
Portainer is a simple UI management for docker. It's easy to use and all your resources will show you friendly. It's very light especially using a VPS which has only 512MB RAM.
In this tutorial, we will make a LNMP server over the docker container by Portainer.
What Will I Learn?
- You will learn how to setup
portainer - You will learn how to create a custom network with the
docker - You will learn how to create a
container
Requirements
- Ubuntu 16.04 (64-bit)
- Base bash knowledge
- Base docker knowledge
- Built a normal LNMP environment before
Difficulty
- Intermediate
Tutorial Contents
Setup Portainer
1.Create a volume to save the portainer data. You also can bind a folder.
$ docker volume create portainer_data
2.Run the Portainer docker.
$ docker run -d -p 9000:9000 --name portainer -v /var/run/docker.sock:/var/run/docker.sock -v portainer_data:/data --restart always portainer/portainer
-dmeans run as daemon-p 9000:9000means making a port map. Portainer needs port 9000 opening.-v /var/run/docker.sock:/var/run/docker.sockThis parameter is important if you want portainer to manage your local docker.
3.Visit http://localhost:9000 in your browser and input your username and password to create the administrator user.

4.In next step select the Local option and press Connect button to finish setup.

5.When you see the main page, the installation is over.

Create a new network
The container link is out of date now. The portainer doesn't support the container link any more. So we need to create a new bridge network and bind static IPs to every container we create. Then each container can communicate with each other through the static IPs.
1.Get in the Networks page and click the Add network button.

2.Input the required information like the snapshot and then click the Create the network button.

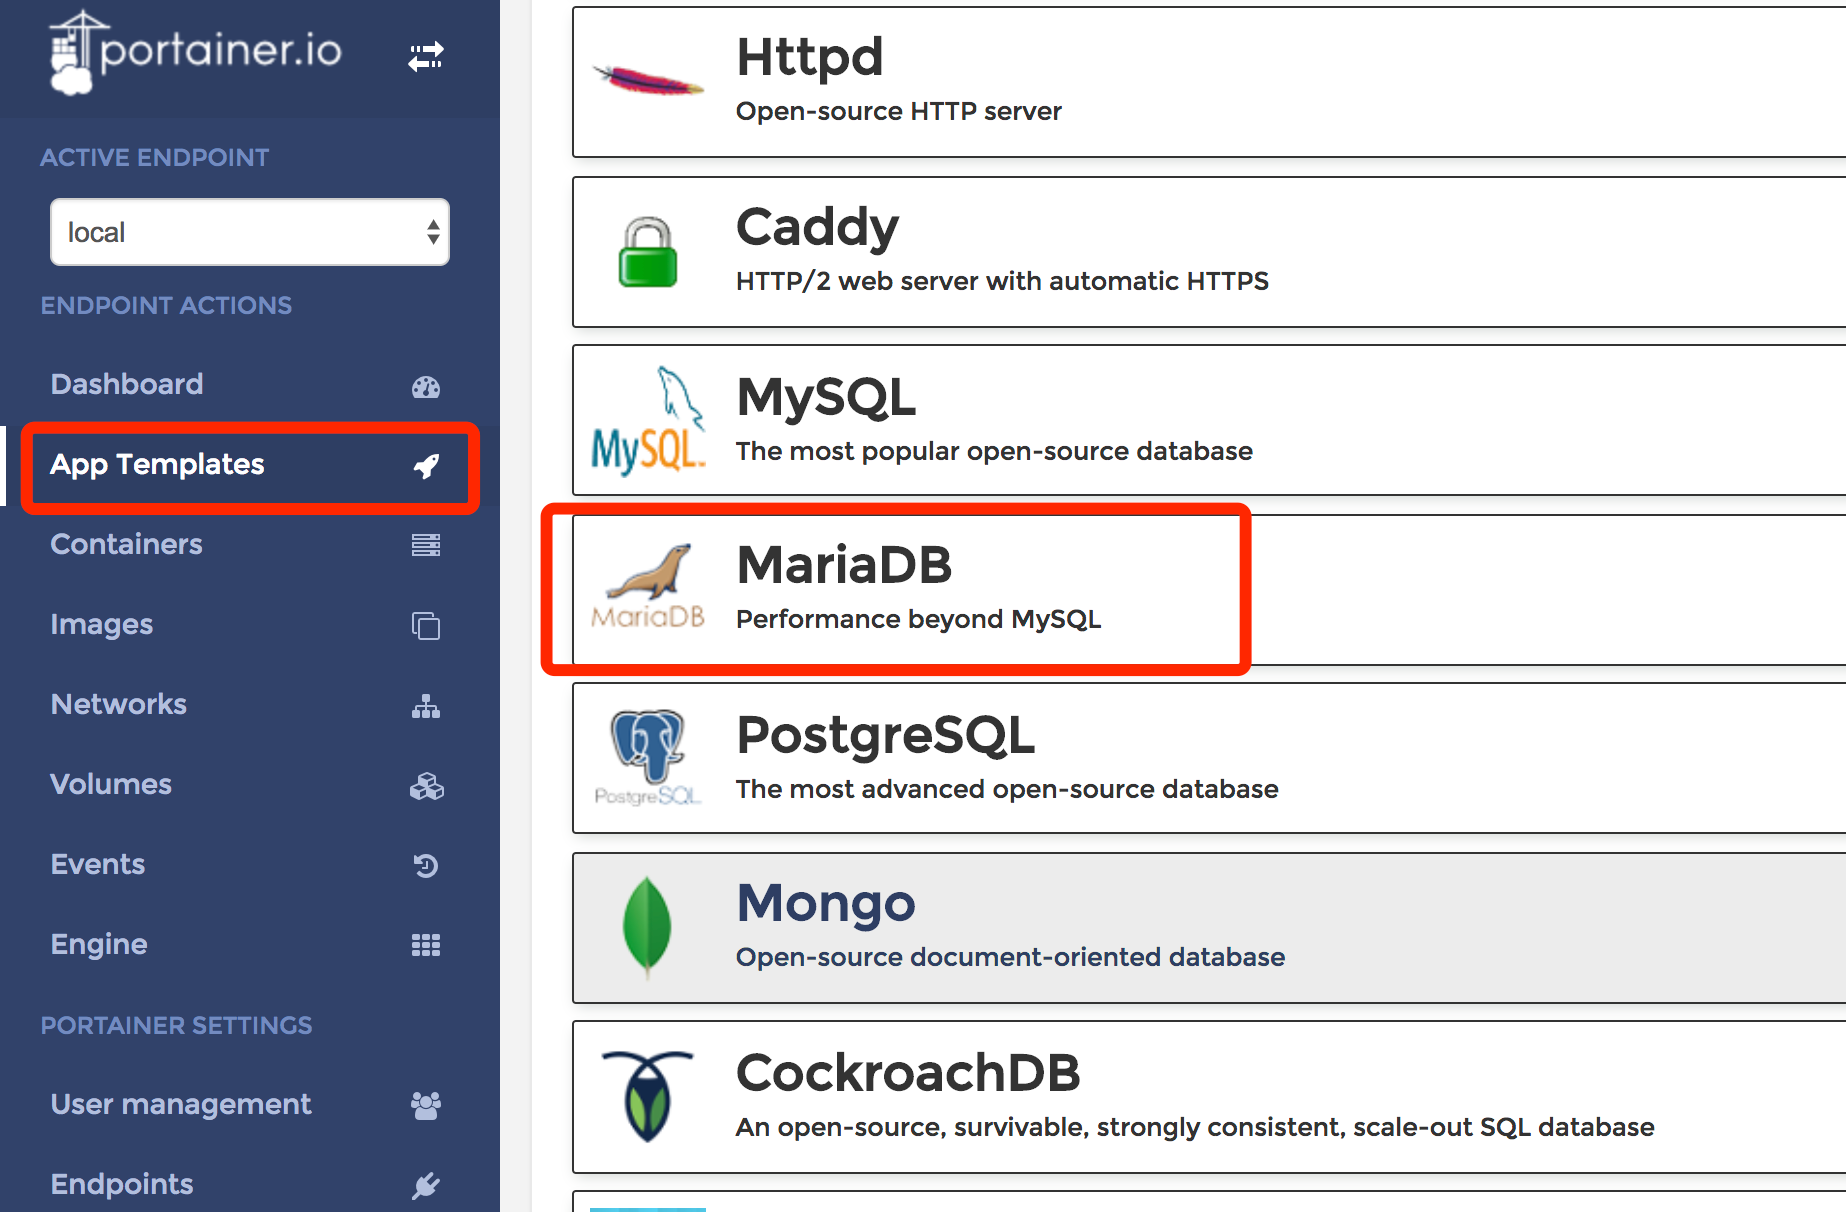
Add MariaDB container
In this tutorial, we use the App Template to create the MariaDB container.
1.Create a folder to storage the MariaDB database file
$ sudo mkdir -p /data/mariadb
2.Enter the App Template page and select the MariaDB option.
3.Input required information with snapshot (When you clicked the Deploy the container button, you need waiting a while. Because docker is pulling the portainer image.)

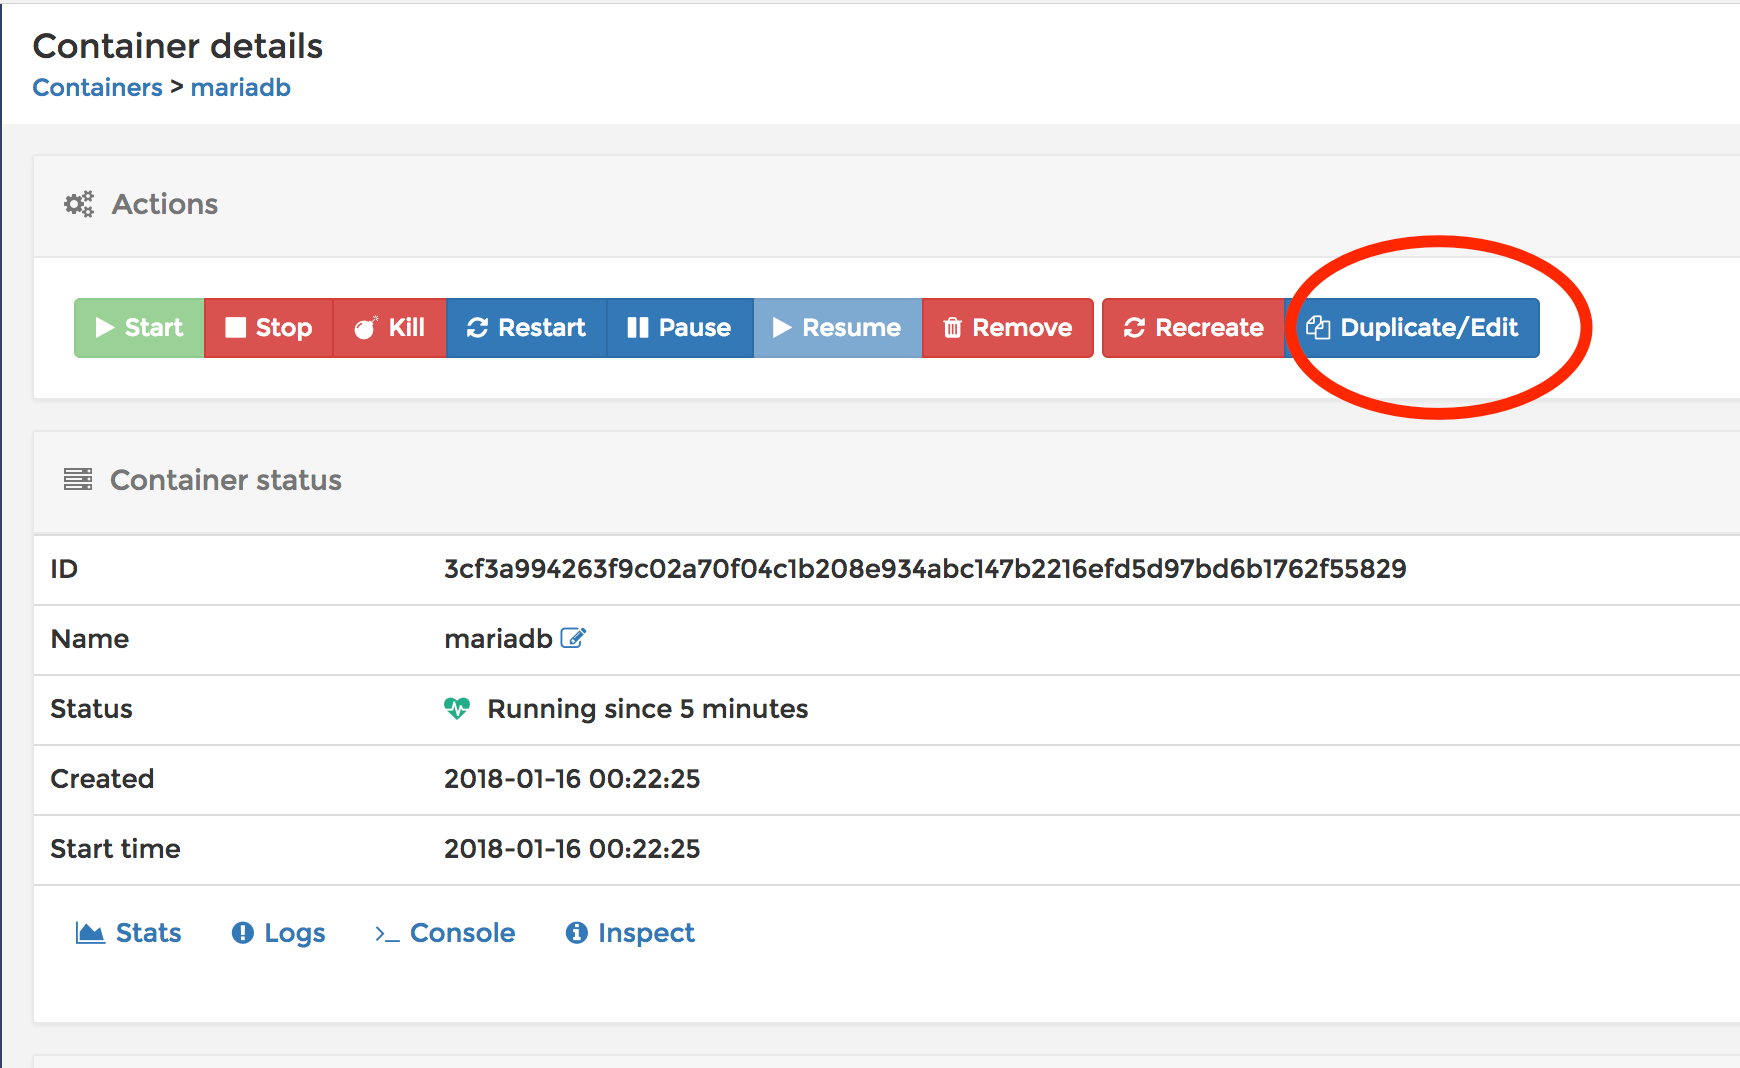
4.Because the App Template doesn't set the static IP, we need set it with editing the container configurations manually. Open the container detail page:

5.Click the Duplicate/Edit button
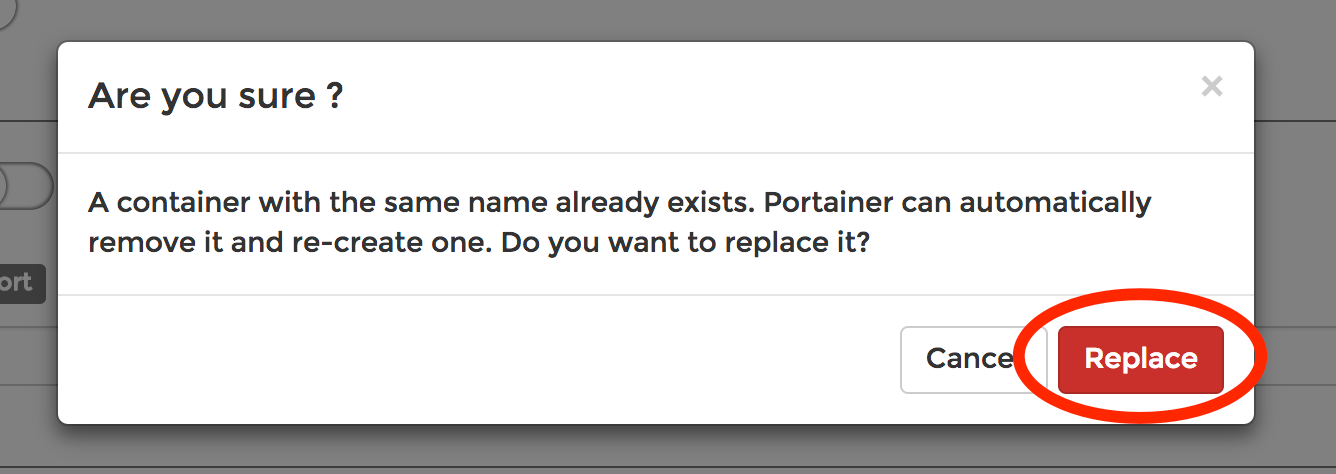
6.Find the Advanced container settings section, select the Network tab, input a static IP into the IPv4 address, click Deploy the container.

7.Portainer will mention you whether if to replace the original container. Click Replace.
8.If we want to connect to the database on the host, we can run this command
$ docker run -it --rm --name mariadb_client --network mynet mariadb /usr/bin/mysql -h 172.20.0.2 -uroot -p
--network mynetis needed. You must put the client container into your MariaDB server container's network.--rmwill destroy this client container when it ends.
OR
$ docker exec -it mariadb /usr/bin/mysql -h 172.20.0.2 -uroot -p
Add nginx container
In this example, we use the App Template to create the nginx container.
1.Deploy a nginx container from App Template and bind container /data to host /data.

2.Open the Containers list and find the container you just created and click the third icon to get in the container console.

3.Run this command to copy nginx configurations to your host.
# cp -r /etc/nginx /data

4.On the host terminal run this command
$ sudo cp -r /data/nginx /etc/nginx
5.Edit the exist nginx container with these snapshots


Add a php-fpm7 container
1.Create a php-fpm7 image
I refer to this repo to create the image. This image is based on Alpine so it's light enough.
$ git clone https://github.com/Yavin/docker-alpine-php-fpm.git
$ cd docker-alpine-php-fpm
2.Edit the php-fpm.conf:
[www]
user = nobody
group = nobody
listen = [::]:9000
chdir = /data/wwwroot  # Change the chdir
pm = dynamic
pm.max_children = 5
pm.start_servers = 2
pm.min_spare_servers = 1
pm.max_spare_servers = 3
catch_workers_output = Yes
3.Build image
$ docker build -t php-fpm7:latest .
4.Add a new container

5.Configure step by step with thees snapshots:


Final Config
1.At last, we need to edit the /etc/nginx/conf.d/default.conf on host like this:
$ sudo vim /etc/nginx/conf.d/default.conf

server {
    listen       80;
    server_name  localhost;

    location / {
        root   /data/wwwroot/default;
        index  index.html index.htm index.php;
    }

    # pass the PHP scripts to FastCGI server listening on 127.0.0.1:9000
    location ~ \.php$ {
        root           /data/wwwroot/default;
        fastcgi_pass   172.20.0.4:9000;
        fastcgi_index  index.php;
        fastcgi_param  SCRIPT_FILENAME $document_root$fastcgi_script_name;
        include        fastcgi_params;
    }

}
2.Create index.php for testing
$ sudo mkdir /data/wwwroot/default
$ sudo echo "<?php phpinfo();?>" > /data/wwwroot/default/index.php
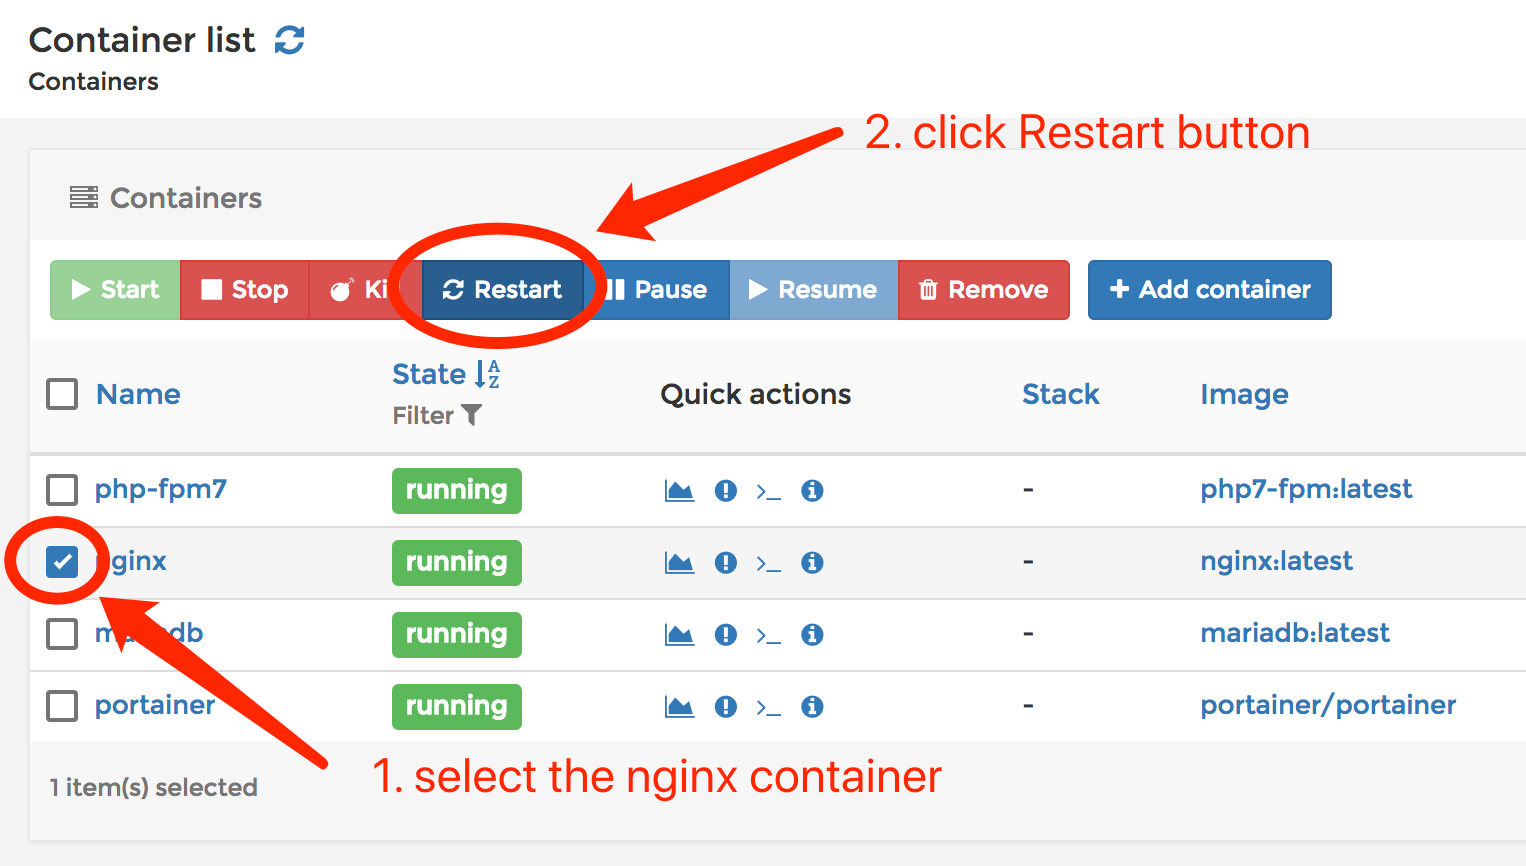
3.Restart nginx container
Visit the test page

Summary
Using dockerized apps is a trend. If you want to run dockerized apps on your personal VPS, Portainer is a good choice. It's easy and light.
Portainer 是一个为 Docker 设计的简易 UI 管理界面. 通过 Portainer 可以轻松管理你的 Docker 的各种资源. 它是轻量级的, 你甚至可以在一台只有 512MB 内存的 VPS 上部署使用.
在这个教程中, 我们将通过使用 Portainer 部署一套 LNMP 环境, 来学习如何使用 Portainer.
将会学到?
- 你将学到如何安装
Portainer - 你将学到如何在
Portainer中创建自定义的网络 - 你将学到如何用
Portainer创建容器
准备工作
- Ubuntu 16.04 (64-bit)
Bash基础知识Docker基础知识- 曾搭建过普通环境的
LNMP
困难度
- 中等
教程内容
安装 Portainer
1.创建一个卷来存储 Portainer 的数据, 你同样也可以使用主机的目录来存储
$ docker volume create portainer_data
2.使用 Docker 运行 Portainer.
$ docker run -d -p 9000:9000 --name portainer -v /var/run/docker.sock:/var/run/docker.sock -v portainer_data:/data --restart always portainer/portainer
-d已后台方式运行-p 9000:9000映射容器9000端口.-v /var/run/docker.sock:/var/run/docker.sock映射出docker socket使Portainer容器可以管理Docker.
3.使用浏览器访问 http://localhost:9000 进入安装界面, 输入用户名和密码完成管理员创建.
4.选择 Local 选项后点击 Connect 按钮完成安装.
5.当你看到管理主页的时候, 安装完成.
创建新的网络
container link 连接容器的方法已经过时了, 并且 Portainer 也不支持 link. 因此为了让容器间可以通讯, 我们需要建立自定义网络, 并手动分配静态IP给每个容器.
1.进入 Networks 页面并点击 Add network 按钮.
2.按照截图提示输入必要信息并点击 Create the network 按钮.
添加 MariaDB 容器
在这个教程中我们使用 App Template 来创建 MariaDB 容器.
1.创建一个目录来存储数据库数据
$ sudo mkdir -p /data/mariadb
2.进入 App Template 页面后选择 MariaDB 选项.
3.按照截图填写配置信息 (当你点击完 Deploy the container 按钮后, 你需要等待一段时间, 因为 Docker 正在后台帮你拉取镜像.)
4.由于 App Template 没有设置静态IP, 我们需要手动配置下. 打开容器的详情页:
5.点击 Duplicate/Edit 按钮
6.找到 Advanced container settings 部分, 选择 Network 选项卡, 在 IPv4 address 中输入一个静态IP, 点击 Deploy the container 完成.
7.Portainer 将会提示你是否替换原有容器. 点击 Replace.
8.如果想在主机上连接访问数据库, 可以执行下面的命令:
$ docker run -it --rm --name mariadb_client --network mynet mariadb /usr/bin/mysql -h 172.20.0.2 -uroot -p
--network mynet这个选项是必须的, 你必须把客户端容器放置在服务端容器的网络中才可以访问到.--rm这个配置可以使这个容器在执行完毕后立即删除.
或者
$ docker exec -it mariadb /usr/bin/mysql -h 172.20.0.2 -uroot -p
创建 Nginx 容器
在本教程中我们使用 App Template 创建 Nginx 容器.
1.从 App Template 中部署一个 Nginx 容器, 并把容器中的 /data 绑定到主机的 /data 上.
2.打开 Containers 列表, 找到你刚才创建的容器并点击第三个图标, 进入容器的 console 界面.
3.执行下面的命令, 把容器中 Nginx 的配置文件复制到主机下.
# cp -r /etc/nginx /data
5.在主机上执行下面的命令
$ sudo cp -r /data/nginx /etc/nginx
6.按照截图的指示修改容器配置, 完成 Nginx 容器部署
创建 php-fpm7 容器
1.创建一个 php-fpm7 的镜像
我参考了这个 repo 来创建镜像. 这个镜像的好处是基于 Alpine 创建, 非常轻量.
$ git clone https://github.com/Yavin/docker-alpine-php-fpm.git
$ cd docker-alpine-php-fpm
2.修改 php-fpm.conf:
[www]
user = nobody
group = nobody
listen = [::]:9000
chdir = /data/wwwroot  # 修改 chdir
pm = dynamic
pm.max_children = 5
pm.start_servers = 2
pm.min_spare_servers = 1
pm.max_spare_servers = 3
catch_workers_output = Yes
3.构建镜像
$ docker build -t php-fpm7:latest .
4.创建新容器
5.按照截图一步一步操作, 完成容器创建:
最后的配置
1.最后我们需要修改下主机上的 Nginx 配置文件 /etc/nginx/conf.d/default.conf:
$ sudo vim /etc/nginx/conf.d/default.conf

server {
    listen       80;
    server_name  localhost;

    location / {
        root   /data/wwwroot/default;
        index  index.html index.htm index.php;
    }

    # pass the PHP scripts to FastCGI server listening on 127.0.0.1:9000
    location ~ \.php$ {
        root           /data/wwwroot/default;
        fastcgi_pass   172.20.0.4:9000;
        fastcgi_index  index.php;
        fastcgi_param  SCRIPT_FILENAME $document_root$fastcgi_script_name;
        include        fastcgi_params;
    }

}
2.创建一个测试首页 index.php
$ sudo mkdir /data/wwwroot/default
$ sudo echo "<?php phpinfo();?>" > /data/wwwroot/default/index.php
3.重启 Nginx 容器
在浏览器中访问测试页面
总结
使用 Docker 化应用是一个趋势. 如果你想在你的个人 VPS 上运行 Docker 化的应用, Portainer 是一个不错的选择, 因为它使用简单并且轻量.
Posted on Utopian.io - Rewarding Open Source Contributors
utopian也是我喜欢的项目,一起支持一下!
哈喽!cn区点赞机器人 @cnbuddy 谢谢你对cn区的贡献。让我们携手努力,共同促进cn区快速发展。更多cn区动态,请留意我的主页。如果我打扰到你,请回复“取消”。
Thank you for the contribution. It has been approved.
You can contact us on Discord.
[utopian-moderator]
感觉技术型的文章没有人看啊!
恩,我也是这么觉得,不过作为个人积累的话,写一写对自己有好处~
Hey @ety001 I am @utopian-io. I have just upvoted you!
Achievements
Suggestions
Get Noticed!
Community-Driven Witness!
I am the first and only Steem Community-Driven Witness. Participate on Discord. Lets GROW TOGETHER!
Up-vote this comment to grow my power and help Open Source contributions like this one. Want to chat? Join me on Discord https://discord.gg/Pc8HG9x