How to create a QR Code generator Android application using Android Studio
What Will I Learn?
- You will how to create a QR generator application using android studio.
Requirements
- Android studio must be installed.
- Knowledge in Java.
Difficulty
- Intermediate
Tutorial Contents
In this series of tutorials, we are going to be developing an android application that will be centered around QR code.
A QR code (quick response code) is a type of 2D bar code that is used to provide easy access to information through a smartphone.
Source - https://whatis.techtarget.com/definition/QR-code-quick-response-code.
Firstly, We will create the QR code generator and in my next tutorial we will be creating the QR code scanner which will clearly intepret the QR code.
Without further ado, lets jump into development:
Next a layout file is created in the activity_main.xml file an editted to look like this:
The layout is mainly has a linearLayout as its root layout which arranges views in a row either horinzonatally or vertically.
- Then five editiext children views are created to receive the first name, last name, email, phone number, and address with the ids -
first_name, last_name, email, phone_number respectively and then a button with the id generate-qr_btn which when clicked the details from the edittext will be gotten and then a QR code will be generated and then it will be displayed in the last children view which is an ImageView with the id - image_view.

Now we move to the interesting part which is the coding part , below is the mainActivity.java file that the activity_main.xml is tied to.
Firslty, a list of BindViews which is possible using the butterknife dependency -
@BindView(R.id.image_view)
ImageView imageView;
@BindView(R.id.first_name)
EditText firstName;
@BindView(R.id.last_name)
EditText lastName;
@BindView(R.id.email)
EditText Email;
@BindView(R.id.phone_number)
EditText PhoneNumber;
@BindView(R.id.address)
EditText Address;
Secondly, is an Onclick injectiion also through the help of the butterknife injection -
@OnClick(R.id.generate_qr_btn)
public void onViewClicked() {
initQRCode();
}
The onclick method is tied to the R.id.generate_qr_btn which is in our activity_main.xml file which whenn clicked fires up the initQRCode() method which is explained below.
initQRCode()
private void initQRCode() {
        String name = "Name : "+firstName.getText().toString() +" "+lastName.getText().toString();
        String email = "Email: "+Email.getText().toString();
        String phonenumber = "Phone: "+PhoneNumber.getText().toString();
        String address = "Address: "+Address.getText().toString();

        StringBuilder textToSend = new StringBuilder();
        textToSend.append(name+" | "+email+" | "+phonenumber+" | "+address);
        MultiFormatWriter multiFormatWriter = new MultiFormatWriter();
        try {
            BitMatrix bitMatrix = multiFormatWriter.encode(textToSend.toString(), BarcodeFormat.QR_CODE, 600, 600);
            BarcodeEncoder barcodeEncoder = new BarcodeEncoder();
            Bitmap bitmap = barcodeEncoder.createBitmap(bitMatrix);
            imageView.setImageBitmap(bitmap);
            imageView.setVisibility(View.VISIBLE);

        } catch (WriterException e) {
            e.printStackTrace();
        }
    }
A series of String variables are declared to get the details of the user as entered into the edittext in the activity_main.xml file.
i.e - the name variable is used to concatenate the firstname and lastname entered by the user by using the code - firstName.getText().toString+" "+lastName.getText().toString() and same with the other string variables that gets the email, phonenumber and address.
Next a StringBuilder varibale is created called textToSend which will be used to concatenate the values of the string variables (name, email, phonenumber, address).
The string variables are later appended to the textToSend variable along with a bar symbol (|).
Next,a Multiformater object is created which is used in encoding the bitMatrix object in the next line with the content of what is to be encoded, the format as specified in BarcodeFormat.QR_CODE and then the width and height as specifiec in the 600, 600.
Next a BarcodeEncoder object is created and used to create a bitmap using the bitMatrix object explained above.
Lastly, the ImageView is set with a bitmap object and the the visibility is set to visible because in the activity_main.xml file its visiblity was set to gone, meaning that at the beginning of the application , the imageView wont be seen but once a user clicks the create a QR code, the QR code is created and the ImageView is set to true.
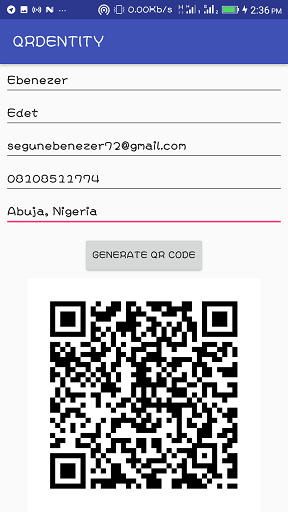
QR CODE Sample.
Full code of MainActivity.java
package com.semanientreprise.qridentity;
import android.graphics.Bitmap;
import android.os.Bundle;
import android.support.v7.app.AppCompatActivity;
import android.view.View;
import android.widget.EditText;
import android.widget.ImageView;
import com.google.zxing.BarcodeFormat;
import com.google.zxing.MultiFormatWriter;
import com.google.zxing.WriterException;
import com.google.zxing.common.BitMatrix;
import com.journeyapps.barcodescanner.BarcodeEncoder;
import butterknife.BindView;
import butterknife.ButterKnife;
import butterknife.OnClick;
public class MainActivity extends AppCompatActivity {
@BindView(R.id.image_view)
ImageView imageView;
@BindView(R.id.first_name)
EditText firstName;
@BindView(R.id.last_name)
EditText lastName;
@BindView(R.id.email)
EditText Email;
@BindView(R.id.phone_number)
EditText PhoneNumber;
@BindView(R.id.address)
EditText Address;

@Override
protected void onCreate(Bundle savedInstanceState) {
    super.onCreate(savedInstanceState);
    setContentView(R.layout.activity_main);
    ButterKnife.bind(this);
}

private void initQRCode() {
    String name = "Name : "+firstName.getText().toString() +" "+lastName.getText().toString();
    String email = "Email: "+Email.getText().toString();
    String phonenumber = "Phone: "+PhoneNumber.getText().toString();
    String address = "Address: "+Address.getText().toString();

    StringBuilder textToSend = new StringBuilder();
    textToSend.append(name+" | "+email+" | "+phonenumber+" | "+address);
    MultiFormatWriter multiFormatWriter = new MultiFormatWriter();
    try {
        BitMatrix bitMatrix = multiFormatWriter.encode(textToSend.toString(), BarcodeFormat.QR_CODE, 600, 600);
        BarcodeEncoder barcodeEncoder = new BarcodeEncoder();
        Bitmap bitmap = barcodeEncoder.createBitmap(bitMatrix);
        imageView.setImageBitmap(bitmap);
        imageView.setVisibility(View.VISIBLE);

    } catch (WriterException e) {
        e.printStackTrace();
    }
}

@OnClick(R.id.generate_qr_btn)
public void onViewClicked() {
    initQRCode();
}
}
Full code of activity_main.xml file.
<EditText
    android:layout_width="match_parent"
    android:layout_height="wrap_content"
    android:hint="First Name"
    android:inputType="text"
    android:id="@+id/first_name"
    />

<EditText
    android:layout_width="match_parent"
    android:layout_height="wrap_content"
    android:hint="Last Name"
    android:id="@+id/last_name"
    />
<EditText
    android:layout_width="match_parent"
    android:layout_height="wrap_content"
    android:hint="Email"
    android:inputType="textEmailAddress"
    android:id="@+id/email"
    />
<EditText
    android:layout_width="match_parent"
    android:layout_height="wrap_content"
    android:hint="Phone Number"
    android:inputType="phone"
    android:id="@+id/phone_number"
    />

<EditText
    android:layout_width="match_parent"
    android:layout_height="wrap_content"
    android:inputType="text"
    android:hint="address"
    android:id="@+id/address"
    />

<Button
    android:layout_width="wrap_content"
    android:layout_height="wrap_content"
    android:text="Generate QR Code"
    android:id="@+id/generate_qr_btn"
    android:layout_gravity="center_horizontal"
    android:layout_marginTop="10dp"
    />

<ImageView
    android:layout_marginTop="5dp"
    android:visibility="gone"
    android:id="@+id/image_view"
    android:layout_width="wrap_content"
    android:layout_height="wrap_content"
    android:layout_gravity="center_horizontal"
    />
Depenedencies
compile 'com.jakewharton:butterknife:8.8.1'
annotationProcessor 'com.jakewharton:butterknife-compiler:8.8.1'
compile 'com.google.zxing:core:3.2.1'
compile 'com.journeyapps:zxing-android-embedded:3.2.0@aar'
Posted on Utopian.io - Rewarding Open Source Contributors
Unfortunately, I have to reject this tutorial.
The tutorial consists nothing but "copy-paste this code to make it work" which we do not accept here on Utopian.
You can check other similar tutorials to see what we accept.
Need help? Write a ticket on https://support.utopian.io.
Chat with us on Discord.
[utopian-moderator]