Android Application to load user profiles using node server (express,steem,body parser packages) in Android Studio
What Will I Learn?
- How to create an Android application that loads users profile in recyclerview.
Requirements
- Javascript Knowledge
- Java Knowledge.
Difficulty
- Intermediate
Table of Contents
- Server Setup
- Android application Creation
- Application testing
- App execution images
Server Setup
In this tutorial we will be using the node.js server which can ge gotten from here (https://nodejs.org/dist/v8.11.1/node-v8.11.1-win-x64.zip) and some packages like express,body-paser and steem.
So first step is to go into the desired directory where you will be working from and then open a command window there.
run the following commands:
"npm install" - this will install all the necesary packages
or you can install them individually :npm install express -g
npm install steem --save
npm install -g nodemon
which will install express,body-parser and steem and remember all this commands must be ran in the folder where you intend to have your javascript file created.
After a succesful installation,create a new javascript file, for the essence of this tutorial we would call the name of the file postHandler.js.
Edit the postHandler.js to have the following contents:(explanations can be see in the comments(//))
const express = require('express'); //an express object is created which will be used to get post request from the android application once created
const bodyParser = require('body-parser'); //a bodyparser object is created here which will be used to parse the request from the android application
const steem = require('steem'); //a steem object is created which we will be using to gain access to the steem api from which we would be making our api calls.
let app = express();
var urlencodedParser = bodyParser.urlencoded({extended : false});
// Function to handle the root path to which the application will call to.
app.post('/postdata',urlencodedParser ,async function(req, res) {
//Three variables are defined below which will hold the value of the three usernames that will be spent by the application
//From the code below, we get the sent arguements from the req.body variable using req.body.variable name.
let username = req.body.fname;
let username2 = req.body.sname;
let username3 = req.body.tname;
//a varable whatIsThis is initialized as a function which is a promise and then the array variable is sent after the result is gotten with the line res.send(fulfilled) as seen below.
var whatIsThis = function () {
showOff(username,username2,username3)
.then(function (fulfilled) {
res.send(fulfilled);
})
.catch(function (error) {
console.log(error.message);
});
};
//the whatIsThis() function is called here.
whatIsThis();
});
//here the server is set to listen on port 8080 and when its all set, a message is displayed on the console
let server = app.listen(8080, function() {
console.log('Server is listening on port 8080')
});
//a function showOff is decleared here which is a promised and the three variables gotten from the server is passed as the argument
var showOff = function (account,account2,account3) {
try {
return new Promise(
function (resolve, reject) {
var reply;
var mainResult = [];
            //an array called accounts is initialized with the arguments passed into the function it self.(showOff)
            accounts = [account,account2,account3];

            //a for each method on the array accounts is written here which will be sent as the argument to the steem.api.getAccounts() method which will get details about the users from which we will filter the results and send the neccessary details to the application
            accounts.forEach(function (element,index){
                steem.api.getAccounts([element], function(err, result) {

                //An if statement is used to check if the result sent has an array object to it, else the user doesnt exist.
                    if (result.length == 0) {
                        reply = "This user doesnt exist";
                        //the code below sends the reply varibale decleared above as the result of the promise
                        resolve(reply);
                    }
                    else{

                    //The meta varibale is initialized as an array and its values are gotten from splitting the .json_metadata variable using "," as a delimeter.
                        var meta = result[0].json_metadata.split("\",\"");

                        //the variable rank is initialized with the result gotten from calling the steem.formatter.reputation() method with the .reputation variable gotten from the result variable.
                        var rank = steem.formatter.reputation(result["0"].reputation);

                        //the below variables are initialized to null.
                        var name,image,about = null;

                        //a for loop is used to loop through the elements in the meta array.
                      for(i = 0; i < meta.length ; i++){

                      //the image variable is initialized with the elements that contains the words profile_image"
                        if (meta[i].includes("profile_image\""))
                          image = meta[i];

                      //the name variable is initialized with the elements that contains the words name"
                        if (meta[i].includes("name\""))
                          name = meta[i];

                      //the about variable is initialized with the elements that contains the words about"
                        if (meta[i].includes("about\""))
                          about = meta[i];
                    }

                    //finally, the three variables(image,name,about) are initialized from substrings as explained below
                    image = image.substring(image.indexOf("http"));
                    name = name.substring(name.indexOf("\":\"") + 3);
                    about = about.substring(about.indexOf("\":\"") + 3);

                    //the reply variable is initialized as an object that contains, link,rank,image,name and about of a user which will be sent to the application.
                    reply = {"link":element,"rank":rank,"image":image,"name":name,"about":about};

                    }

                    //the reply object is pushed to the mainResult array variable which will in turn be sent to the application when the final array element sent to the steem.api.getAccount() has finished.
                    mainResult.push(reply);
                    if (index === accounts.length - 1) {

                    //the mainResult array is sent to the caller
                        resolve(mainResult);
                    }
                });
        });
        }
    );
  }
catch (error) {
    console.log(error.message);
}
};
Android application Creation
After creating a java application, head to the gradle file, the app level and add the following dependencies which will be used in the application:
//picasso used to load the user profile image
compile 'com.squareup.picasso:picasso:2.5.2'
//retrofit used to send request to the server with the neccesarry arguements.
compile 'com.squareup.retrofit2:retrofit:2.1.0'
compile 'com.squareup.retrofit2:converter-gson:2.1.0'
compile 'com.squareup.okhttp3:okhttp:3.3.1'
//butterknife used to inject views
compile 'com.jakewharton:butterknife:8.8.1'
annotationProcessor 'com.jakewharton:butterknife-compiler:8.8.1'
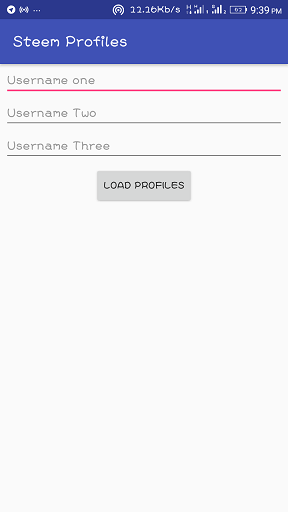
Next, in your main activity xml file which should be activity_main.xml by default will be used to create a layout that looks like this:

Three EditText elements are created where the user will enter three steemit usernames and also a button is created where the user can click inorder to load the user details.
The last child element of the layout file is a recylerview which will be used to show the details of the users gotten from the server and its visibility is set to gone in the line - android:visibility="gone" because we want the recyclerview to be visible only when the details of the users are gotten.
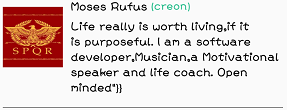
Next, create a layout called user_layout which will be used as a layout sample which will be how all the details of the users will be displayed.
The layout will end up looking like this:

Next create a java class file which will be a okHttpClient which will have detials of the client, I will try my best to explain the codes below:
static OkHttpClient okHttpClient = new OkHttpClient().newBuilder()
        .connectTimeout(120, TimeUnit.SECONDS) //timeout seconds here
        .readTimeout(120, TimeUnit.SECONDS) //readtime out here
        .writeTimeout(120, TimeUnit.SECONDS) //writetimout here
        .retryOnConnectionFailure(true) //to retry on connection is set to true.
        .build(); //this statement builds the client

public static Retrofit retrofit = null;

//a gson client object is decleared
public static Gson gson = new GsonBuilder()
        .setLenient()
        .create();

public static Retrofit getClient(){
    if(retrofit == null){
        retrofit = new Retrofit.Builder()
        //since we are using localhost, the url of my localhost is used here so that the application can connect correctly,
                .baseUrl("http://192.168.43.244:8080/")
                //the client decleared above is set as the client for retrofit
                .client(okHttpClient)
                .addConverterFactory(GsonConverterFactory.create(gson))
                .build();
    }
    //the retrofit obejct is returned
    return retrofit;
}
Next, create a service file which will be used to send the details to the server, note that the name of the fields must correspond to the names also in the server i.e fname,sname and tname.
@FormUrlEncoded
    //this line of code indicates that we will be sending a post request with the /postdata url of the server.
    @POST("/postdata")
    //the below code inidicates that the result gotten will be a list of UserDetails class which will be explained later.
    Call<List<UserDetails>> getUserDetails(

    //Three string variables are sent to the server with the field name fname,sname,tname.
            @Field("fname") String usernameOne,
            @Field("sname") String usernameTwo,
            @Field("tname") String usernameThree
    );
Next, create a UserDetails java class file which is a model of how the result from the server be returned to the application which just contains a bunch of strings and its getters and setters methods as sens below:
public class UserDetails {
String name;
int rank;
String image;
String about;
String link;
public String getLink() {
    return link;
}

public void setLink(String link) {
    this.link = link;
}

public String getName() {
    return name;
}

public void setName(String name) {
    this.name = name;
}

public int getRank() {
    return rank;
}

public void setRank(int rank) {
    this.rank = rank;
}

public String getImage() {
    return image;
}

public void setImage(String image) {
    this.image = image;
}

public String getAbout() {
    return about;
}

public void setAbout(String about) {
    this.about = about;
}
}
Next, create an array adapter file and edit its content as below, minimal explanation of the codes will be done here:
private List arrayList;
private Context context;
//CustomItemClickListner is used to initialize an onClick on the recyclerview elements.
CustomItemClickListener listener;
public UserProfileAdapter(List<UserDetails> arrayList, Context context, CustomItemClickListener listener) {
    this.arrayList = arrayList;
    this.context = context;
    this.listener = listener;
}

@Override
public UserProfileViewHolder onCreateViewHolder(ViewGroup parent, int viewType) {
//the user_layout file is inflated here which serves as a sample as explained above
    View view = LayoutInflater.from(parent.getContext()).inflate(R.layout.user_layout, null);
    final UserProfileViewHolder userProfileViewHolder = new UserProfileViewHolder(view);
    view.setOnClickListener(new View.OnClickListener() {
        @Override
        public void onClick(View v) {
            listener.onItemClick(v, userProfileViewHolder.getAdapterPosition());
        }
    });

    return userProfileViewHolder;
}

@Override
public void onBindViewHolder(UserProfileViewHolder holder, int position) {
    holder.displayName.setText(arrayList.get(position).getName());
    holder.displayLink.setText("("+arrayList.get(position).getLink()+")");
    holder.about.setText(arrayList.get(position).getAbout());

    //here, we firstly check to ensure that the each array element recieved is not empty and if so, picasso loads the image in the specified id with the width and height of 150 for each.
    if(!arrayList.get(position).getImage().isEmpty()){
        Picasso.with(context).load(arrayList.get(position).getImage())
                .resize(150,150)
                .into(holder.profileImage);
    }
}

@Override
public int getItemCount() {
    return arrayList.size();
}

class UserProfileViewHolder extends RecyclerView.ViewHolder {
    @BindView(R.id.image) ImageView profileImage;
    @BindView(R.id.display_name) TextView displayName;
    @BindView(R.id.display_link) TextView displayLink;
    @BindView(R.id.about) TextView about;

    public UserProfileViewHolder(View itemView) {
        super(itemView);
        ButterKnife.bind(this, itemView);
    }
}
Finally, yes Finally I said we would be joining everything together in the java class file to which the activity_main.xml file is tied to, content of the file is below and explanations are done in comments (//)
//Views are being injected here using the butterknife dependency which can be done by putting your cursor on the activity_main.xml file and pressing alt+ins if you are using a mac and then click the generate butterknife injection option and then click the confirm button on the next dialog thats being shown.
@BindView(R.id.usernameone)
EditText usernameone;
@BindView(R.id.usernametwo)
EditText usernametwo;
@BindView(R.id.usernamethree)
EditText usernamethree;
@BindView(R.id.users_recView)
RecyclerView usersRecView;
//a List of the class UserDetails called userdetails is decleared here
private Call<List<UserDetails>> userdetails;

//a recyclerview layout manager which will be used to inidacate how the recylerview will be displayed is decleared here
private RecyclerView.LayoutManager userDetailsLayoutManager;

//a recycler adapter called userDetailsAdapter is delared here which will be an object of the UserDetailsAdapter class.
private RecyclerView.Adapter userDetailsAdapter;

@Override
protected void onCreate(Bundle savedInstanceState) {
    super.onCreate(savedInstanceState);
    setContentView(R.layout.activity_main);
    ButterKnife.bind(this);

    //a method called initMethod() where the neccesary initialization will be done.
    initMethod();
}

private void initMethod() {
//the layout manager is set to be a vertical layout meaning that the elements of the recyclerview will be displayed vertically which is from top to bottom.
    userDetailsLayoutManager = new LinearLayoutManager(this, LinearLayoutManager.VERTICAL, false);

//the recycler view layout manager is set to the userDetialsLayoutManager variable decleared above.
    usersRecView.setLayoutManager(userDetailsLayoutManager);
    usersRecView.setHasFixedSize(true);
}

//this method is being injected by the butterknife dependency which is being fired once the user clicks the button on the activity_main.xml layout.
@OnClick(R.id.load_profiles_btn)
public void onViewClicked() {

    //an APISERVICE object is created here
    APISERVICE service = ApiClient.getClient().create(APISERVICE.class);

    //the userdetials variable is initialized with the service decleared above and its used to instanciate the getUserDetails method decleared in the APISERVICE java class file as explained above with the entered text into the three edittext in the layout file.
    userdetails = service.getUserDetails(usernameone.getText().toString(), usernametwo.getText().toString(), usernamethree.getText().toString());

    //a retrofit call is made here and the onResponse method will be called upon success of the call and the onFailure method is called if an error occurs
    userdetails.enqueue(new Callback<List<UserDetails>>() {
        @Override
        public void onResponse(Call<List<UserDetails>> call, Response<List<UserDetails>> response) {

        //an if statement is used to check if the response code sent back is 200 which indicates success and also to check to ensure that the reponse.isSucceessful()
            if (response.code() == 200 && response.isSuccessful()) {

            //Once the call is succesful, a variable called rowListItem is initialzed with the reponse which is gotten from response.body and then its later sent as the array used to initialize the userDetialsAdapter which is an object of the UserProfileAdapter class
                final List<UserDetails> rowListItem = response.body();

                userDetailsAdapter = new UserProfileAdapter(rowListItem, MainActivity.this, new CustomItemClickListener() {
                    @Override
                    public void onItemClick(View v, int position) {
                        //call to the method to show the dialog containing the details
                        //of the user
                        loadUserDetailsInBrowser(rowListItem,position);
                    }
                });

                //the recycler view is set with the above adapter
                usersRecView.setAdapter(userDetailsAdapter);

                //the recycler view's visibility is set to visible as in the layout file we set it's visibility to gone.
                usersRecView.setVisibility(View.VISIBLE);
            }
        }

        @Override
        public void onFailure(Call<List<UserDetails>> call, Throwable t) {
            Log.d("USERDETAILS", t.getMessage());
        }
    });

}
Application testing
To test the application, firstly ensure your local server is running, ensure you start the node server using the command -
nodemon postHandler.js
provided you named your javascript file as told earlier.
next, ensure that your phone and your pc are on the same network and ensure you include the permission to access the internet in your manifest file - <uses-permission android:name="android.permission.INTERNET" /> below the manifest tag.
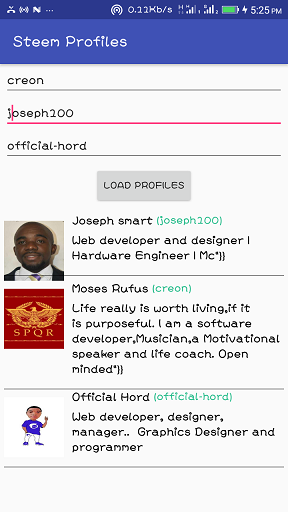
Then input the user names in the edittext and then click the load profiles button which loads the details of the users.
App execution images:

Sorry for the long tutorial, but I know it was worth it.
Posted on Utopian.io - Rewarding Open Source Contributors
Your contribution cannot be approved because it does not follow the Utopian Rules/Guidelines.
Violated Rule(s)/Guideline(s):
The writing style should be formal and informative.
The writing style should be professional and clear.
Submissions presenting content creation and simple on-screen instruction will be rejected.
Submissions containing substantial instruction in ubiquitous functions (Save, Open, Print, etc.) or basic programming concepts (variables, operators, loops, etc.) will be rejected.
My Opinion(s):
Need help? Write a ticket on https://support.utopian.io.
Chat with us on Discord.
[utopian-moderator]
Hey @yokunjon, I just gave you a tip for your hard work on moderation. Upvote this comment to support the utopian moderators and increase your future rewards!
You have a minor misspelling in the following sentence:
It should be necessary instead of necesary.