Firebase firestore in the forum application #5: Get User data from Sign-in and Cloud Firestore
Repository
What Will I Learn?
- Get User data from Sign-in
- Use Cloud Firestore
- Structure of users collection
Requirements
- Basic Javascript
- Install Firebase
Resources
- Firebase-https://firebase.google.com/
Difficulty
Basic
Tutorial Content
Let's continue with our next tutorial, this tutorial is a series of tutorials that we have worked on before. there are some features that we have made, we have completed our sign-in method, namely by using Facebook, Gmail and Twitter. This tutorial is a follow-up action after we have successfully signed with the method mentioned earlier. here we will manage and register the data of users who have signed in with the method. Okay, we just start this tutorial.
Data user that has been signed-in
In this section, we will register or save data for users who have signed in to our application. As we discussed earlier, in this tutorial we will use firebase firestore as its database system, for those of you who don't know what Frestore is you can visit the documentation here. To use the Firestore database there are a number of steps that we must do. the following are the steps:
- Create a database in Firebase console
to use the database at Firestore you must first create it in your Firebase console. There are two types of databases in Firebase, namely real-time database and cloud firestore. In this tutorial, I will use cloud firestore. for more details you can see in the picture below:
You can see in the picture above, Firebase will automatically generate the name of the database, you can see in the picture above we have generated a database like this forum-firebase-b3205. well, here we have succeeded in creating the database, then we will add the Firestore dependency to the forum application that we have created.
- Add collection
In firestore, we don't know what a table is, what we use in Firestore is a collection. now this collection functions more or less like a table in the MySQL database. I will create a collection of users, in the users collection I will save users who have signed in to our application. For more details you can see the picture below:
I will enter fake data so you can see how the database structure is created, when entering data automatically we will be given generate ID as a marker of the data we have input.
- Add Rules
After we create collections and data in the document, I will add rules to this database. rules are used as settings of your database to manage who can create or read data. For more details you can see in the picture below:
service cloud.firestore {
  match /databases/{database}/documents {
    match /users/{document=**} {
      allow read, create: if request.auth != null;
    }
  }
}
We see in the picture above, that we allow all users to read data allow read. but to write our data requires the user to be in a logic state first create: if request.auth != null. We can detect whether the user is logged in or not with request.auth.
- Add Firestore dependencies
After we create the database now we will add dependencies to the application we have made. We can add dependencies like the following:
We can add the dependencies in the home.hbs template like this <script type="text/javascript" src="https://www.gstatic.com/firebasejs/6.0.2/firebase-firestore.js"></script>. You can see on the console if an error occurs when importing dependencies.
Store data in Firestore
We have been configuring and creating a Firestore database, now we can use the database in the application that we have created. To use it we have to use an instance of firestore because the database is firestore that we will use. for more details. we can see in the example below:
auth.js
    firebase.auth().signInWithPopup(provider).then(function(result) {
        var token = result.credential.accessToken; // get access token
        var user = result.user // store user data

    }).catch(function(error) {
      console.log(error)
    });
After successfully signing in there are two things that we will save in the first variable which is the token var token = result.credential.accessToken; and the second is data from the user var user = result.user.
Data from users that we will check whether the user is registered or not. If it's not registered in our collection, then we will save the data to the collection users.
- Save data to Firestore
After we save the token and user data then we will store data from the user as follows. What we will do is check whether the user has been registered or not, to check we can see an example like the code below
    firebase.auth().signInWithPopup(provider).then(function(result) {
        var token = result.credential.accessToken;
        var user = result.user

        db.collection('users').doc(user.uid).get() // get user
        .then(function(doc) {
            if(doc.exists) { // is user Exist
                console.log("User exists")
            } else {
                db.collection('users').doc(user.uid).set({
                    name: user.displayName
                });
                console.log("User successfully registered")
            }
        }).
    }).catch(function(error) {
      console.log(error)
    });
to access the Firestore data base we can use an instance of Firestore as we defined above var db = firebase.firestore();. Now we can use the instance via the variable db. and to check whether the user's data has been registered or not, we can access the collection and User ID db.collection('users').doc(user.uid).get().
If the user exists. This function is a promise so we can check whether the user exists by using the exists. If the user is there, I will give a sign by doing a console.log("User exists").
If the user does not exist then we can store user data in our users collection. To store data in a collection we can make the document directly and use user.uid to be the name of the document. Because user.uid is a unique value representing one user. We can see examples like the following:
later the name of the document in the user collection is user.uid. Now that we have made the document. How do we enter the value of the document contents ?.
We will use the set () function to give data to the document, the set function will store data in the form of an object. as we can see in the code below:
auth.js
db.collection('users').doc(user.uid).set({
        name: user.displayName
});
We can see in the example code above, the data we will store in the document is the value that comes from user.displayName with key name: user.displayName. For more details we can see in the picture below below:
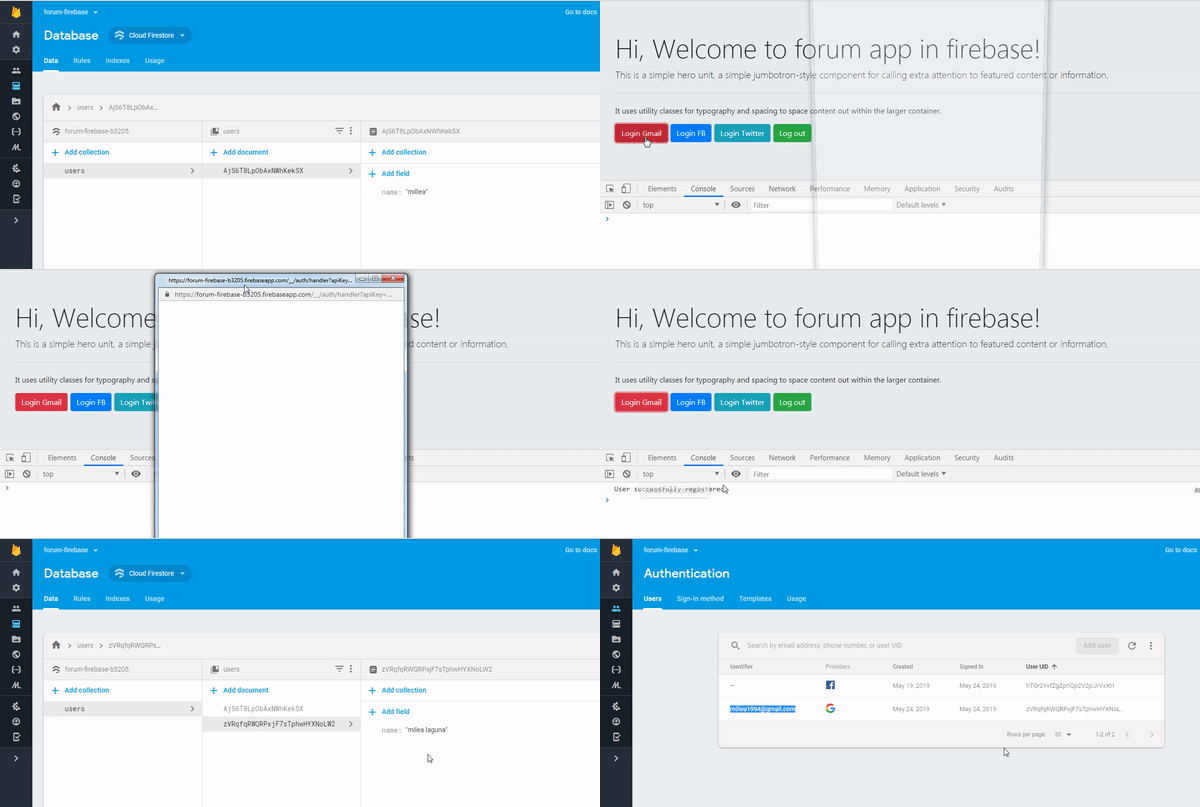
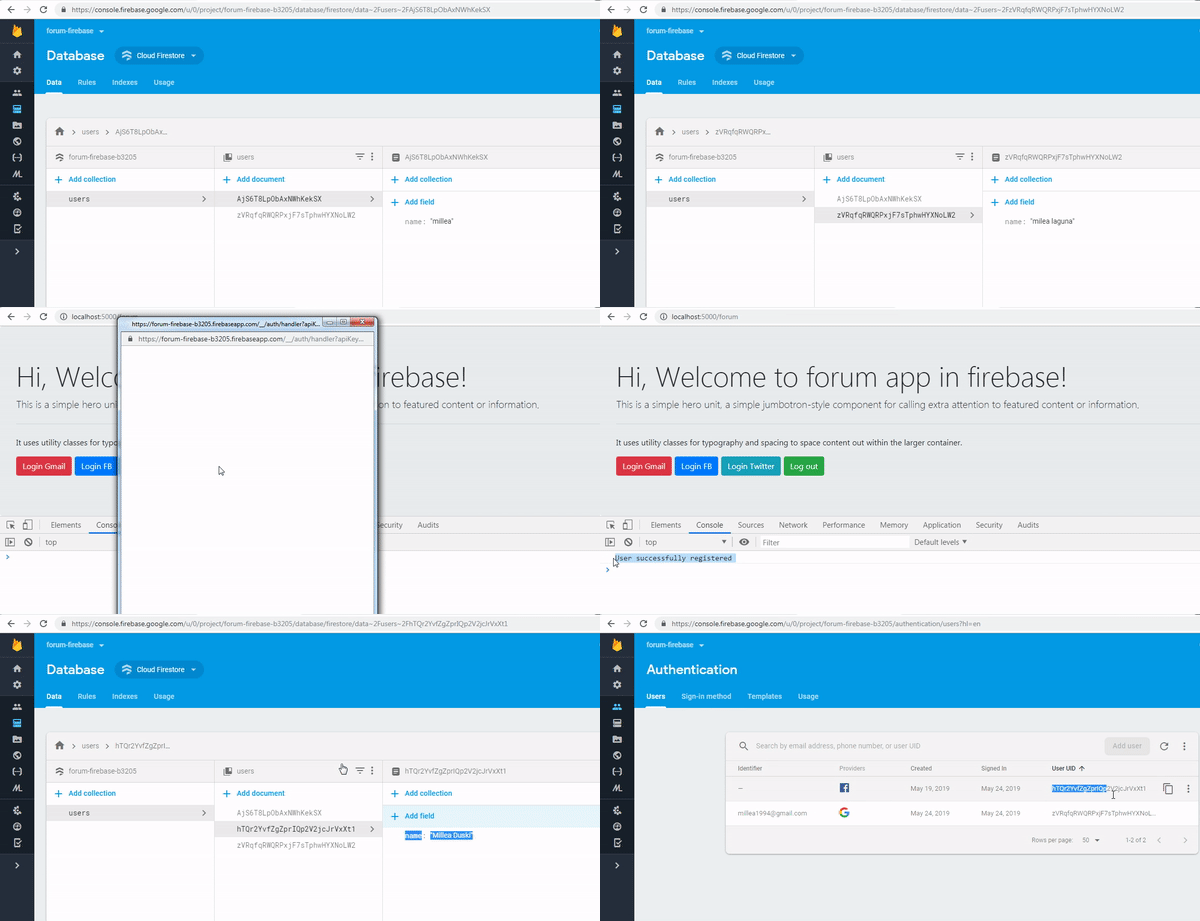
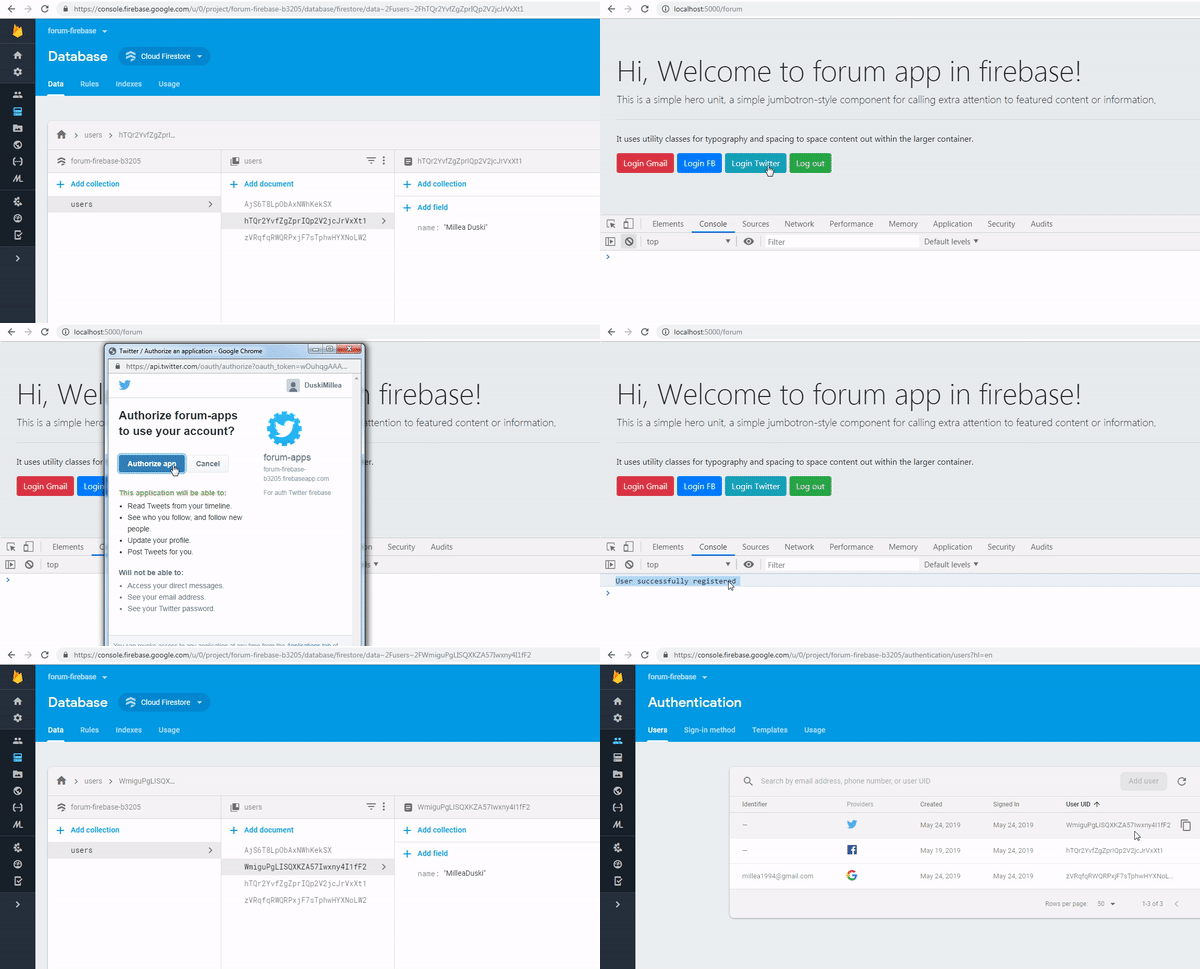
Now we will implement it on the application that we have made. I will try to add data to people who have signed in with one method from Facebook, Gmail or Twitter. The following is the demonstration.
Sign with Gmail
The first time I will use Gmail to sign in and see the following demonstration:
We can see in the picture above we have generated the document id from the user.uid user who has signed in
Sign with Facebook
Then we can see Sign-in via Facebook, The following is a demonstration if we use the Facebook sign-in method.
Sign with Twitter
Then we will see a sign-in by using the Twitter method, the following is the demonstration:
We have successfully stored the data of users who have signed in with the *Facebook, Gmail and Twitter methods. in the next section, we will create new features in the application forum.
Curriculum
- Forum app

.gif)
.gif)
.gif)
Thank you for your contribution @duski.harahap.
After reviewing your contribution, we suggest you following points:
Using the first person in the tutorials makes it difficult to understand the tutorials. We suggest using the third person in your text.
Nice work on the explanations of your code, although adding a bit more comments to the code can be helpful as well.
In the sections of your code please ident the code.
Thank you for your work in developing this tutorial.
Looking forward to your upcoming tutorials.
Your contribution has been evaluated according to Utopian policies and guidelines, as well as a predefined set of questions pertaining to the category.
To view those questions and the relevant answers related to your post, click here.
Need help? Chat with us on Discord.
[utopian-moderator]
Thank you for your review, @portugalcoin! Keep up the good work!
Hey, @duski.harahap!
Thanks for contributing on Utopian.
We’re already looking forward to your next contribution!
Get higher incentives and support Utopian.io!
Simply set @utopian.pay as a 5% (or higher) payout beneficiary on your contribution post (via SteemPlus or Steeditor).
Want to chat? Join us on Discord https://discord.gg/h52nFrV.
Vote for Utopian Witness!