Create BOT terminal with Jquery#2 : Create Database and add AJax process, Connect the database, Display data
Repository
https://github.com/jquery/jquery
What Will I Learn?
- Create Database and add AJax process
- How to connect the database with BOT
- Show the data in frontend
Requirements
- Html, CSS, javascript
- Install Jquery and basic Jquery
- Localserver (Xampp, Wampp, or etc)
Resources
- jQuery - https://github.com/jquery/jquery
Difficulty
Basic
Tutorial Content
This tutorial is an advanced tutorial from the bot terminal that we created in the previous tutorial. in this tutorial, we will use our bot to relate to the database. We will assign our bot to perform queries related to our database. for that, I will create a database that we can use to test our bot. we start this tutorial by preparing to create a database.
Create database
We will start by creating a simple database. I will create a database with the name data_bot and I will make table lessons. The following is the table structure.
- Table structure
| Name | Type | Length/value | Index |
|---|---|---|---|
| id | int | 10 | Primary |
| title | varchar | 200 | -- |
| description | varchar | 200 | -- |
We will create a simple table containing 3 columns, namely id, title, and description. we will later use this database with data so we can use it as an example material.
- Code lessons.sql
to make that table, you can run the .sql code below.
CREATE TABLE IF NOT EXISTS `lessons` (
  `id` int(100) NOT NULL,
  `title` varchar(200) NOT NULL,
  `description` varchar(200) NOT NULL,
   PRIMARY KEY (`id`)
) ENGINE=InnoDB DEFAULT CHARSET=latin1;
- Add sample data
then we can make dummy data to fill in the fields. the following is the sql query
INSERT INTO lessons (title, description) VALUES ('tutorials','tutorials category in utopian'), ('graphics','graphics design in utopian');
We have set up the database that we will use in the terminal bot now we switch again to the project code that we created
Create a new command key
We will make a new command key to be recognized by the BOT. previously we have created a key that is open which we have made in the previous tutorial. in the command key this time we will create a new command key that is db. We can implement it as follows.
$('#terminal').on('keyup', '.input',function(e){
            if(e.keyCode == 13){
                var value = $(this).val().trim().split(' ');
                if( value == ''){
                    doResponse("Command not recognized")
                }else{
                    if(value[0] == "open"){
                        openLink(value[1])
                    }else if(value[0] == "db"){
                           ## Youre code here.....
                    }
                }
                commandBot()
            }
        });
- As we have seen in the previous tutorial
value [0]is the first word of the sentence we do functionvar value = $(this).val().trim().split(' ');. Therefore we can useelse if(value[0] == "db")there is our code.
- Request Ajax to access DB
We will make an ajax request when the db key command is executed by the bot. we can use ajax as follows.
if(value[0] == "open"){
    openLink(value[1])
}else if(value[0] == "db"){
       $.post("api/index.hp", { command: value[0], table:value[0] },
        function(response){
                ## Response should be in the data
       });
 }
We can use jquery ajax and use the post method
$.post()with the post method we have three mandatory parameters that is the URL, the data you want to post, and the callback method to see the response."api/index.hp"the first parameter that contains the URL of the endpoint that we want to use. We will make the backend in the next section.{ command: value[0], table:value[0] }the second parameter which contains the data we post to the backend in the form of a JSON. the keys of JSON arecommandandtable.Then the callback function to receive a response from the backend
function(response){ }.
Create Backend for BOT
We have created the code for the request to the api/index.php endpoint. But we haven't made the backend yet, we can start by creating a folder that we adjust to the endpoint api/index.php.
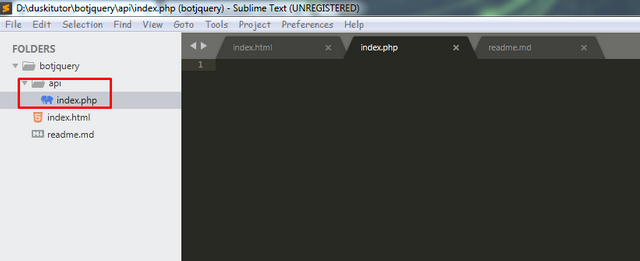
The backend file directory as above we can see I created a folder called API and in the index.php file.
api/index.php
<?php
header('Content-Type : application/json');
$conn = mysqli_connect('localhost','root', '',  'data_bot');
//get the json key
$command  = $_POST['command'];
$table  = $_POST['table'];

getTable($table);

// create a function
function getTable($table){
  global $conn;
  $sql = "SELECT * FROM $table";
  $result = mysqli_query($conn,$sql);
  echo json_encode(mysqli_fetch_all($result, MYSQLI_ASSOC));
}
Set the header content type : Because we will send data in json form we have to set content-type to Json
header('Content-Type : application/json');.Make a connection to database: We made the
data_botdatabase connection, this tutorial I used the MySQL database driver. Here's how to do the connection$conn = mysqli_connect('hostname','username', 'password', 'database');Accept JSON parameter: In the ajax section when we do post
$.post()the object parameters with command and table keys. So to accept it we can do it like this$_POST['key'];
Create SQL Query: We can create a SQL query to retrieve data from the database. We can do it like this
"SELECT * FROM $table";, We make the query dynamic by using the$tableparameter that we get from$table = $_POST['table'];and pass on the functionfunction getTable($table){}.Execute the query: We can execute the query using
$result = mysqli_query($conn,$sql);and pass two parameters, those are connection ($conn) and query($sql).JSON Encode: We can make a value in the form of JSON using the
json_encode ()method.
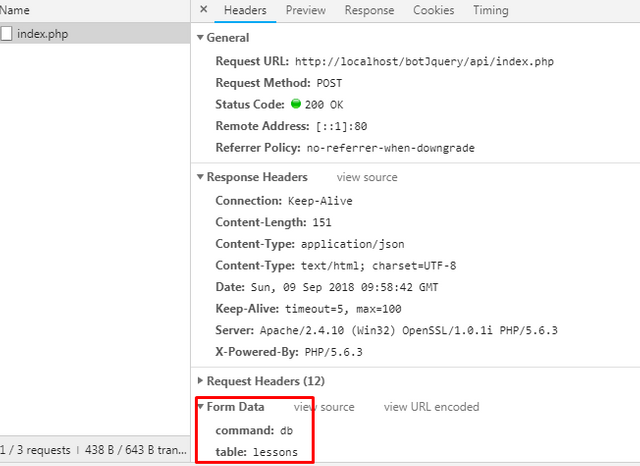
Noted: You must run your localhost first because we will connect to my database using the local Xampp server.

If there is no error then we will see like the picture above, the results we get in the form of JSON.
Show the output in Frontend
We have created a function in the backend to do the Ajax process. now our final task is to release data and convert it into data that can be read by the Bot which means the data is no longer in JSON. As we see on the frontend side, We see that the result of the ajax process is in the callback function.
$.post("api/index.php", { command: value[0], table:value[1] },
    function(response){
  // All data in response
});
- Show the data
We have got all the responses we want in the callback response parameter function(response){}. Because the data is more than one. We need to loop the data. Here's how
$.post("api/index.php", { command: value[0], table:value[1] },
    function(response){
        for (var i = 0; i < response.length; i++) {
                    doResponse(response[i].title);
                 }
  });
We can do
for ()data based on the length of data in responseresponse.length.to extract the data we need to access the index array first then the key of the object we want to display like this
doResponse(response[i].title);. We can run our localhost to see the results as follows:
as we see in the picture above. after we do the ajax process, the results of the process are above the command line. the command line should be below the results of Ajax.
- Display title and description
If we want to extract the contents of another column we can access the column name. such as the following.
$.post("api/index.php", { command: value[0], table:value[1] },
        function(response){
    for (var i = 0; i < response.length; i++) {
        doResponse('The title is '+response[i].title+ "and description is "+ response[i].description);
    }
});
- Change the code structure
We will make a little change so that the bug like the picture above can be resolved. we only need to move the commandBot() function after the ajax process was completed.
$.post("api/index.php", { command: value[0], table:value[1] },
    function(response){
    for (var i = 0; i < response.length; i++) {
            doResponse(response[i].title);
        }
   commandBot();
});
We put the commandBot() function in the callback method and after the for() function, to make sure the ajax process is complete. the following is the result:
We have successfully connected the BOT terminal with our database by using the db command key, we have taught our BOT to recognize the key. thank you for following this tutorial, I hope this tutorial can help you understand how the functionality of jquery is very broad and can be explored more deeply.
Curriculum
Bot Jquery#1 Preparation, input and output
Hi @duski.harahap!
Your post was upvoted by @steem-ua, new Steem dApp, using UserAuthority for algorithmic post curation!
Your post is eligible for our upvote, thanks to our collaboration with @utopian-io!
Feel free to join our @steem-ua Discord server
Hey, @duski.harahap!
Thanks for contributing on Utopian.
We’re already looking forward to your next contribution!
Get higher incentives and support Utopian.io!
Simply set @utopian.pay as a 5% (or higher) payout beneficiary on your contribution post (via SteemPlus or Steeditor).
Want to chat? Join us on Discord https://discord.gg/h52nFrV.
Vote for Utopian Witness!