Making a Telegram Chat Bot With the TelegramBot Arduino Library and ESP8266 Wifi Module - Tutorial
Introduction
This is a tutorial of an open source Arduino library, which lets you build a “Telegram Bot”, with a ESP8266 Wifi Module, that allows internet connection to Arduino microcontroller. I will show you how to install the library to Arduino IDE and make an example project with the library, throughout this tutorial while giving information what bots are and how do they work.
What Will I Learn?
In this tutorial you will learn:
- General knowledge about bots.
- How to install TelegramBot library to Arduino IDE.
- How to use TelegramBot library and how to use It’s functions.
- How to apply Telegram Bot project using the library functions.
Requirements
This tutorials requirements are:
- Arduino UNO or equivalent microprocessor.
- Arduino IDE (Download here)
- TelegramBot Arduino library (Download here)
- ESP8266 Wifi Module, Breadboard (optional), 4 Jumper Cables.
- Telegram messaging application (Download here)
- Telegram account.
- Telegram bot token (See the steps below to obtain the token).
Difficulty
This tutorials difficulty is:
- Intermediate
Tutorial Contents
What are Bots and How Do They Work
Bots are computer software’s that performs an automated task. There are types of bots such as internet bots, game bots, chat bots, web crawlers, social bots. All bots have different purposes some good, some malicious. Good bots are usually implemented for convenience purposes such as search bots, chat bots or social bots that helps the user. Malicious bots are usually viruses, spam bots or bots that launches DDoS attacks. Most bots work in a different way.
Since we are going to implement a chat bot, I’ll explain how does a chat bot work. A chat bot is a software that communicates with a user, either powered with machine learning or using intelligent rules. First bot type uses machine learning principles to gather the data and learn to communicate from scratch. It does not have a pre planned command, It solely teaches itself. Second type of chat bot is the one that needs certain set of triggers to respond pre planned commands.
Some bots try to imitate human behavior. Image Source (Royalty free)
How to Install TelegramBot Library to Arduino IDE
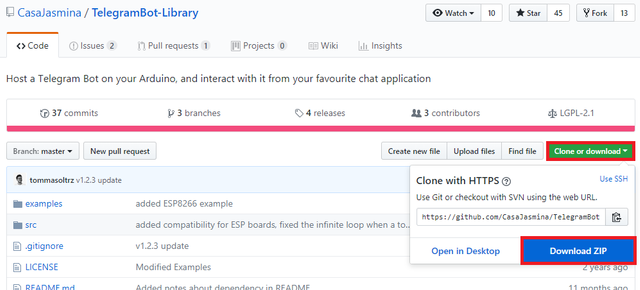
1. Download the library from https://github.com/CasaJasmina/TelegramBot-Library.
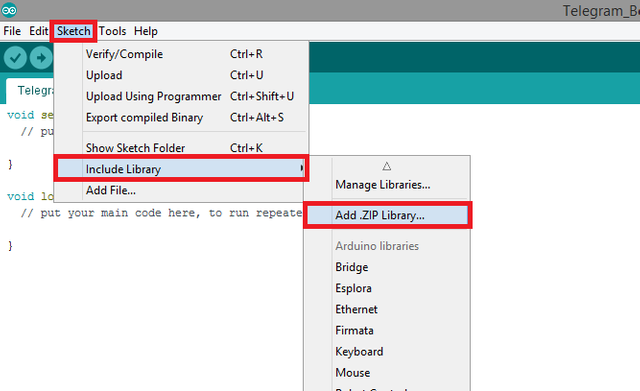
2. Open Arduino IDE. Then go to and select Sketch->Include Library->Add .ZIP Library.
3. Choose TelegramBot-Library-master.zip file and click to Open.
An Example Project Using TelegramBot Arduino Library
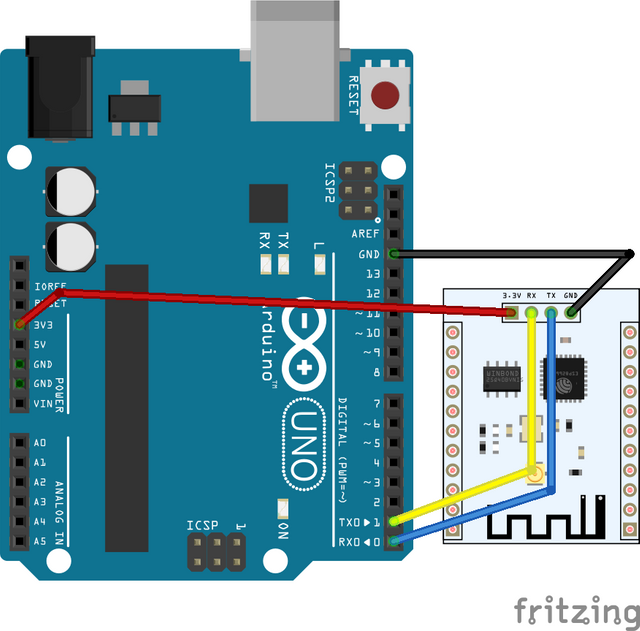
I'll show you step by step how to use the TelegramBot Arduino library with a simple example. In this example project, we will make a Telegram Bot with an Arduino microcontroller, ESP8266 Wifi module. In order to make a Telegram Bot, first we need to obtain an token from Telegram application. Then we need to program the ESP8266 Wifi module to connect to a Wifi network. After that bot should be initialized in ESP8266 Wifi module. See the steps for how to do these actions. Connections for ESP8266 Wifi module to Arduino is shown below. If you don't know how to use ESP8266 Wifi module see my tutorial about using ESP8266 Wifi module.
If you use this library in your other projects please tell in the comments.
Connection diagram for ESP8266 Wifi module to Arduino. Made with Fritzing.
1. In order to create a Telegram bot with a ESP8266 Wifi module, first you must have a telegram account. Sign up to Telegram messaging application If you don’t have an account. Otherwise sign in to your Telegram account.
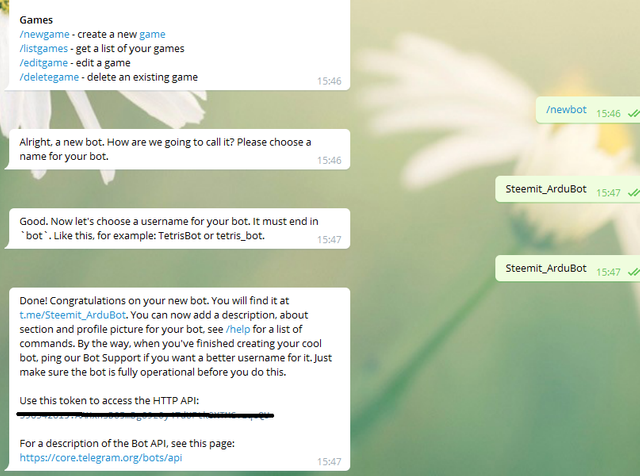
2. For creating the bot you will need a bot token ID, that you can obtain from another Telegram Bot named “BotFather”. Click here to start a conversation with the “BotFather” in the Telegram application. Once you start the conversation bot will give you the commands that you can use. Type “/newbot” to create a new Telegram bot. Then BotFather will ask you for your bots name. Type a name as you desire. Then choose a username that ends with “bot”. Once done, BotFather will give you a token ID. Note this token, you will use it in the next steps.
3. Open a new sketch and save it as "Telegram_Bot”.
4. To add our libraries to our sketch, type #include <ESP8266WiFi.h>, #include <WiFiClientSecure.h>, #include <TelegramBot.h> at the beginning of the code.
5. After adding the libraries, define a string that will hold the bot token. Enter your Telegram bot token obtained from BotFather here. Then create a SSL Client and add the library functions.
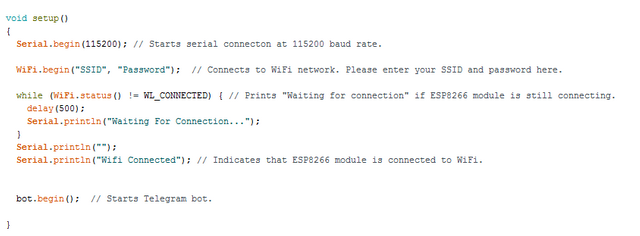
6. In the void setup() function, add the command that starts serial connection at 115200 baud rate. Then add the ESP8266 library function that connects to the Wifi network. Type your networks SSID and password to the function. Add a while loop that will trigger if there is no network connection. Make the loop print "Waiting for connection" if ESP8266 module is still connecting and add a 500ms delay. Then add another print command after the while loop, indicating that ESP8266 module is connected to Wifi network. Add the code that starts the Telegram bot.
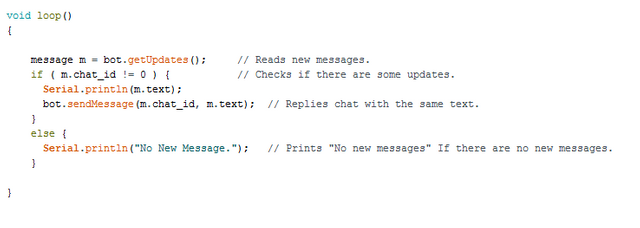
7. In the void loop() function, add the library function that will read the new messages from the Telegram chat. Add an if statement that will trigger if there is a new message in any chat bot have, and make it reply the chat with the same text written to bot. Add an else statement to print "No new messages" If there are no new messages to the Arduino serial monitor.
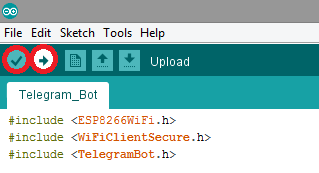
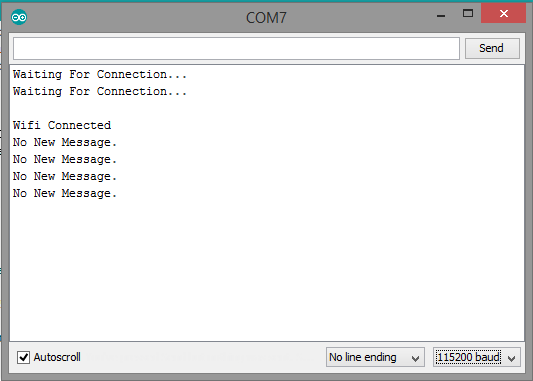
8. Click “Verify” and then “Upload” in order to compile and execute your codes. You should get a serial monitor screen like this. Make sure your COM port and board setting is set right.
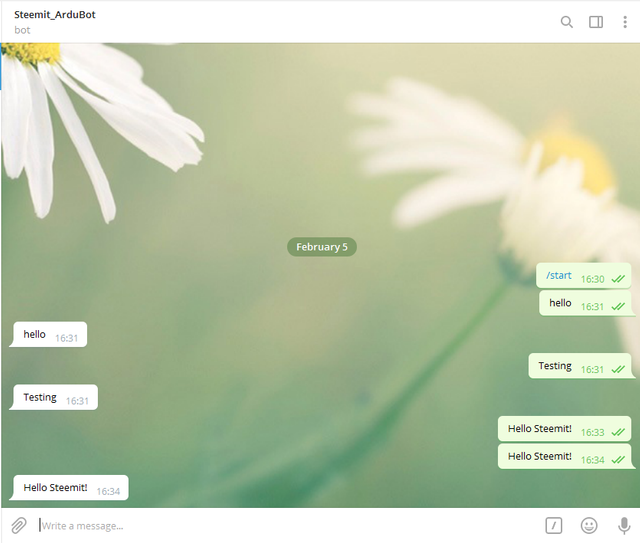
9. Open the Telegram application and start a conversation with you bot. The bot should reply you with the same text you wrote.
Conclusion
In this tutorial I’ve shown how to install “TelegramBot” Arduino library, written by GitHub user “CasaJasmina” to Arduino IDE, showing how to use the library functions with an Telegram Bot example, while giving information about what computer bots are and their working principle.
I hope that you enjoyed this tutorial and the information that I’ve given. Thank you for reading.
If you want more information about the library and the source use the link below.
Github: https://github.com/CasaJasmina/TelegramBot-Library
Code
#include <ESP8266WiFi.h>
#include <WiFiClientSecure.h>
#include <TelegramBot.h>

const char BotToken[] = "tokenID"; // Defines bot token. Enter your Telegram bot token here.

WiFiClientSecure net_ssl;               // Creates an SSL Client.
TelegramBot bot (BotToken, net_ssl);    // Adds library functions.


void setup()
{
  Serial.begin(115200); // Starts serial connecton at 115200 baud rate.

  WiFi.begin("SSID", "Password");  // Connects to WiFi network. Please enter your SSID and password here.

  while (WiFi.status() != WL_CONNECTED) { // Prints "Waiting for connection" if ESP8266 module is still connecting.
    delay(500);
    Serial.println("Waiting For Connection...");
  }
  Serial.println("");
  Serial.println("Wifi Connected"); // Indicates that ESP8266 module is connected to WiFi.


  bot.begin();  // Starts Telegram bot.

}

void loop()
{

    message m = bot.getUpdates();     // Reads new messages.
    if ( m.chat_id != 0 ) {           // Checks if there are some updates.
      Serial.println(m.text);
      bot.sendMessage(m.chat_id, m.text);  // Replies chat with the same text.
    }
    else {
      Serial.println("No New Message.");   // Prints "No new messages" If there are no new messages.
    }

}
Posted on Utopian.io - Rewarding Open Source Contributors



Thank you for the contribution. It has been approved.
You can contact us on Discord.
[utopian-moderator]
Hey @drencolha I am @utopian-io. I have just upvoted you!
Achievements
Suggestions
Get Noticed!
Community-Driven Witness!
I am the first and only Steem Community-Driven Witness. Participate on Discord. Lets GROW TOGETHER!
Up-vote this comment to grow my power and help Open Source contributions like this one. Want to chat? Join me on Discord https://discord.gg/Pc8HG9x
This is a Turkish tutorial of an open source Arduino library, which lets you build a “Telegram Bot”, with a ESP8266 Wifi Module, that allows internet connection veery good post