Build a Conversations System with Laravel and Lucid Architecture Pt 1
Our mission today is a head-first dive into some Laravel fun. We'll cover Conversation Systems and building them. We'll explore our subject in depth, learn and hopefully have fun in the process!
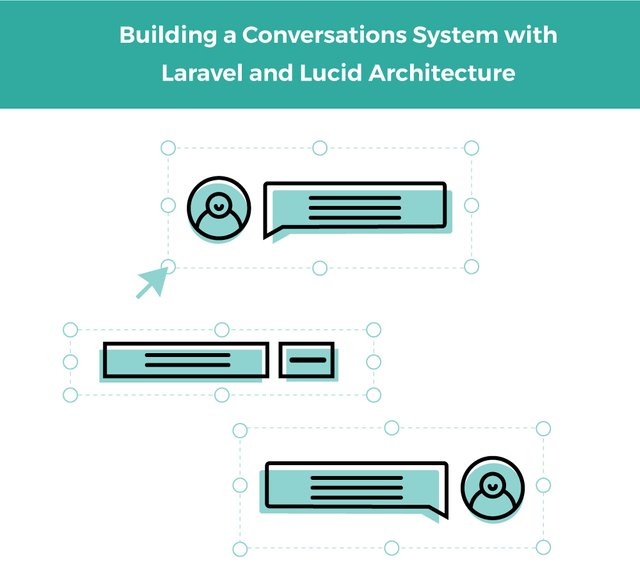
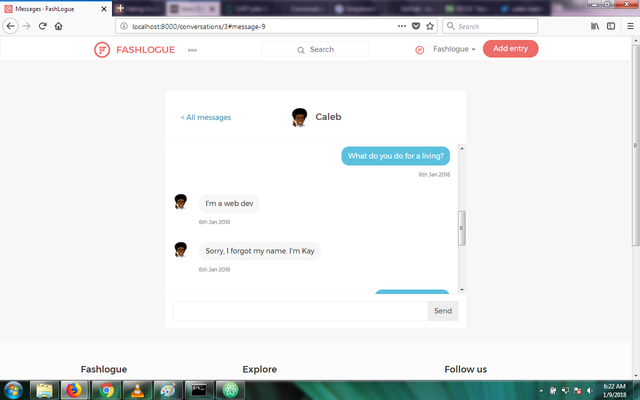
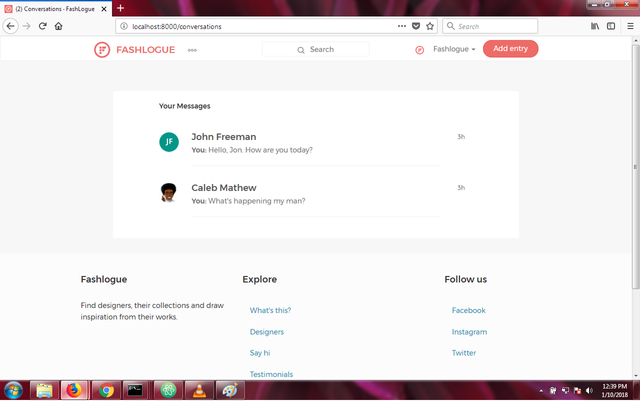
We'll build a Conversations System that looks like the shots below.
ConvieX Conversation View
ConvieX Conversations List
Briefing
In this installment, we'll design our database schema, setup our installation and run migrations.
Table of Content
- What are Conversation Systems
- How Do Conversation Systems Work?
- How Do We Build Conversation Systems?
- How Do We Get Started?
- Designing Our Database Schema
- Setting Up Our Lucid Laravel Installation
1. What are Conversation Systems ?
Conversations are a part of our everyday lives. We are constantly surrounded by them. Not surprisingly, an online conversations system is important for both fun and business.
We'll be building a conversations system with Laravel. It will be built using Lucid Architecture.
2. How Do Conversations Systems Work?
Every conversation must have people talking and making replies. We can identify three important parts of a conversation.
Conversers:
These are persons taking part in a conversation.Messages:
These are either new thoughts or replies to previous thoughts.Conversation
These are interactions between conversers and messages.
3. How Do We Build Conversation Systems?
To build any type of software, we first need to take a look at our requirements and then carefully plan out steps that would help us meet our requirements.
Our Conversations System has the following requirements:
- It must grant our users the ability to send and receive messages within our app.
- It should make the conversation experience as smooth as possible within our tech boundaries.
- It must scale—that means it must perform as well for a thousand users as well as it would for two users.
Our limitations:
We must make the experience accessible to all browser regardless of their level of support for Javascript and (or) WebSockets.
We must ensure our Conversations System is well optimized for high performance.
We also have to ensure our users get the very best experience possible within our limitations.
4. How Do We Get Started?
The very first thing we must do to get started building out our Conversations System is design. User Interface (UI), User Experience (UX) and Interaction (IxD) design are usually explored. However, to keep our tutorial simple, we'll stick to just program design and database design.
We must design the database schema to reflect our requirements and limitations. Since we want efficiency and speed, we should design our schema to enable us reduce the number of queries issued to the database.
5. Designing Our Database Schema
To design our schema, we must first pick out the most important stuff in the database. We already understand that a Conversations System is made up of Conversers, and their Messages within the Conversation.
Also, we must understand the relationships at play here.
- A Message belongs to a User and also a Conversation
- A Converser belongs to a Conversation and a User
- A Conversation belongs to a User
Let's examine each of their attributes and fields.
Message
MessageID: The auto-incrementing ID for each message.
Body: The message in text form. It should be able to accomodate large texts so we'll use the text type.
UserID: We'll store the ID of the user that created the message.
ConversationID: We'll store the ID of the conversation that this message belongs to.
Converser
ConverserID: The auto-incrementing ID for each conserver.
UserID: Every converser is a User.
ConversationID: We'll store the ID of the conversation that this converser was in.
LastReadAt: We'll update this datetime field whenever a converser posts a message.
Design
We need a table to represent each entity and how they relate with each other. We can use pen and paper for the design but for convenience we'll use QuickDBD (Quick Database Diagrams). QuickDBD is an online database schema design app that can help us share our schema designs quickly with friends. Simply head over to https://app.quickdatabasediagrams.com and you'll see an example schema for you to modify to your taste.
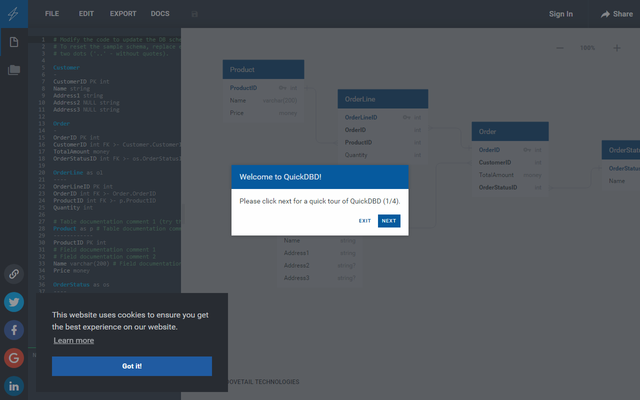
This is the screen that greets you upon a visit to QuickDBD. You may take the tour if you're curious. Simply click the exit button to skip the tour.
Moving on, simply click File>Clear for a fresh diagram.
Then paste this code in the text area to the left of the screen.
# Modify the code to update the DB schema diagram.
# To reset the sample schema, replace everything with
# two dots ('..' - without quotes).
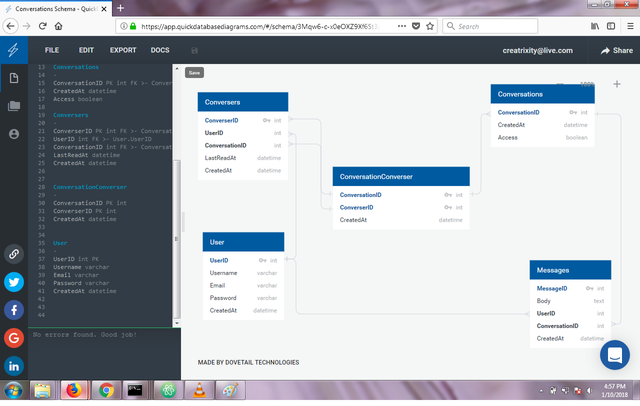
Messages
-
MessageID PK int
Body text
UserID int FK >- User.UserID
ConversationID int FK >- Conversations.ConversationID
CreatedAt datetime
Conversations
-
ConversationID PK int
CreatedAt datetime
Conversers
-
ConverserID PK int
UserID int FK >- User.UserID
ConversationID int FK >- Conversations.ConversationID
LastReadAt datetime
CreatedAt datetime
ConversationConverser
-
ConversationID PK int
ConverserID PK int
CreatedAt datetime
User
-
UserID int PK
Username varchar
Email varchar
Password varchar
CreatedAt datetime
You should see a diagram similar to what I have below. Feel free to play with the entities and explore.
Now we have our schema design, let's setup our Lucid installation.
##6. Setting Up Our Lucid Laravel Installation
If you have composer installed, simply open a command prompt terminal in your PHP installation's development folder. For my windows installation, I use C:\xampp\htdocs>.
With that done, if you want the most recent version of Laravel, simply run this command. We'll call this project Conviex
composer create-project lucid-arch/laravel conviex
I prefer developing on Laravel v5.3.x as I find it easier to work with, so I'll instead run:
composer create-project lucid-arch/laravel=5.3.x conviex
You should have a directory called conviex in your development folder.
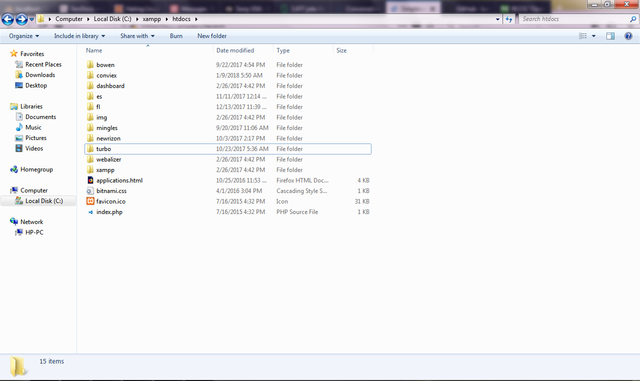
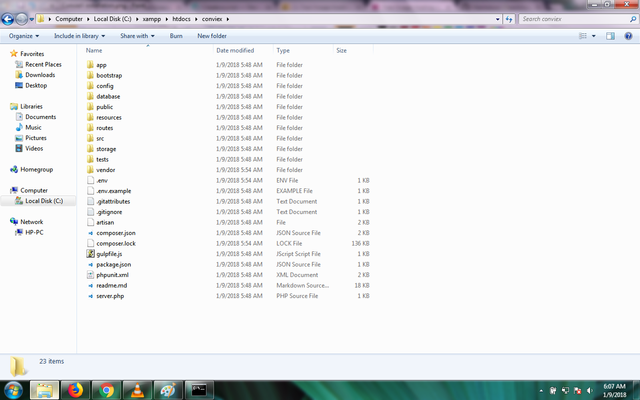
Open the conviex folder and you should see this
Great! Next we need to setup our .env file. Simply open the .env file and edit it to your taste. Here's my .env file below
# Env file code

APP_ENV=local
APP_DEBUG=true
APP_KEY=base64:q63PVcqNRhO8bbU27gDG8rIThkBoAyYObn0jHbWNhOU=

DB_HOST=localhost
DB_DATABASE=conviex
DB_USERNAME=root
DB_PASSWORD=

CACHE_DRIVER=file
SESSION_DRIVER=file
QUEUE_DRIVER=sync

MAIL_DRIVER=smtp
MAIL_HOST=mailtrap.io
MAIL_PORT=2525
MAIL_USERNAME=null
MAIL_PASSWORD=null
MAIL_ENCRYPTION=null
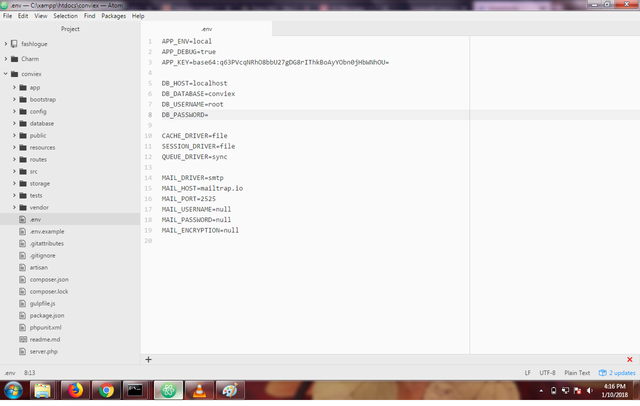
Save and close the .env file.
Our env file specifies conviex as our database name but at the moment that database does not exist yet...Let's fix that! Using your favorite database management tool, create a database named conviex.
If you use XAMPP on windows, visit http://127.0.0.1/phpmyadmin to access the phpmyadmin panel. Click the new link in the left sidebar to access the database creation form. Next, fill in conviex as the database name and create the database.
Next, we must setup our config/app.php file. Simply set the app_name parameter to Conviex.
With that done let's setup migrations and models. Simply hop into the terminal and run these commands
php artisan make:migration create_conversations_table --create=conversations

php artisan make:migration create_conversers_table --create=conversers

php artisan make:migration create_messages_table --create=messages
These commands will create migrations for all our tables.
Next, edit the migration files (the file names may differ, so don't let that bother you) available at the database/migrations directory and add the below snippets up method.
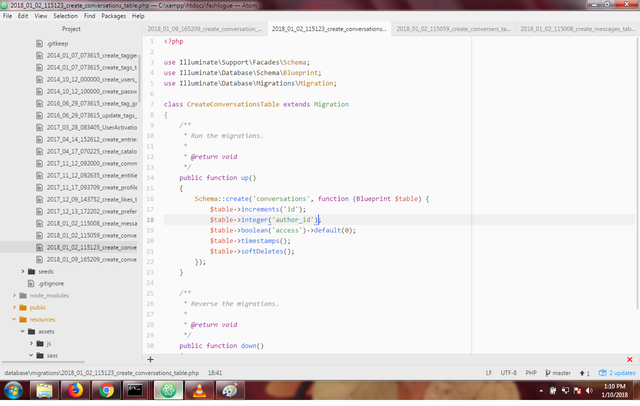
2018_01_02_115123_create_conversations_table.php
    Schema::create('conversations', function (Blueprint $table) {
        $table->increments('id');
        $table->integer('author_id');
        $table->boolean('access')->default(0);
        $table->timestamps();
        $table->softDeletes();
    });
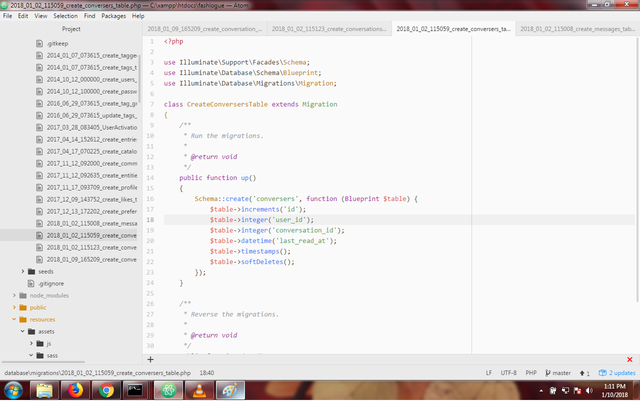
2018_01_02_115059_create_conversers_table.php
    Schema::create('conversers', function (Blueprint $table) {
        $table->increments('id');
        $table->integer('user_id');
        $table->integer('conversation_id');
        $table->datetime('last_read_at');
        $table->timestamps();
        $table->softDeletes();
    });
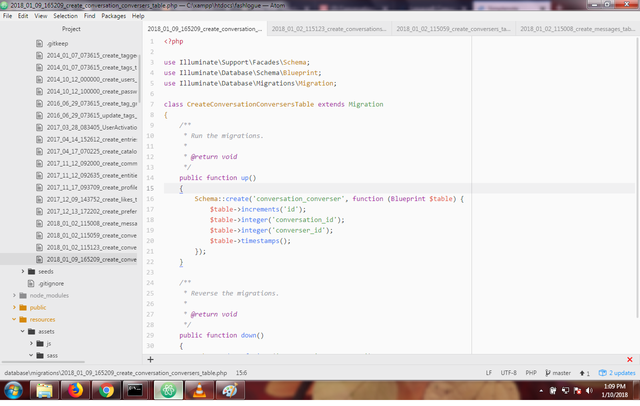
2018_01_09_165209_create_conversation_converser_table.php
Schema::create('conversation_converser', function (Blueprint $table) {
    $table->increments('id');
    $table->integer('conversation_id');
    $table->integer('converser_id');
    $table->timestamps();
});
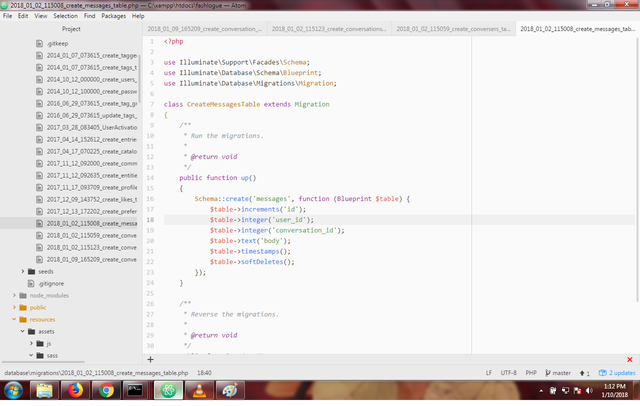
2018_01_02_115008_create_messages_table.php
    Schema::create('messages', function (Blueprint $table) {
        $table->increments('id');
        $table->integer('user_id');
        $table->integer('conversation_id');
        $table->text('body');
        $table->timestamps();
        $table->softDeletes();
    });
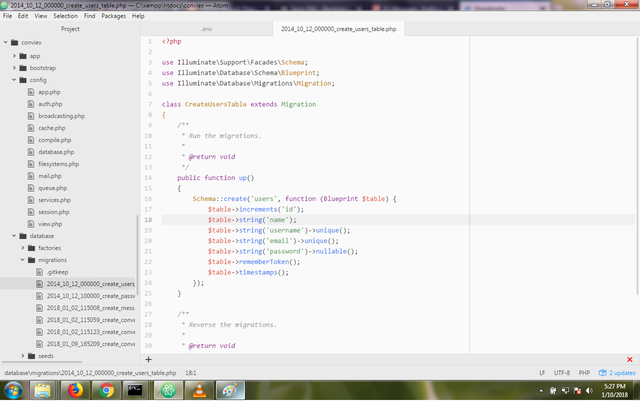
2014_10_12_000000_create_users_table.php
    Schema::create('users', function (Blueprint $table) {
        $table->increments('id');
        $table->string('name');
        $table->string('username')->unique();
        $table->string('email')->unique();
        $table->string('password')->nullable();
        $table->rememberToken();
        $table->timestamps();
    });
Great! All we now need to do is to run this command
php artisan migrate
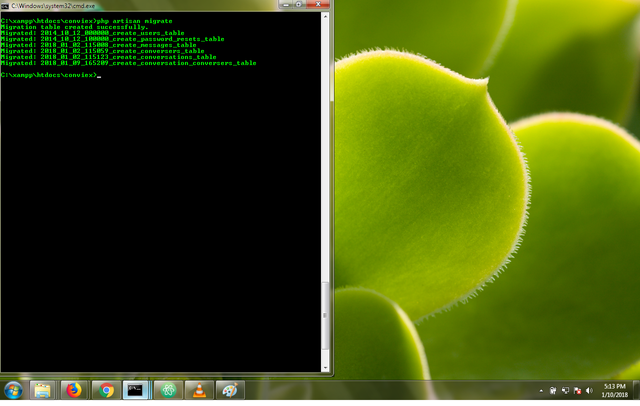
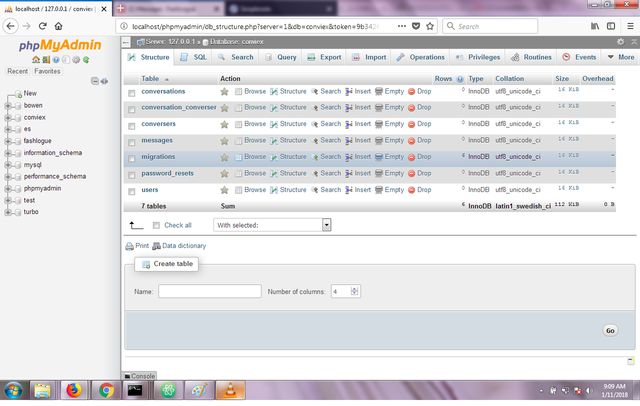
Check the conviex database using your favorite admin tool and you should see the following tables:
conversations, conversers, converser_converser and messages
Conclusion
In this installment, we examined conversation systems and how they work. We outlined core entities of a basic conversation and constructed a schema around them.
Also, we set up our Lucid Laravel installation, configured our env file, created and ran migrations to create our database structure.
In our next installment, we will set up Eloquent models, create our first Lucid services, features and jobs. We will create repositories and decouple them from rigid implementations.
Stay tuned for the second installment in this series! Have an awesome day!
Posted on Utopian.io - Rewarding Open Source Contributors
Upvote you . I love your blog . thank you
Thank you for the contribution. It has been approved.
You can contact us on Discord.
[utopian-moderator]
Thank you for the contribution. It has been approved.
You can contact us on Discord.
[utopian-moderator]
Hey @creatrixity I am @utopian-io. I have just upvoted you!
Achievements
Suggestions
Get Noticed!
Community-Driven Witness!
I am the first and only Steem Community-Driven Witness. Participate on Discord. Lets GROW TOGETHER!
Up-vote this comment to grow my power and help Open Source contributions like this one. Want to chat? Join me on Discord https://discord.gg/Pc8HG9x