Working with HTML Controls, Web Server Controls (ASP.NET Tutorial)
Lesson Objectives
A. Introduction to Server Controls
B. Working with HTML Server Controls
C. Working with Web Server Controls
Needs are;
A.Asp.NET
B. Visual Studio
C. C#
The difficulty level of commands we use is middle.
A web application provides a Graphical User Interface over the web. The fundamental elements of GUI are controls. The users use various controls to enter information in the web page. ASP.NET provides several controls which can be used to accept data from the user and validate the information.
ASP.NET server controls provide programmability and user interface functionality. They follow a server-side event model. For example, when a user clicks a button on the form, an action is triggered and the button control is posted back to the server. The event handler associated with the button, for the particular event is invoked on the server and the processing takes place.
The ASP.NET server controls allow the developer to use a well defined object model. The developers use server controls to specify the functionality and ASP.NET runtime automatically produces the output which is sent to the browser. Server Controls inherit from System.Web.UI.Control class. The
ASP.NET server controls are fundamentally classified as HTML Server Controls and Web Server Controls. These controls can be accessed from the Toolbox. They can be further categorized as Rich web controls, Data controls, Validation controls, Navigation controls, Login controls etc. Let us now discuss HTML server controls, Web server controls and Validation controls in detail.
The HTML Server Controls
The HTML Server controls are the standard HTML controls that are mapped to classes in ASP.NET. The standard HTML controls can be easily converted into HTML Server Controls. The "runat" attribute of the standard HTML control is set to "true" to convert it into a HTML server control. These controls provide HTML kind of programming model. The code that is generated for the browser can be explicitly controlled. The HTML server controls are written within the < form > and < /form > tags. The elements must be closed properly and the tags should be properly nested. These controls have various properties which can be set to appropriate values.
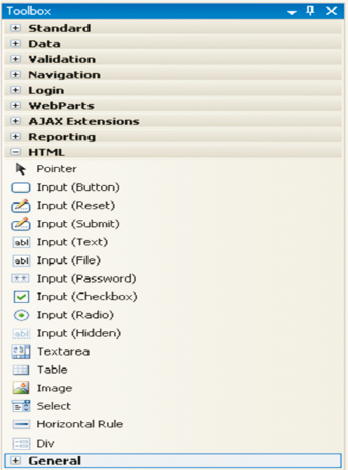
The Toolbox with HTML Server Controls is given below:
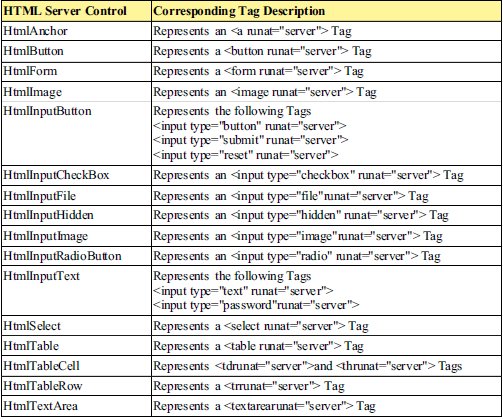
The HTML Server Controls and corresponding HTML Tags is given below:
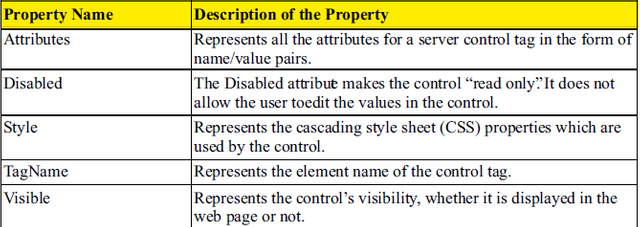
The list of properties shared by all HTML controls is given below:
Demonstration:Creating a Customer Registration form using HTML Server Controls.
Steps to create the Web Page
1 ) Create a new web form named HTMLServerControlsDemo.aspx
2 ) Design the form as below by placing a table and adding controls to it.
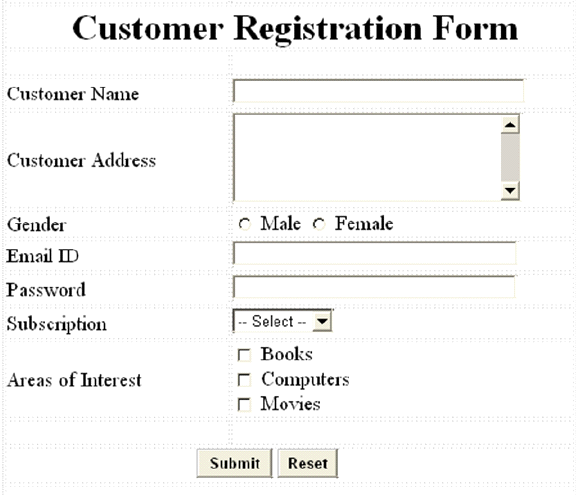
3 ) The various controls and their properties to be used to design the form are given in the table below:
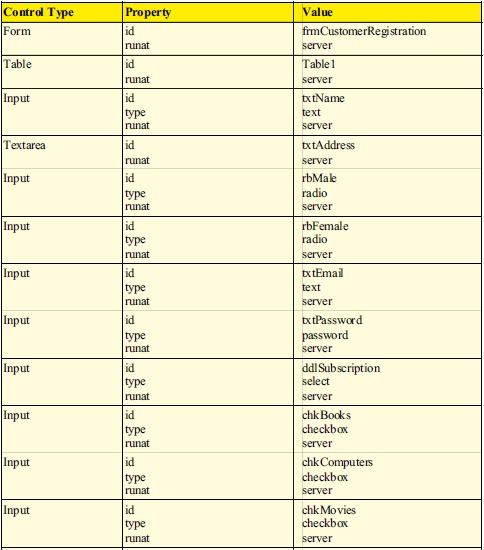
4 ) Write the code for HTMLServerControlsDemo.aspx file
<%@ Page Language="C#" AutoEventWireup="true"
CodeFile="HTMLServerControlsDemo.aspx.cs"
Inherits="HTMLServerControlsDemo" %>
<html xmlns="http://www.w3.org/1999/xhtml">
<head runat="server">
<title>HTML Server Controls Demo</title>
<style type="text/css">
.style1
{
}
.style2
{
width: 328px;
}
.style3
{
width: 269px;
height: 68px;
}
.style4
{
width: 328px;
height: 68px;
}
#txtName
{
width: 260px;
}
#txtAddress
{
width: 257px;
height: 80px;
}
#txtEmail
{
width: 253px;
}
#txtPassword
{
width: 252px;
}
#txtSubscription
{
width: 246px;
}
.style5
{
height: 22px;
}
.style6
{
width: 328px;
height: 22px;
}
.style7
{
height: 28px;
}
.style8
{
width: 328px;
height: 28px;
}
.style9
{
height: 86px;
}
.style10
{
width: 328px;
height: 86px;
}
.style11
{
height: 24px;
}
.style12
{
width: 328px;
height: 24px;
}
</style>
</head>
<body>
<form id="frmCustomerRegistration" runat="server">
<table id="Table1" runat="server" style="width: 42%; margin-left: 209px; font-weight:
normal;
font-size: medium;" align="left">
<tr>
<td class="style1" colspan="1" align="center">
</td>
<td class="style2">
</td>
</tr>
<tr>
<td colspan="2" align="center">
<b style="font-size: x-large; font-weight: bold;">Customer Registration Form
</td>
</tr>
<tr>
<td class="style5" colspan="1" height="50" align="center">
</td>
<td class="style6" height="50">
</td>
</tr>
<tr>
<td class="style7" colspan="1" align="left" style="font-size: medium">
Customer Name
</td>
<td class="style8" style="font-size: medium">
<input id="txtName" runat="server" type="text" />
</td>
</tr>
<tr>
<td align="left" class="style9" colspan="1" style="font-size: medium">
Customer Address
</td>
<td class="style10" style="font-size: medium">
<textarea id="txtAddress" runat="server" name="S1"></textarea>
</td>
</tr>
<tr>
<td class="style11" colspan="1" align="left" style="font-size: medium">
Gender
</td>
<td class="style12" style="font-size: medium">
<input id="rbMale" runat="server" type="radio" />
Male
<input id="rbFemale" runat="server" type="radio" />
Female
</td>
</tr>
<tr>
<td class="style7" colspan="1" align="left" style="font-size: medium">
Email ID
</td>
<td class="style8" style="font-size: medium">
<input id="txtEmail" runat="server" type="text" />
</td>
</tr>
<tr>
<td class="style7" colspan="1" align="left" style="font-size: medium">
Password
</td>
<td class="style8" style="font-size: medium">
<input id="txtPassword" runat="server" type="password" />
</td>
</tr>
<tr>
<td class="style7" colspan="1" align="left" style="font-size: medium">
Subscription
</td>
<td class="style8" style="font-size: medium">
<select id="ddlSubscription" runat="server">
<option>-- Select --</option>
<option>Quarterly</option>
<option>Half Yearly</option>
<option>Annually</option>
</select>
</td>
</tr>
<tr>
<td class="style3" colspan="1" align="left" style="font-size: medium">
Areas of Interest
</td>
<td class="style4" style="font-size: medium">
<input id="chkBooks" type="checkbox" runat="server" />
Books<br />
<input id="chkComputers" type="checkbox" runat="server" />
Computers<br />
<input id="chkMovies" type="checkbox" runat="server" />
Movies
</td>
</tr>
<tr>
<td class="style1" colspan="1" align="center">
</td>
<td class="style2">
</td>
</tr>
<tr>
<td class="style1" colspan="2" align="center">
<input id="btnSubmit" type="submit" runat="server" value="Submit"
onserverclick="btnSubmit_Click"
style="font-weight: bold" />
<input id="btnReset" type="submit" runat="server" value="Reset"
onserverclick="btnReset_Click"
style="font-weight: bold" />
</td>
</tr>
<tr>
<td class="style1" colspan="2" align="left">
<p id="pInfo" runat="server">
</p>
</td>
</tr>
</table>
</form>
</body>
</html>
5 ) Write the code for HTMLServerControlsDemo.aspx.cs file. The “btn_Submit_Click” is a server-side event handler which is invoked when the user clicks the Submit button after filling the form. The “btn_Reset_Click” is a server-side event handler which is invoked when the user clicks the Reset button to clear the values in the form.
using System;
using System.Collections.Generic;
using System.Linq;
using System.Web;
using System.Web.UI;
using System.Web.UI.WebControls;
public partial class HTMLServerControlsDemo : System.Web.UI.Page
{
protected void btnSubmit_Click(object sender, EventArgs e)
{
pInfo.InnerHtml = "<b>You have entered the following information </b><br><br>";
pInfo.InnerHtml = pInfo.InnerHtml + "Customer Name :<b>" + txtName.Value +
"</b><br>";
pInfo.InnerHtml = pInfo.InnerHtml + "Customer Address :<b>" + txtAddress.Value
+ "</b><br>";
if(rbMale.Checked == true)
pInfo.InnerHtml = pInfo.InnerHtml + "Gender :<b> Male</b><br>";
if(rbFemale.Checked == true)
pInfo.InnerHtml = pInfo.InnerHtml + "Gender : <b>Female</b><br>";
pInfo.InnerHtml = pInfo.InnerHtml + "Email ID :<b>" + txtEmail.Value +
"</b><br>";
pInfo.InnerHtml = pInfo.InnerHtml + "Password :<b>" + txtPassword.Value +
"</b><br>";
pInfo.InnerHtml = pInfo.InnerHtml + "Subscription :<b>" + ddlSubscription.Value +
"</b><br>";
pInfo.InnerHtml = pInfo.InnerHtml + "Areas of Interest : ";
if(chkBooks.Checked == true)
pInfo.InnerHtml = pInfo.InnerHtml + "<b> Books</b>";
if (chkComputers.Checked == true)
pInfo.InnerHtml = pInfo.InnerHtml + "<b> Computers</b>";
if (chkMovies.Checked == true)
pInfo.InnerHtml = pInfo.InnerHtml + "<b> Movies</b><br>";
}
protected void btnReset_Click(object sender, EventArgs e)
{
txtName.Value = "";
txtAddress.Value = "";
rbMale.Checked = false;
rbFemale.Checked = false;
txtEmail.Value = "";
txtPassword.Value = "";
ddlSubscription.SelectedIndex = 0;
chkBooks.Checked = false;
chkComputers.Checked = false;
chkMovies.Checked = false;
pInfo.InnerHtml = "";
}
}
6 ) Run the form. Enter the values in the various fields and click submit button to see the output below:

7 ) Click the Reset button to clear the controls.
Posted on Utopian.io - Rewarding Open Source Contributors
Nice post bro keep doing
Thank you for the contribution. It has been approved.
You can contact us on Discord.
[utopian-moderator]
Hey @coderlovely I am @utopian-io. I have just upvoted you!
Achievements
Suggestions
Get Noticed!
Community-Driven Witness!
I am the first and only Steem Community-Driven Witness. Participate on Discord. Lets GROW TOGETHER!
Up-vote this comment to grow my power and help Open Source contributions like this one. Want to chat? Join me on Discord https://discord.gg/Pc8HG9x