Tutorial Intermediate - How To Create A 2-Dimension Object (Butterfly)
What Will I Learn?
- You will learn how to create a 2 dimensional object
- You will learn about C ++ programming language
- You will learn about basic 2 dimensions
Requirements
- You need high confidence
- You need basic about C ++ programming language
- You need the ability to create an object
- You need a basic 2D object
Difficulty
- Intermediate
Tutorial Contents
Hello friends all, at this time I will give tutorial to my friends all how to make a 2 dimensional object and application that i use is microsoft visual because this app is quite easy in using you can download the application Here, As we know together that every day we see objects in the form of 2 dimensions for example when you see tv on cartoon animation show and this time I will give the object is a butterfly and if you want to make it you can follow the steps below:
- You can write the syntax below on the screen that has been created on the microsoft visual page and every syntax is explained in this tutorial:
The above command is to declare the header used C ++. It is a function for input and output operations.
#include <stdio.h>
The above command is a functions used for mathematical operations.
#include <stdlib.h>
The command to implement 2D transformation in the program is 2D Data Matrix structure.
#include <math.h>
To perform mathematical calculations
#include <GL/glut.h>
Command to declare the 2D object that will occur on plot X and plot Y
typedef struct
{
float x,y;
}
point2D_t;
Command to declare the color that occurs that is red, green, blue.
typedef struct
{
float r,g,b;
}
color_t;
Command to call the above function
void userdraw(void);
Command to draw the number of dots created on each plot
void drawPolygon(point2D_t pnt[],int n)
{
int i;
glBegin(GL_LINE_LOOP);
Command to drag the created point
    for(i=0;i<n;i++)
    {
        glVertex2f(pnt[i].x,pnt[i].y);
    }
    glEnd();
}
Command to declare color in the form of float
void setColor(float red,float green,float blue)
{
glColor3f(red,green,blue);
}
Command to declare color on point
void setColor(color_t col)
{
glColor3f(col.r,col.g,col.b);
}
Command to fill a point on the line
void fillPolygon(point2D_t pnt[],int n,color_t color)
{
int i;
setColor(color);
glBegin(GL_POLYGON);
for(i=0;i<n;i++)
{
glVertex2f(pnt[i].x,pnt[i].y);
}
glEnd();
}
This function is used to color a polygon with colors that are graded from a color of other colors.
void gradatePolygon(point2D_t pnt[],int n,color_t color[])
{
int i;
glBegin(GL_POLYGON);
for (i=0;i<n;i++)
{
setColor(color[i]);
glVertex2f(pnt[i].x,pnt[i].y);
}
}
Command to draw a line that will be made in the subject then will be done looping at each point to be connected so that the creation of a very small point so as to form like a straight line length
void userdraw(void)
{
point2D_t shape[360];
double srad,r ;
for(int s=0;s<360;s++)
{
srad=s * 3.14/180;
r=sin(2srad);
shape[s].x=(float)(rcos(srad));
shape[s].y=(float)(r*sin(srad));
}
color_t biru={0.,1.,1.};
fillPolygon(shape,360,biru);
setColor(0.,1.,1.);
drawPolygon(shape,360);
}
command for polygon and polyline declarations
void display(void)
{
glClear(GL_COLOR_BUFFER_BIT);
userdraw();
glFlush();
}
Command to create a border on your laptop page as well as cover the already declared syntax
void main (int argc,char **argv)
{
glutInit(&argc,argv);
glutInitDisplayMode(GLUT_SINGLE | GLUT_RGB);
glutInitWindowSize(640,480);
glutInitWindowPosition(100,150);
glutCreateWindow("kupu-kupu");
glClearColor(1.0,1.0,1.0,0.0);
gluOrtho2D(-200.,-200.,200.,200.);
glutDisplayFunc(display);
glutMainLoop();
}
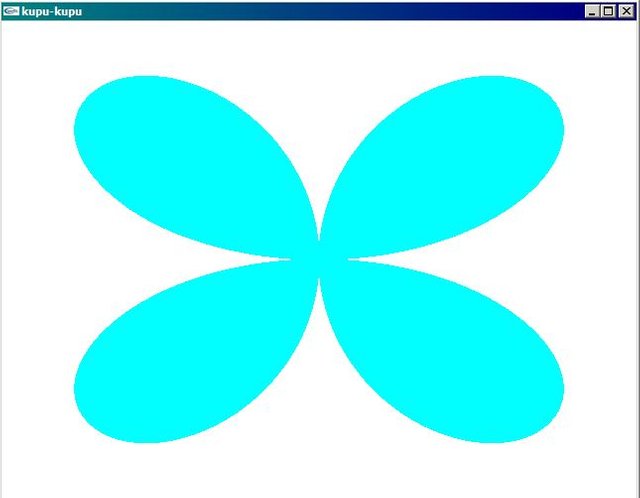
- After we follow the steps above then we will get result like picture below:

- All The Syntax Can Be Downloaded On Google Drive
Download
Curriculum
- Tutorial Intermediate - How To Create A 3-Dimensional Object (Cube)
- Tutorial Basic - How To Backup Database Using Navicat in (.Sql)
Posted on Utopian.io - Rewarding Open Source Contributors
@brainalien, I always try to support who contribute to open source project, upvote you.
Your contribution cannot be approved because it does not follow the Utopian Rules.
Hi, there are some problems with your tutorial
In the future I recommend you find an open-source project with a valid repository, and create a tutorial with good formatting where you actually tutor the readers.
You can contact us on Discord.
[utopian-moderator]