How to make your own DIY gaming console GAMEBUINO
Hello world! I would like to introduce you to this project on how to make your own do it yourself arduino based gaming console GAMEBUINO, by using the arduino microcontroller, push buttons and nokia 5110 LCD display modules, which is make a 'DIY Gamebuino'. Gamebuino is an arduino game machine that makes up Arduboy and two mountain ranges. Like Arduboy, you can share your own games with your own homepage, or you can play games created by other users, or make your own games and share with them. we can play snake, pong, space invader, puzzle, supermario, bounce, spacemanship, maze, metalog, solitare and many more games using this project.

What Will I Learn?
- You will learn how to make your own mini gaming console
- You will learn how program and make your own games
- You will learn how to connect all the components in one breadboard
HARDWARE
Gather all the Requirements
- Nokia 5110 LCD Display
- Arduino UNo
- Speaker/Buzzer
- Connecting wires
- Breadboard
- 7 pcs Push buttons
- Resistance
- Usb cable
- PC
- Extra battery pack
This a Basic electronic tutorial, I will provide the connection of pin to arduino and the sketch code to make our programming easily.

- Step 1: Build the Display
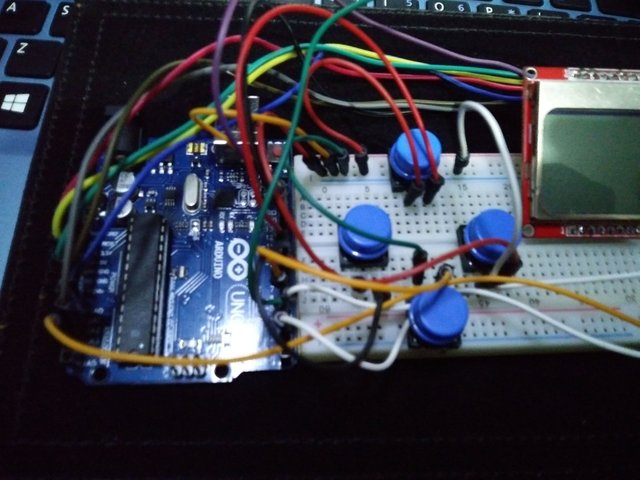
This project uses a Nokia 5110 as the Display adapter, This display is made of 84x48 individual pixels, so you can use it for graphics, text or bitmaps. so less expensive than using oled display. this display module has built in 8 pin outputs, the power pins GNd and VCC the LIGHT pin and the 4 data pin which will be connected to specified arduino pins.
| Nokia LCD | ARDUINO |
|---|---|
| RST | AO |
| SC | A1 |
| DC | A2 |
| DIN | D11 |
| CLK | D13 |
| VCC | 3.3V |
| LIGHT | GND |
| GND | GND |
Follow the 'Nokia 5110/3310 Monochrome LCD' tutorial from Adafruit to hookup and test your lcd.
Arduino Nokia LCD address Code:
#define SCR_CLK 13;
 #define SCR_DIN 11;
 #define SCR_DC  A2;
 #define SCR_CS  A1;
#define SCR_RST A0;- Step 2: Build The Switch
The Momentary Push Button Switch a 12mm Square, These buttons gives a nice soft click every time it's pressed so you know that you've definitely activated it. Their almost instant return make them great for building your own homemade button pad. it also make a good reset switch or user feedback for a microcontroller circuit.
| Push buttons | ARDUINO |
|---|---|
| Right Button | D7 |
| Left Button | D8 |
| Down Button | D6 |
| Up Button | D9 |
| A Button | D4 |
| B Button | D2 |
| C Button | A3 |
You will need 7 buttons (up,down,left,right,A,B,C). Without buttons you can't really play any games,
Buttons address code:
 #define BTN_UP_PIN      9;
 #define BTN_RIGHT_PIN   7;
 #define BTN_DOWN_PIN    6;
 #define BTN_LEFT_PIN    8;
 #define BTN_A_PIN       4;
 #define BTN_B_PIN       2;
#define BTN_C_PIN A3;- Step 3: Build the Speaker
The speaker/buzzer can be driven by an oscillating electronic circuit or other audio signal source. A click, beep or ring can indicate that a button has been pressed most of this using to make alarm tune or alarm system that we will use in this tutorial. the speaker that i used here was came from an old mini fm radio.
Hookup a 8 ohm speaker with a 100 ohm resistor between pin 3 and gnd.
| 1.8" TFT LCD | ARDUINO |
|---|---|
| SPK | D3 |
Speaker Address Code
#define BuzzerPin 3;
- Step 4: Experimental Procedures
At this step we need to build a proper wiring on the breadboard, you can use PCB than breadboard and solder the components, but you cannot remove the components as its soldered and attached to the board, unless you un-solder it. possitioning the buttons on the breadboard is too difficult when you have big buttons like what i used here, the both UP and DOWN buttons will slide to horizontal powerlane of the breadboard, we cannot put the leg of the buttons there, you can bend the 2 legs and slide it outside the rails of the breadboard. we have 2 remaining leg of buttons the power and the pwm pin. remember to put a 220k ohms resistance between the speaker - pin to GND to protect the speaker from overload. both LIGHT pin of lcd should have a resistance too before the 3,3v.
- **Step 5: Download the software and libraries
**
SOFTWARE
download the Arduino IDE for your specific operating system. I’ll leave a link to where you can download this software: https://www.arduino.cc/en/Main/Software
Adafruit-GFX-Library; https://github.com/adafruit/Adafruit-GFX-Library
Adafruit-PCD8544-Nokia-5110-LCD-library; https://github.com/adafruit/Adafruit-PCD8544-Nokia-5110-LCD-library/
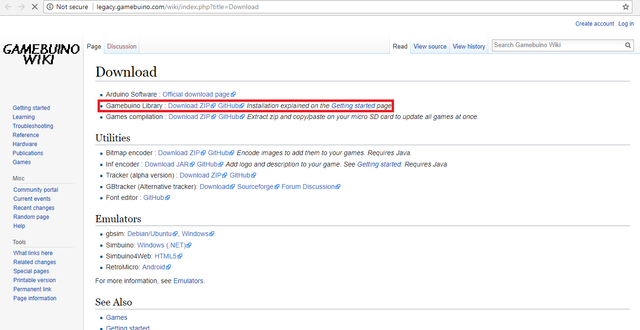
- Download the Gamebuino library; http://legacy.gamebuino.com/wiki/index.php?title=Download

- Step 5: Buid a Simple Game
By The use GAMEBUINO library we run games and program it with ease, On building a simple PONG games. the first line of the code we need to include the gamebuino H file. The Serial Peripheral Interface SPI for communicating with one or more peripheral components quickly over short distances
#include <SPI.h>
#include <Gamebuino.h>
Gamebuino gb;
boolean paused = false;
//player variables
int player_score = 0;
int player_h = 16;
int player_w = 3;
int player_x = 0;
int player_y = (LCDHEIGHT - player_h) / 2;
int player_vy = 2;
//oponent variables
int oponent_score = 0;
int oponent_h = 16;
int oponent_w = 3;
int oponent_x = LCDWIDTH - oponent_w;
int oponent_y = (LCDHEIGHT - oponent_h) / 2;
int oponent_vy = 2;
//ball variables
int ball_size = 6;
int ball_x = LCDWIDTH - ball_size - oponent_w - 1;
int ball_y = (LCDHEIGHT - ball_size) / 2;
int ball_vx = 3;
int ball_vy = 3;
extern const byte font5x7[]; //get the default large font
setup() is where you want to do any initialisation steps, and in loop() you want to run the code you want to run over and over again.
///////////////////////////////////// SETUP
void setup() {
gb.begin();
gb.display.setFont(font5x7); //change the font to the large one
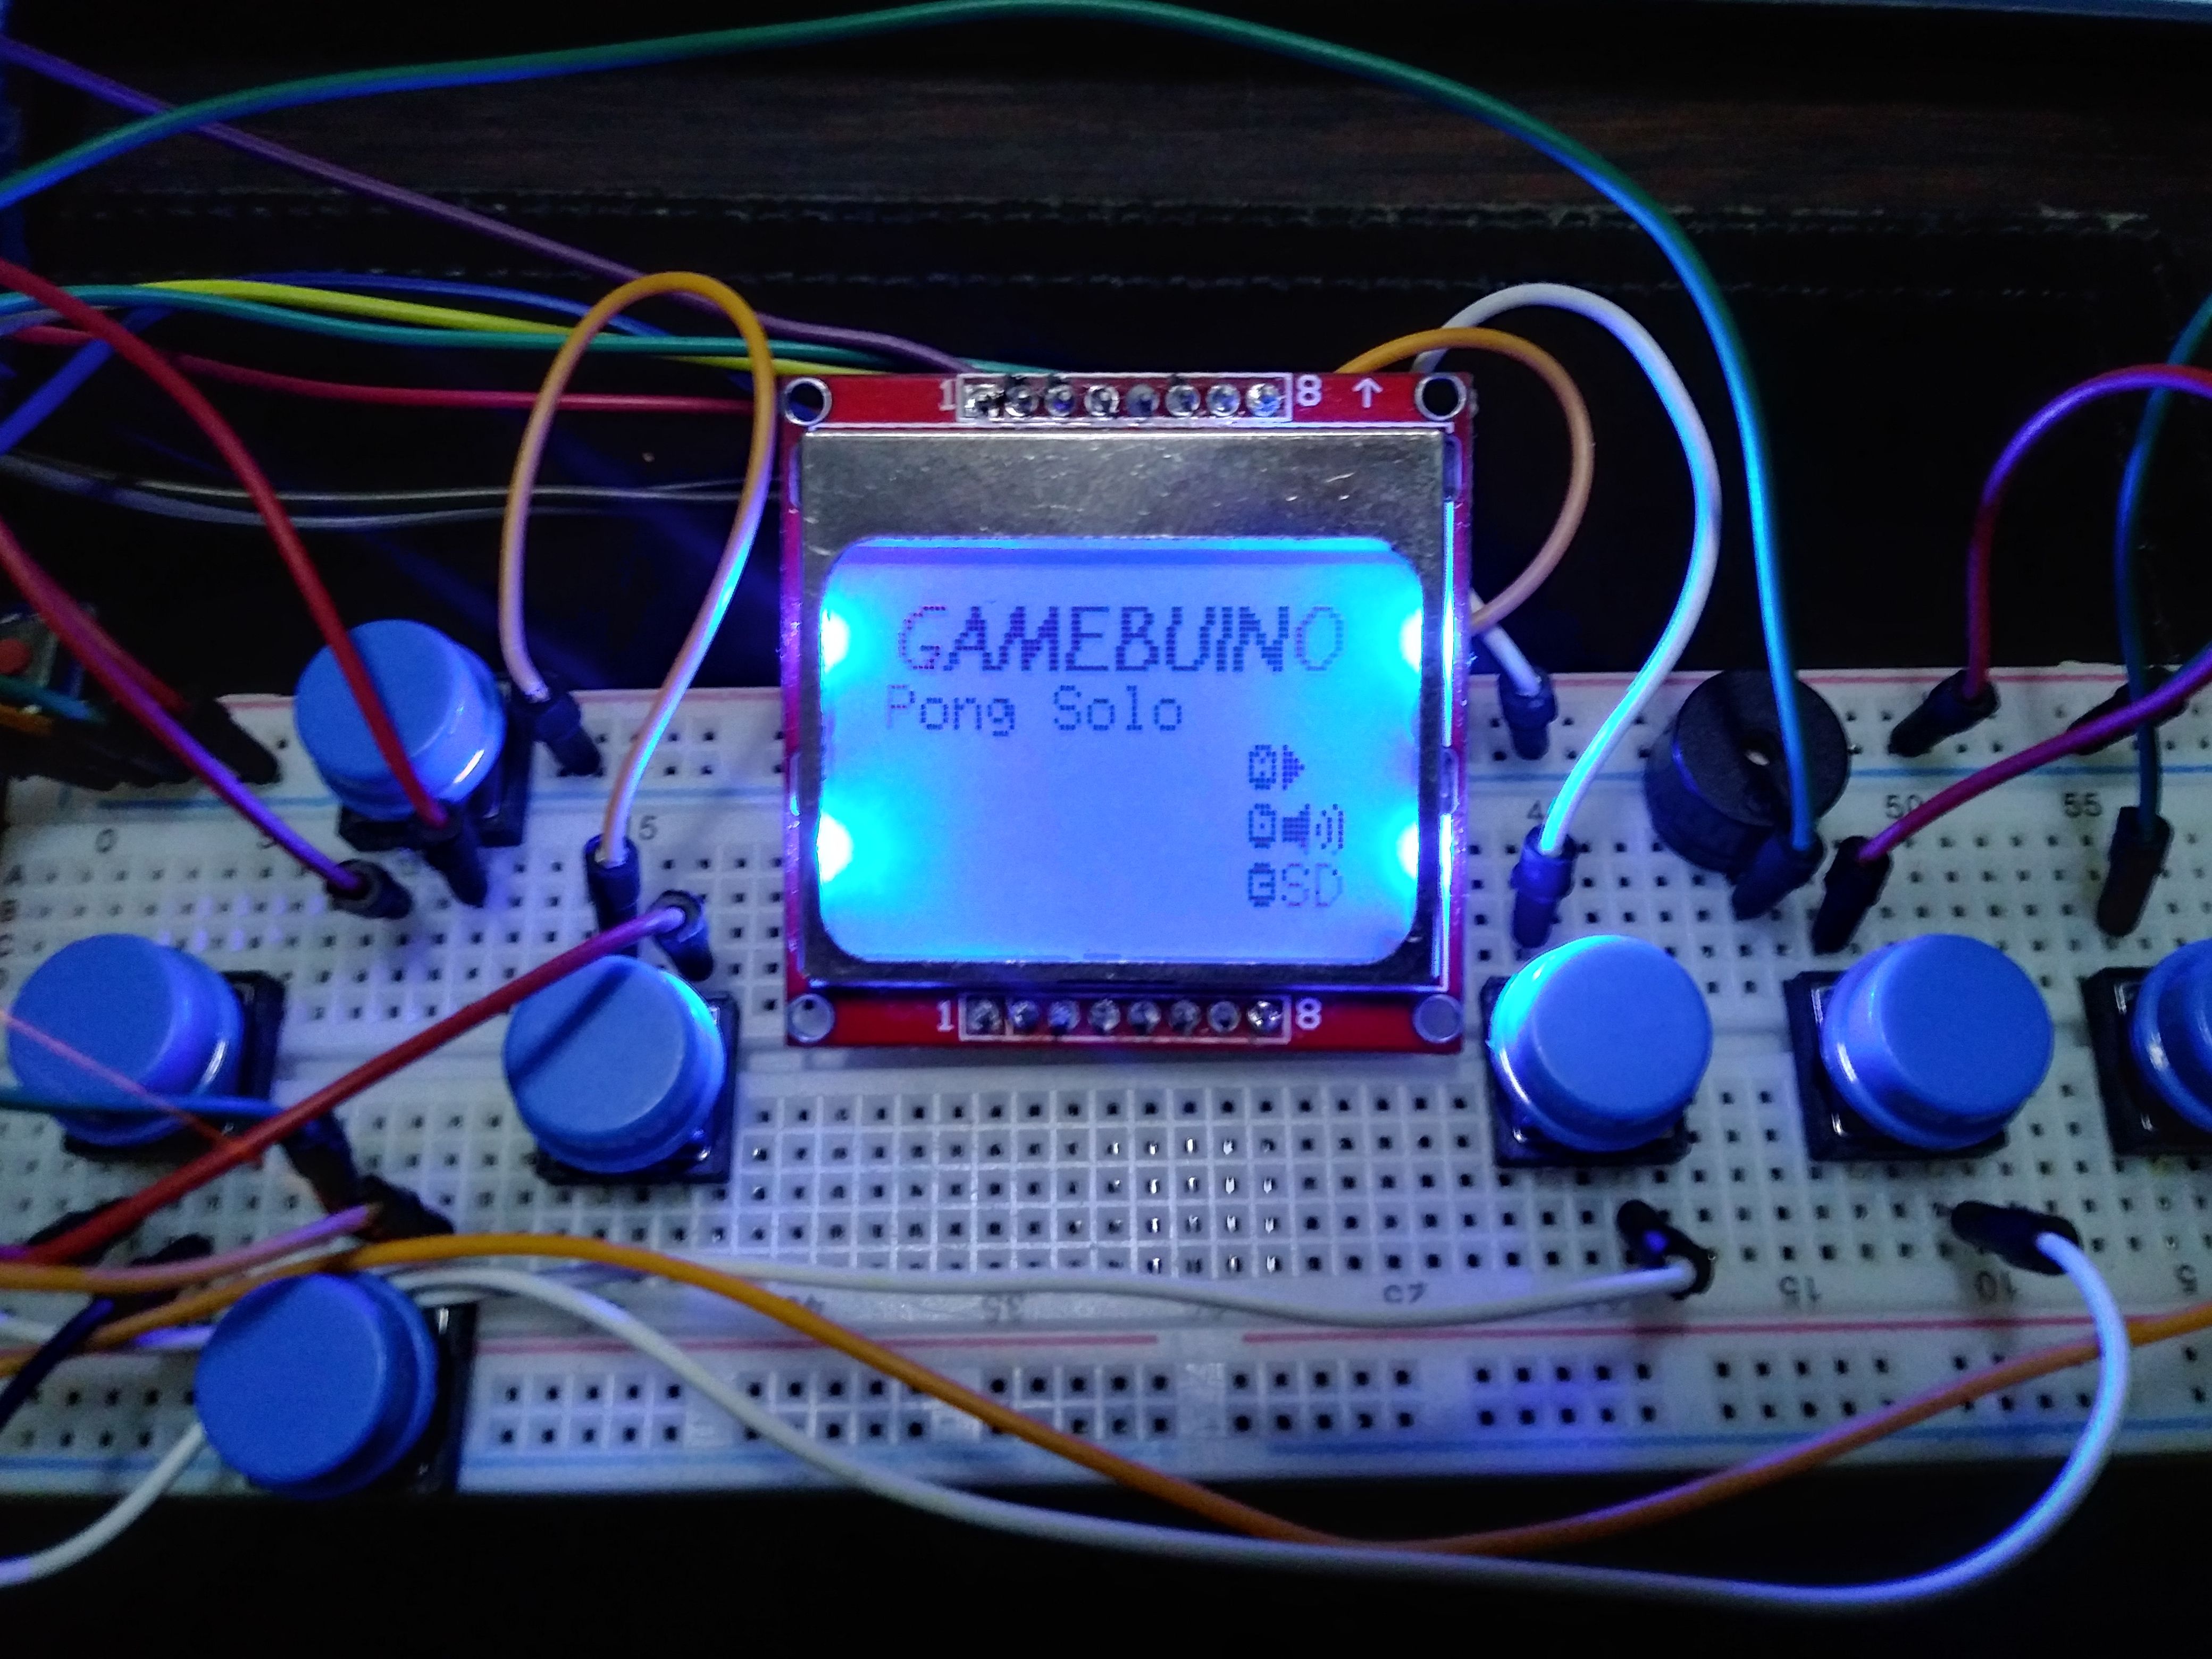
gb.titleScreen(F("Pong Solo"));
gb.pickRandomSeed(); //pick a different random seed each time for games to be different
gb.battery.show = false; //hide the battery indicator
}
///////////////////////////////////// LOOP
void loop() {
if (gb.update()) {
//pause the game if C is pressed
if (gb.buttons.pressed(BTN_C)) {
gb.titleScreen(F("Pong Solo"));
gb.battery.show = false;
gb.display.fontSize = 2;
}
//move the player
if (gb.buttons.repeat(BTN_UP, 1)) {
player_y = max(0, player_y - player_vy);
}
if (gb.buttons.repeat(BTN_DOWN, 1)) {
player_y = min(LCDHEIGHT - player_h, player_y + player_vy);
}
//move the ball
ball_x = ball_x + ball_vx;
ball_y = ball_y + ball_vy;
//check for ball collisions
//collision with the top border
if (ball_y < 0) {
ball_y = 0;
ball_vy = -ball_vy;
gb.sound.playTick();
}
//collision with the bottom border
if ((ball_y + ball_size) > LCDHEIGHT) {
ball_y = LCDHEIGHT - ball_size;
ball_vy = -ball_vy;
gb.sound.playTick();
}
//collision with the player
if (gb.collideRectRect(ball_x, ball_y, ball_size, ball_size, player_x, player_y, player_w, player_h)) {
ball_x = player_x + player_w;
ball_vx = -ball_vx;
gb.sound.playTick();
}
//collision with the oponent
if (gb.collideRectRect(ball_x, ball_y, ball_size, ball_size, oponent_x, oponent_y, oponent_w, oponent_h)) {
ball_x = oponent_x - ball_size;
ball_vx = -ball_vx;
gb.sound.playTick();
}
//collision with the left side
if (ball_x < 0) {
oponent_score = oponent_score + 1;
gb.sound.playCancel();
ball_x = LCDWIDTH - ball_size - oponent_w - 1;
ball_vx = -abs(ball_vx);
ball_y = random(0, LCDHEIGHT - ball_size);
}
//collision with the right side
if ((ball_x + ball_size) > LCDWIDTH) {
player_score = player_score + 1;
gb.sound.playOK();
ball_x = LCDWIDTH - ball_size - oponent_w - 16; //place the ball on the oponent side
ball_vx = -abs(ball_vx);
ball_y = random(0, LCDHEIGHT - ball_size);
}
//reset score when 10 is reached
if ((player_score == 10) || (oponent_score == 10)) {
player_score = 0;
oponent_score = 0;
}
//move the oponent
if ((oponent_y + (oponent_h / 2)) < (ball_y + (ball_size / 2))) { //if the ball is below the oponent
oponent_y = oponent_y + oponent_vy; //move down
oponent_y = min(LCDHEIGHT - oponent_h, oponent_y); //don't go out of the screen
}
else {
oponent_y = oponent_y - oponent_vy; //move up
oponent_y = max(0, oponent_y); //don't go out of the screen
}
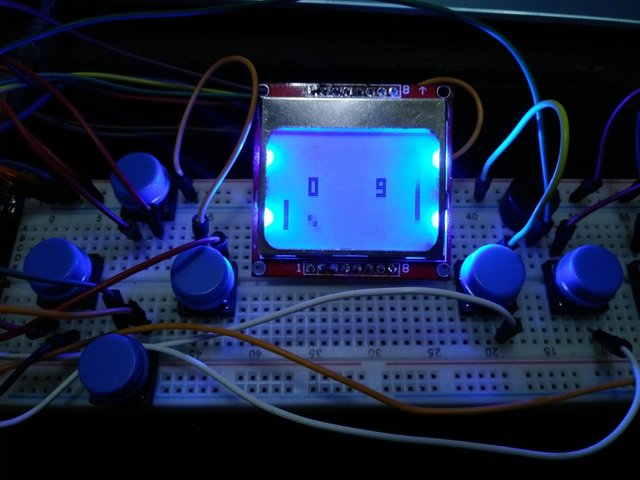
//draw the score
gb.display.fontSize = 2;
gb.display.cursorX = 15;
gb.display.cursorY = 16;
gb.display.print(player_score);
gb.display.cursorX = 57;
gb.display.cursorY = 16;
gb.display.print(oponent_score);
//draw the ball
gb.display.fillRect(ball_x, ball_y, ball_size, ball_size);
//draw the player
gb.display.fillRect(player_x, player_y, player_w, player_h);
//draw the oponent
gb.display.fillRect(oponent_x, oponent_y, oponent_w, oponent_h);
}
}
- Step 6: Upload code to Microcontroller board
Connect the arduino uno board nano/mega/r3 to your computer via type b usb cable.
your computer will automatically scan the device driver, to verify the board of the arduino, on the IDE click >. TOOLS then verify the board type and PORT where the USB is connected.


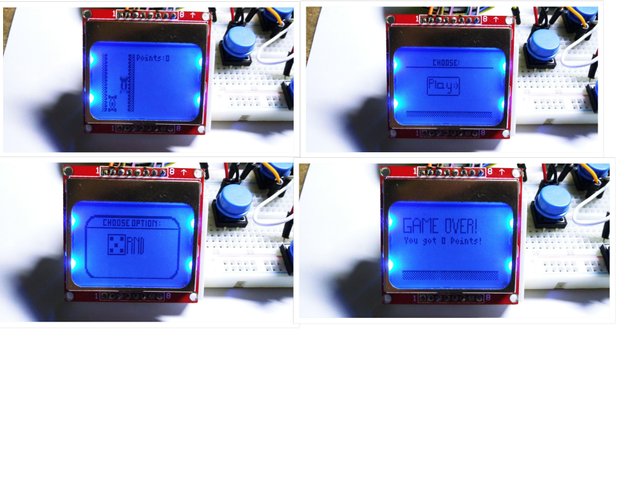
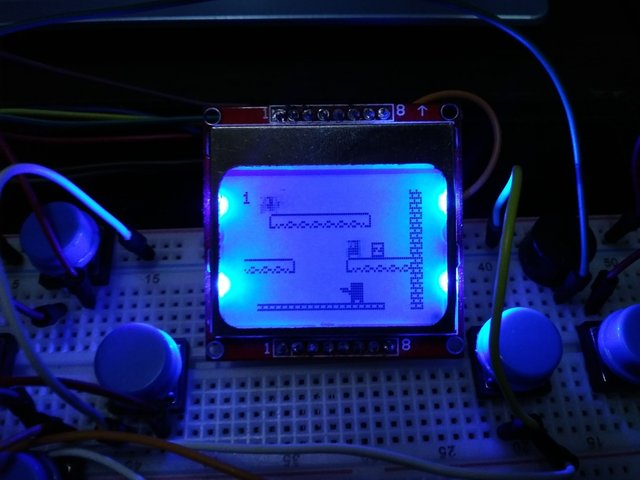
When the game main screen is displayed on the screen of nokia 5110 LCD as shown below, firstly, the LCD is connected without any abnormality! As you can see on the screen, you can operate with three buttons on the main screen.
The operations for each button are as follows. So let's test each button through the game to see if it works. In case of Pong Game, it is possible to play game through Up Button and Down Button. You can check if the piezo buzzer is connected properly by confirming that the sound of the game sounds well.Press C Button during game to return to main screen!
- Step 7: INSTALL GAMES from GAMEBUINO
Now let's try uploading another game to our own diy gamebuino. we are going to use the via ino file on PC on USB cable since there is no SD card module in our DIY gamebuino.
Access the Gamebuino homepage to download the game .
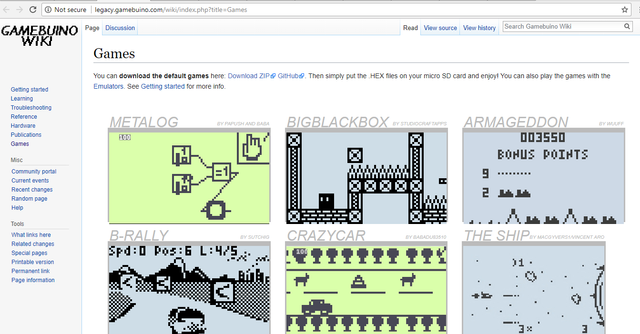
When you click on Game from the menu bar at the top of the homepage, you can see that various games are coming out. click on the DOWNLOAD button to install the zip file which contain the .ino file for arduino IDE.
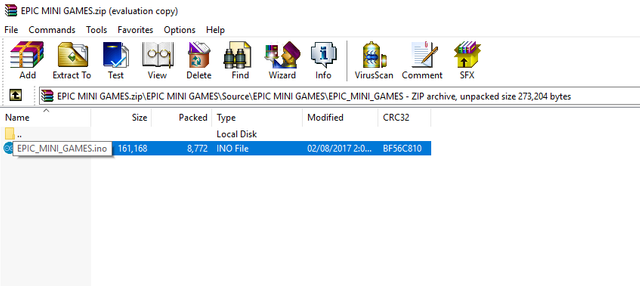
Lets try to download and play the EPIC MINI GAME to our DIY gamebuino. Download the zip file then open it, locate the source code .INO file then open it with arduino IDE.
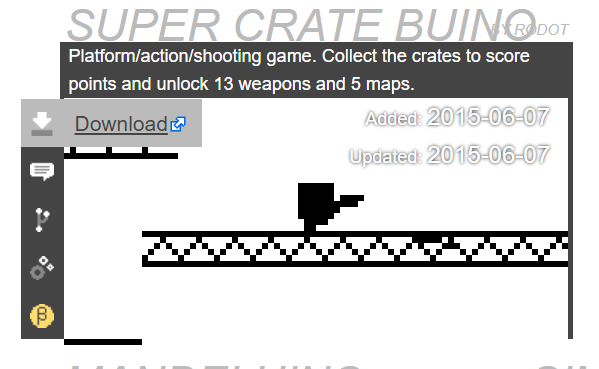
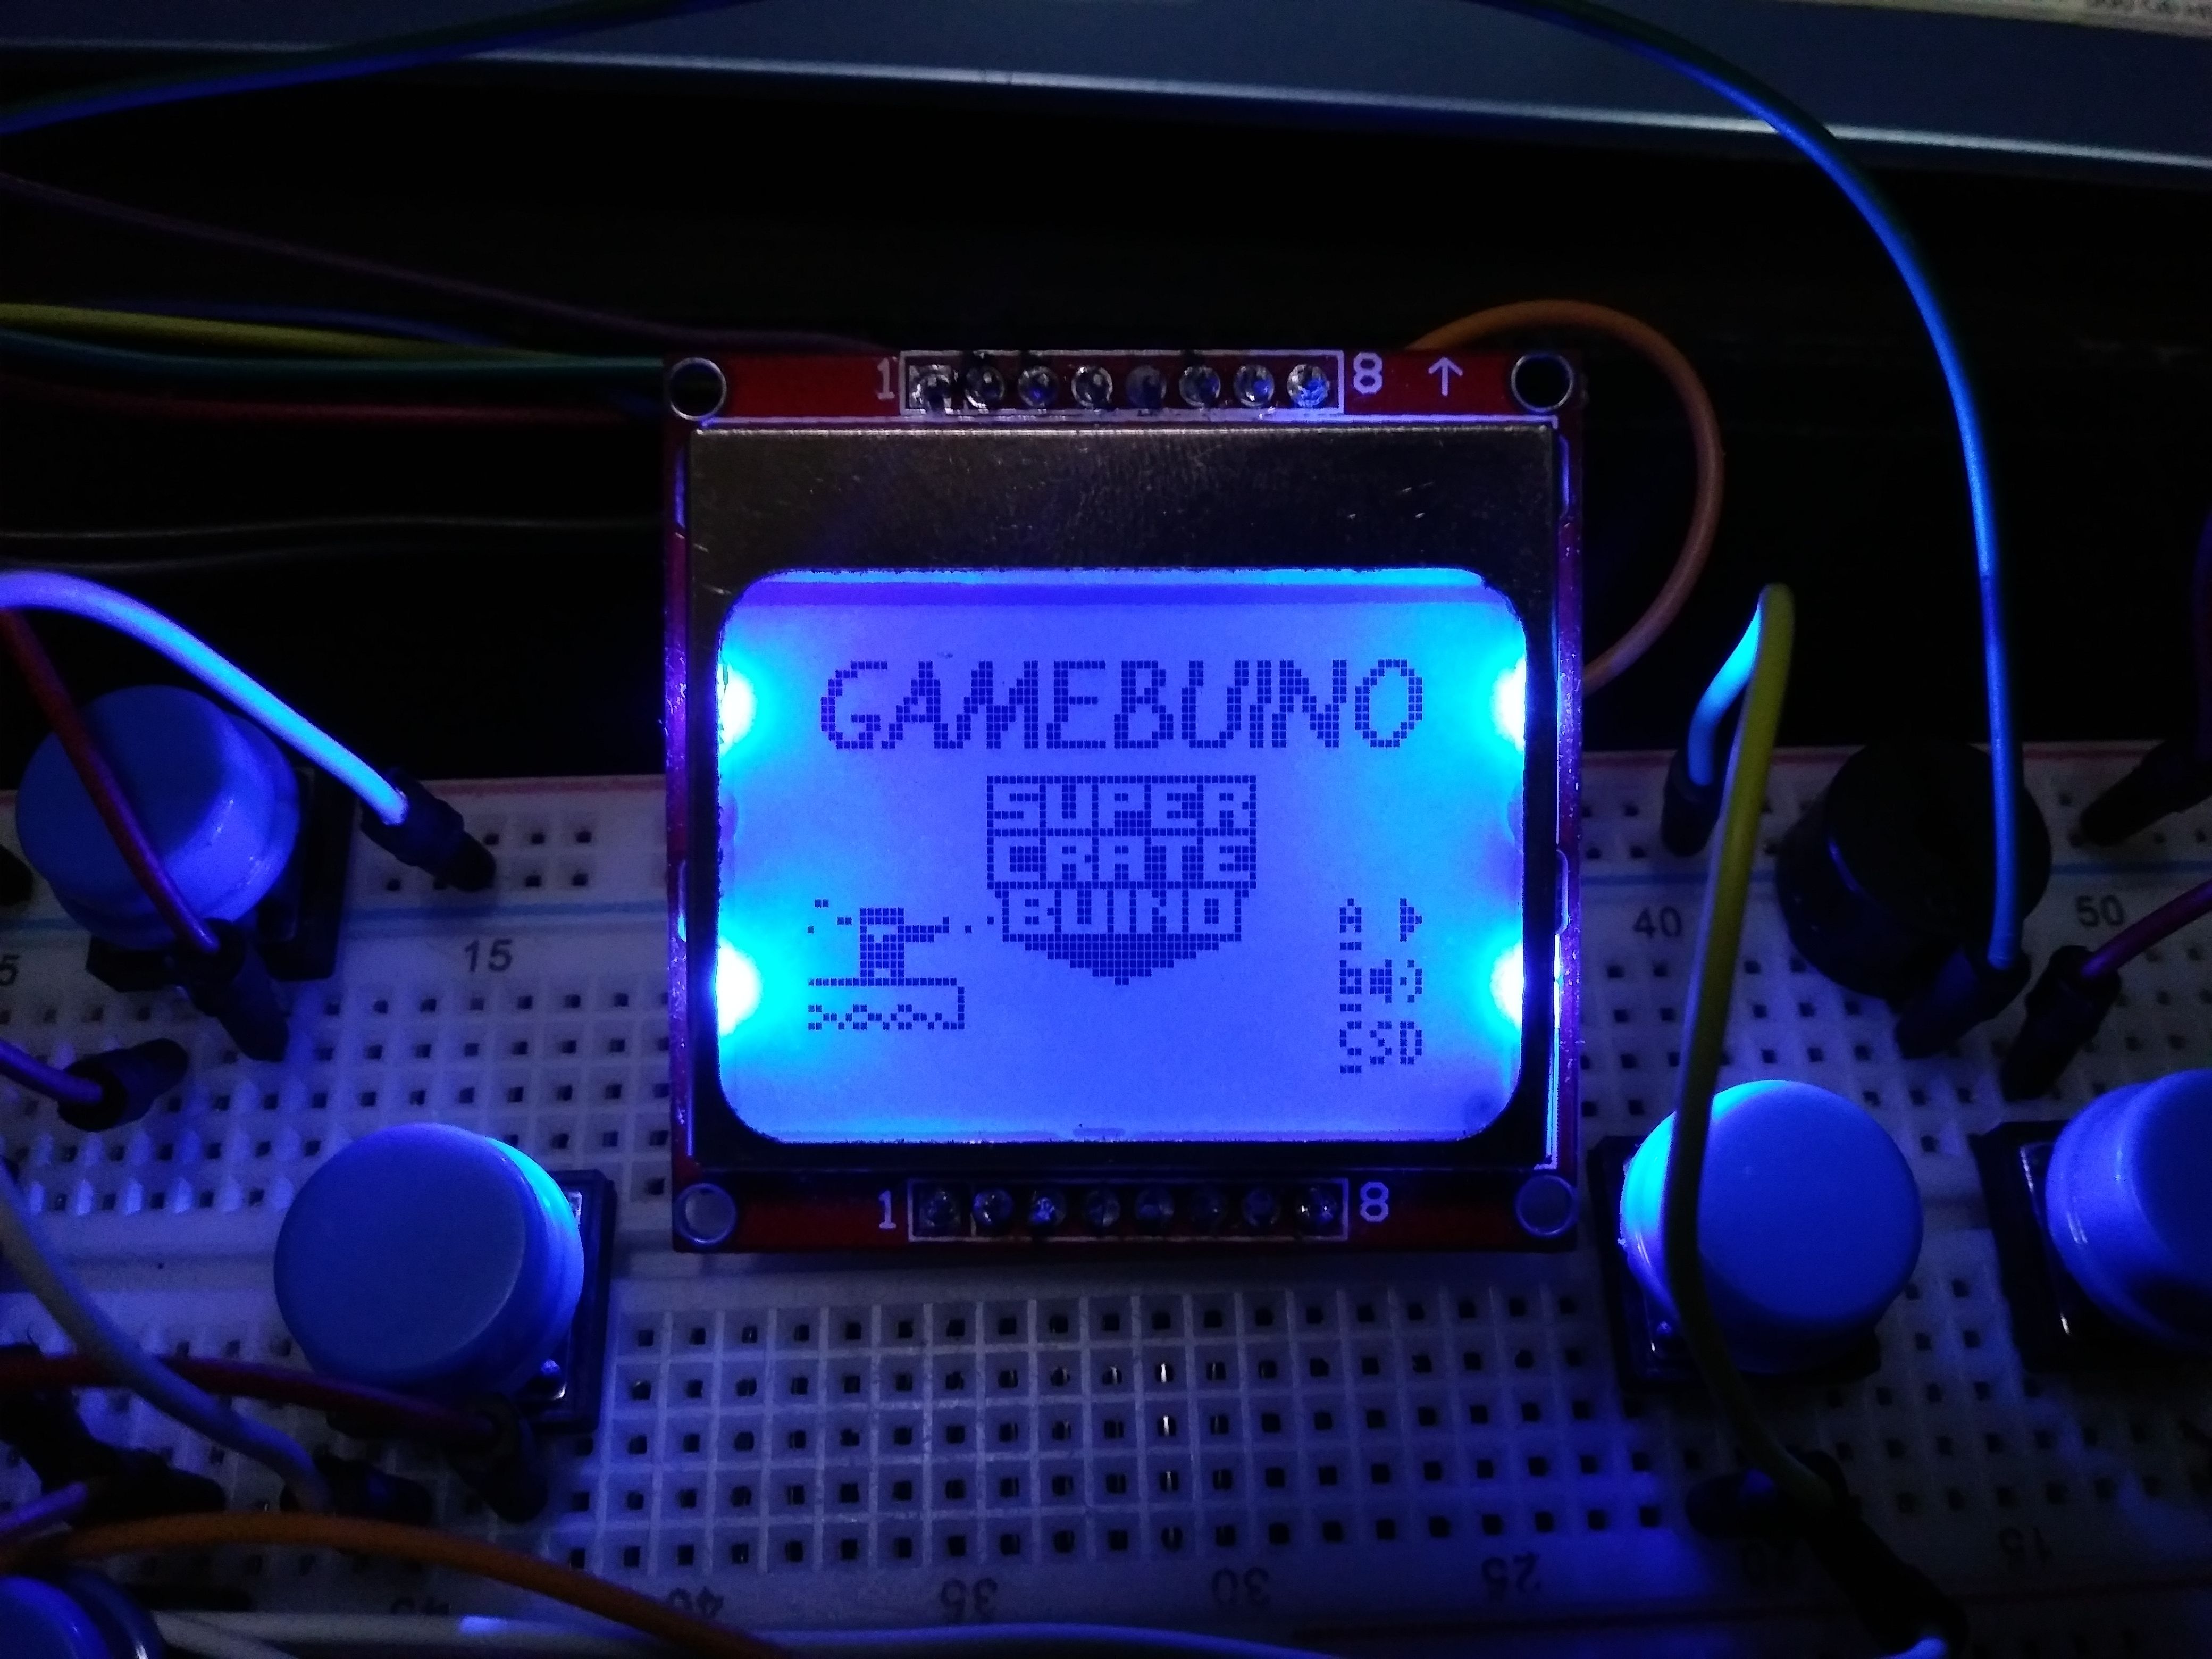
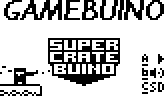
- LET'S PLAY Another Gamebuino Game Super Crate Buino
Here's How crate works
This is how the game works
- Each crate you collect gives you 1 point
- You have to kill the enemies (or they'll kill you), but it makes no points
- The enemies keep spawning at the top of the map, the higher you score the faster they spawn
- When an enemy reaches the bottom of the map, it comes back to the top instantly but angry and running faster
- You start with only a pistol and a little map, but there is a total of 13 very different weapons and 5 maps to unlock by scoring points
After creating the game through the emulator provided by Gamebuino, *
Here is the process of making DIY Gamebuino! The most difficult part seems to be the amount of information. But a series of trial and error seemed to have been a big help.. thank you for reading..
Posted on Utopian.io - Rewarding Open Source Contributors
Thanks for the contribution.
Need help? Write a ticket on https://support.utopian.io.
Chat with us on Discord.
[utopian-moderator]
kumusta boompanot ! :) that is cool! i like the little screen too! very retro yet modern looking. yay!
im following u and upvoted now.