Steemit Down? - Deploy Your Own Steemit Front-end in Docker
Your Own Steemit Website
When steemit was down last night, at first I wasn't sure what to do. Then I realized, the front-end is completely open source so I deployed my own copy. And now you can too!
What Will I Learn?
We will review a bash script that you can use to quickly deploy an instance of the Steemit front-end using the User data functionality at DigitalOcean.
Requirements
You will need an account at DigitalOcean and at least a cursory understanding of docker and command line Linux.
Difficulty
While some of the concepts are more advanced, the work itself is very simple.
- Basic
In truth, you can literally copy/paste The Script, click Create and be up and running, even if you do not understand any of this.
Tutorial Contents
A quick overview of the points we'll cover.
- How it Works
- Create Your Server
- Start
- Distribution
- Size
- Region
- User Data
- Create
- Build and Run
- Steemit is Online!
- The Script
How it Works
This is a proven deployment of the installation scripts outlined at Github.
We start by installing docker and git using yum, the standard CentOS package manager.
yum -y install docker git
systemctl start docker
systemctl enable docker
We then start the docker service and enable it to start at boot. Obviously, remove this if you don't want to automatically boot.
Next, we pull down the git repo.
cd /root
git clone https://github.com/steemit/condenser
The remainder of our script simply writes additional bash scripts to /root/bin to allow us to easily finish our deployment and manage the environment going forward. First, build.sh
#!/bin/bash
cd /root/condenser
docker build -t condenser .
This script simply moves to the directory where we pulled in condenser from git and builds it in docker. I tried executing this in the deploy itself, but ran into issues so I've scripted it for easy execution in the shell.
Once it's built, we'll call the first_run.sh script, which is just a shorthand way to call docker run for us.
#!/bin/bash
docker run -it -p 8080:8080 --name steemit condenser
All in, this entire script is pretty straightfoward.
Create Your Server
Start
We begin by logging in to DigitalOcean and clicking the Create button and selecting Droplets from the menu.

Distribution
Then, we select CentOS 7.4 as our distribution.

Size
In my testing, the 1GB instance didn't work well but 2GB seems alright so far, but has not been through any real testing so your results may vary.

One thing to consider is that you can always expand or decrease your memory and CPU, but the disk can only be expanded and cannot be decreased. If you pick a smaller size, you can resize memory/CPU larger and roll back to a smaller size later, so keep this in mind as you decide on a size.
Region
In the simplest sense, pick a location geographically closest to you. For our purposes here the region is mostly up to your preference.
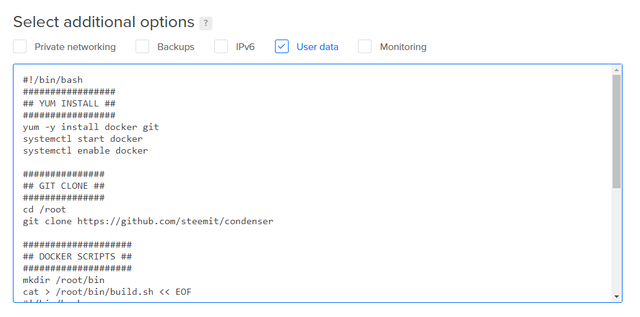
User Data
DigitalOcean provides User Data functionality that allows us to pass in a bash script to be executed at deployment so our droplet comes online ready to go.
Click the User data checkbox and a textarea will appear. Scroll to The Script and copy paste everything into this box.
Create
Here you can define a hostname for this instance or simply name it something convenient.
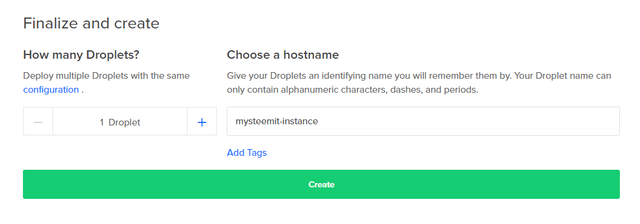
Click create and the deploy will begin.

Build and Run
When the deploy completes you'll get an email with login info. Check for that and get logged into your server. Putty is a free SSH client you can use.
Once logged in, we want to ensure the deploy script has completed by running tail -n1 /var/log/cloud-init.log in the server. If you log in quickly, you'll likely see:
# tail -n1 /var/log/cloud-init.log
2018-02-06 18:05:09,688 - util.py[DEBUG]: Running command ['/var/lib/cloud/instance/scripts/part-001'] with allowed return codes [0] (shell=False, capture=False)
If you look at /var/lib/cloud/instance/scripts/part-001 you'll see it is the script we pasted into the User data.
When it finishes you'll see SUCCESS like this:
# tail -n1 /var/log/cloud-init.log
2018-02-06 18:06:10,252 - handlers.py[DEBUG]: finish: modules-final: SUCCESS: running modules for final
At this point, we are ready to execute our scripts.
First, we need to build condeser in docker. Our build.sh script handles this.
Execute that script with this command /root/bin/build.sh and you'll see output like this.
# /root/bin/build.sh
Sending build context to Docker daemon 16.17 MB
Step 1 : FROM node:8.7
Trying to pull repository docker.io/library/node ...
8.7: Pulling from docker.io/library/node

85b1f47fba49: Extracting [====================>                              ] 21.73 MB/52.6 MB
5409e9a7fa9e: Download complete
661393707836: Download complete
1bb98c08d57e: Downloading [=======================================>           ] 107.3 MB/134.7 MB
f957ac1b6e47: Download complete
166b7c18b759: Download complete
02cb65a8d0f6: Download complete
9052b6207e12: Download complete
The build does take awhile, roughly 10 minutes in my testing, so now is a great time to refill your coffee.
Once it completes, you'll see something like this and your command prompt will return.
Successfully built 4c2d6470c95d
Now, we can actually run the docker build with the /root/bin/first_run.sh script.
When you execute this, you'll quickly see it has started.
# /root/bin/first_run.sh
yarn run v1.3.2
$ NODE_ENV=production node lib/server/index.js
application server starting, please wait.
Worker process started for port 8080
After the first time, the docker container will exist with the name steemit so you can stop and start as usual with docker commands.
docker stop steemit
docker start steemit
Steemit is Online!
Then, just go to http://your_ip_address:8080 and you can start browsing Steemit on your own private front-end! Again, this does run on port 8080 so we need to append :8080 to our URL in the browser.
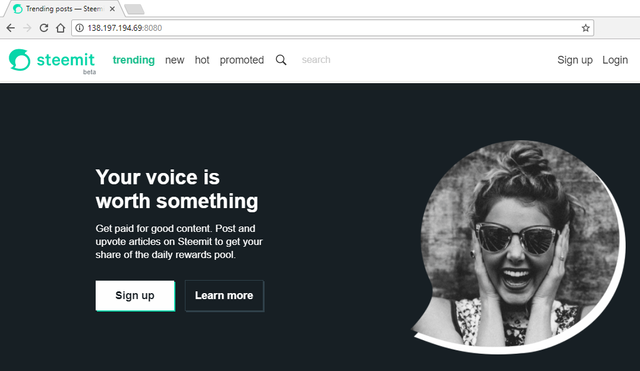
All of the functionality is available, so you can login, upvote, and create posts.
Keeping you on steemit, even when steemit itself is having trouble!
The Script
#!/bin/bash
#################
## YUM INSTALL ##
#################
yum -y install docker git
systemctl start docker
systemctl enable docker

###############
## GIT CLONE ##
###############
cd /root
git clone https://github.com/steemit/condenser

####################
## DOCKER SCRIPTS ##
####################
mkdir /root/bin
cat > /root/bin/build.sh << EOF
#!/bin/bash
cd /root/condenser
docker build -t condenser .
EOF
cat > /root/bin/first_run.sh << EOF
#!/bin/bash
docker run -it -p 8080:8080 --name steemit condenser
EOF
cat > /root/bin/stop_steemit.sh << EOF
#!/bin/bash
docker stop steemit
EOF
cat > /root/bin/start_steemit.sh << EOF
#!/bin/bash
docker start steemit
EOF
chmod +x /root/bin/*.sh
Posted on Utopian.io - Rewarding Open Source Contributors
Hey @blervin I am @utopian-io. I have just upvoted you!
Achievements
Suggestions
Get Noticed!
Community-Driven Witness!
I am the first and only Steem Community-Driven Witness. Participate on Discord. Lets GROW TOGETHER!
Up-vote this comment to grow my power and help Open Source contributions like this one. Want to chat? Join me on Discord https://discord.gg/Pc8HG9x
What is the backend from where does the data come?
This is all an open source project of the actual code running the steemit.com front-end.
There is no backend in this deployment, but the project says you can run MySQL. This makes real-time calls to a
steemdserver to get all the data.@blervin, I like your contribution to open source project, so I upvote to support you.
Thank you for the contribution. It has been approved.
You can contact us on Discord.
[utopian-moderator]