Build A Simple Curriculum Vitae Mobile Application With Ionic Framework in 3 Days [ Part 1 of 3]
Curriculum Vitae Mobile Application With Ionic Framework
Software Requirements:
- NodeJS [Download](https://nodejs.org/en )
- Java JDK [Download]( https://www.oracle.com/technetwork/java/javase/downloads/jdk8-downloads-2133151.html)
- Ionic Framework [Download]( https://ionicframework.com/docs/cli/package/download/)
- Sublime (any preferred code editor)
- Browser (Firefox Mozilla or Chrome or Other)
What you will learn:
In this tutorial, you will learn about how to Build The Simple CV (Curriculum Vitae) Mobile Application With Ionic Framework.
Details What do you will learn :
- How to start a mobile application using the ionic framework
- Learn how to make a New Project Application ( Curriculum vitae Mobile Application)
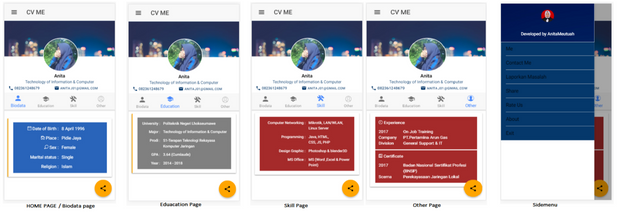
- How to add a component of ionic like as Grid, list, Image & some other to HomePage.
- How to testing it
Tutorial
Today I will show to you how to make a Simple CV Mobile Application with the ionic framework.
You can make a mobile application be easily and fastly with this platform. This framework is cross-platform and open source on Github. I will make the CV application because this is so important when we are searching for a job right? And at the CV there are have your photo, biodata, contact, your skills, your education & other your personality. Ok, let's get started...
- I assume you have downloaded it all of the Software Requirements. Now you can check all with command prompt first to see your version of ionic with this code : ionic -v.
- To starting with ionic we must be using the Command Prompt (CMD) to manage the ionic project.
- Make a new project on ionic we must download the ionic template with CMD, there is a blank template, side menu, tabs, and super template.
- Ok, I will start with a sidemenu template to make the this CV Mobile Application. 5. Next step, on your Command windows/ CMD, open the folder where you want to create the application use command : cd [your directory]. After that write this :
ionic start myapp sidemenu.
5. have done it now you won't see of the folder structure of your project? This so important to understand the pupose of every directory. So open your directory folder to see that.
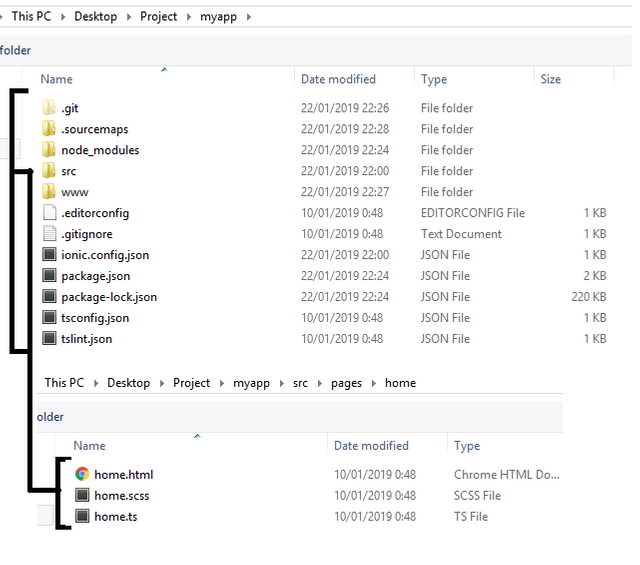
6. Now you can see There are have a folder with name node modules, plugins, resources, src, www and some other file. So we will use the app & pages folder of src folder for manage & Styling our application.
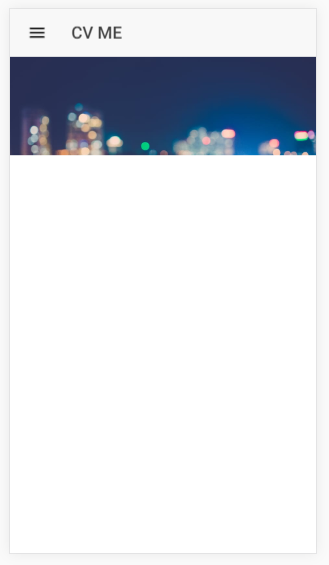
7. To test the project, open CMD and write this code: ionic serve this is for to testing/run the ionic application via your browser & press F12 to access the developer console. This result of sidemenu template.
https://ipfs.pics/QmW3FgNGeD46kHEryFUw1ftEUqRw254WkKxYeKaouz7DJA
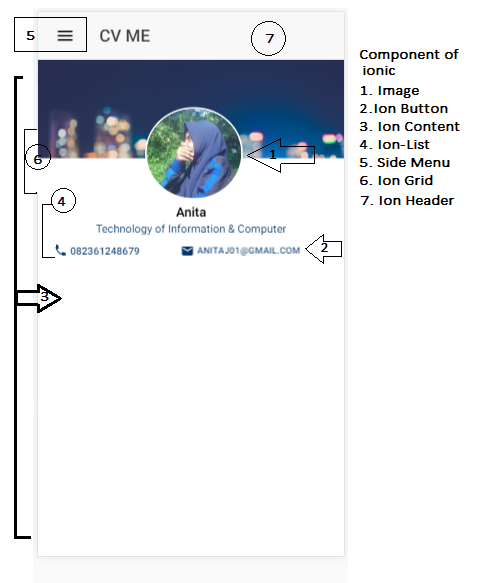
8. OK let's go to write code and styling our application. Open your code editor and then open folders project and open the home.html. In this HTML file I will add and using : Ion-grid, Image and Ion-list. This picture below to see that components :
9. Ok first. I will put a background image (component: image) to Home Page. To do that we must Theming/styling on our CSS file (Home.css). I will set this component with using the grid (component: ion-grid) for divide the place for component. -To add a background image to ion-content of the home.html and add this code :
<ion-header no-border>
<ion-navbar>
<button ion-button menuToggle style="color:black">
<ion-icon name="menu"></ion-icon>
</button>
<ion-title>CV ME</ion-title>
</ion-navbar>
</ion-header>
<ion-content style="margin-top:0px">
<ion-grid class="g1">
</ion-grid>
</ion-content>
add code to Home.CSS
page-home {
.g1{
background-image:url('../assets/img/bg1.jpg');
background-size:100%;
}
at there i was set ion-grid component with class name "g1" and in home.css
i was set the backgroud-color and background-size. Dont forget to put a image in folder assets/image.
9. Next, add a photo profile to page in other ion grid with class name is g2. I set this photo at center with align-content in home.css. code :
<ion-grid no-padding class="g2">
<img class="i" src="assets/img/poto.jpg" />
<b> <p class="p">Anita</p></b>
<p class="p2">Technology of Information & Computer</p>
</ion-grid>
code home.css :
home.css
img{
width: 32%;
height: 30%;
align-content:center;
display:block;
margin-top:-60px;
margin-left:35%"
border:2px solid #fff;
border-radius:50%;
}
.p{
text-align:center;
font-size: 15px;
color: black;
height:5px;
margin-top:6px;
}
.p2{
text-align:center;
font-size: 13px;
color: #05386B;
height:5px;
margin-top:1px;
margin-bottom:1px; }
result :
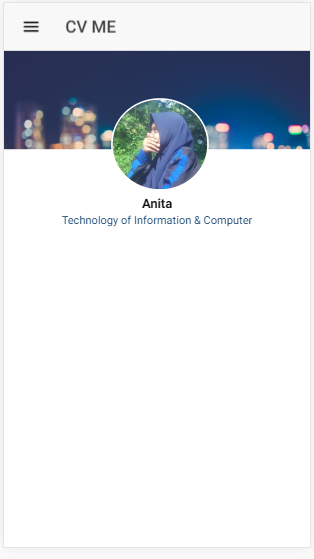
styling image to be image-avatar with border-radius is so easy.
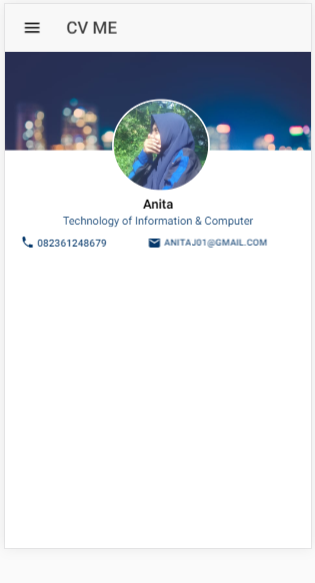
Now i will add button component for telephone number and email using ion-button.
i will put button between ion-row, please following this code below :
<ion-row>
<ion-col class="colom"col-5>
<button class="b" ion-button color="light" clear icon-start>
<ion-icon name="call"></ion-icon>082361248679
</button>
</ion-col>
<ion-col class="colom" col-7>
<button class="b2" ion-button color="light" clear icon-start>
<ion-icon name="mail"></ion-icon>
</button>
</ion-col>
</ion-row>
Home.css
.b{
font-size:12px;
color: #05386B}
.b2{
font-size:11px;
color:#05386B;
}
reload again and this my result :
Thats result of this part. So Next [Part 2] i will show to you how to add and theming a page, how to add & theming component ion-card and add the tabs on Home Page.
Get my full code on [Github](https://github.com/anitatmj/CV-Mobile-App-with-Ionic)
& [Ionic Repository on Github ](https://github.com/ionic-team/ionic)
Hey, @anitatmj!
Thanks for contributing on Utopian.
We’re already looking forward to your next contribution!
Get higher incentives and support Utopian.io!
Simply set @utopian.pay as a 5% (or higher) payout beneficiary on your contribution post (via SteemPlus or Steeditor).
Want to chat? Join us on Discord https://discord.gg/h52nFrV.
Vote for Utopian Witness!
thankss @utopian-io
Hi @anitatmj!
Your post was upvoted by @steem-ua, new Steem dApp, using UserAuthority for algorithmic post curation!
Your post is eligible for our upvote, thanks to our collaboration with @utopian-io!
Feel free to join our @steem-ua Discord server
thanks