[Part 2] Simple Chat Application using DjangoRestFramework
If you haven't read the previous Part of this tutorial, please consider reading it to ensure continuity:
[Part1] Creating a Simple Chat App using DjangoRestFramework
We will use the APIs we created before, in the previous tutorial for several purpose including User management and Message transmission.
So in this part, we are going to learn:
- Creating Views for front-end.
- Designing Templates for the views.
- Accessing and manipulating the Database realtime with jQuery AJAX through the DRF API we created before.
Before starting, we have to set up a folder for our HTML templates and another for static files such as CSS and JS files.
First of all, Create folders named template and static for the specified purpose in the project directory.
For setting a directory for the templates, edit TEMPLATES settings in ChatApp\settings.py
TEMPLATES = [
    {
        'BACKEND': 'django.template.backends.django.DjangoTemplates',
        'DIRS': [os.path.join(BASE_DIR,  'templates')], /*We added the templates folder in our project's base directory*/
        'APP_DIRS': True,
        'OPTIONS': {
            'context_processors': [
                'django.template.context_processors.debug',
                'django.template.context_processors.request',
                'django.contrib.auth.context_processors.auth',
                'django.contrib.messages.context_processors.messages',
            ],
        },
    },
]
To setup the static files folder, just copy this line to the end of Chatapp/settings.py
STATICFILES_DIRS = [os.path.join(BASE_DIR, 'static')]
Our project directory now looks like this :
ChatApp
├── ChatApp
├── chat
├── db.sqlite3
├── manage.py
├── static
└── templates
Download the MaterializeCSS files required for our app.
Extract the contents to the static folder such that the directory looks like this :
static
├── css
│   ├── materialize.css
│   ├── materialize.min.css
│   └── style.css  //For custom styles (Not a part of MaterializeCSS)
├── fonts
│   └── roboto
└── js
    ├── chat.js  //For custom scripts (Not a part of MaterializeCSS)
    ├── materialize.js
    └── materialize.min.js
The Front-End
As specified in the previous part, we use the MaterializeCSS Framework for designing the UI components. It is a very useful framework which provides easy integration of Material design to our Web pages. It also have a lot of components pre-coded which makes it so easy for newbies.
P.S. I don't consider myself as a 'Designer' type so please bear with my UI designs, lol.
Our app needs a Front-end or UI consisting:
- A User Login & Registration page
- A Registration page
- Chat Console page
Import the required modules for the views
from django.contrib.auth import authenticate, login #Django's inbuilt authentication methods
from django.contrib.auth.models import User #Inbuilt User model
from django.http.response import JsonResponse, HttpResponse
from django.shortcuts import render, redirect
from django.views.decorators.csrf import csrf_exempt
from rest_framework.parsers import JSONParser
from chat.models import Message
from chat.serializers import MessageSerializer, UserSerializer
Let's create a basic Login page.
For that first of all create a view:
def index(request):
    if request.user.is_authenticated: #If the user is authenticated then redirect to the chat console
        return redirect('chats')
    if request.method == 'GET':
        return render(request, 'chat/index.html', {})
    if request.method == "POST": #Authentication of user
        username, password = request.POST['username'], request.POST['password'] #Retrieving username and password from the POST data.
        user = authenticate(username=username, password=password)
        if user is not None:
            login(request, user)
        else:
            return HttpResponse('{"error": "User does not exist"}')
        return redirect('chats')
To assign a URL to the view add the following line to the urlpatterns list in ChatApp/chat/urls.py
urlpatterns = [
     ...
     path('', views.index, name='index'),
]
Now lets create the template, templates/chat/index.html for the view:
{% load staticfiles %} (html comment removed: Django template tag for loading static files)
  <!DOCTYPE html>
  <html>
    <head>
      (html comment removed: Import Google Icon Font)
        <link href="https://fonts.googleapis.com/icon?family=Material+Icons" rel="stylesheet">
        (html comment removed: Import materialize.css)
        <link type="text/css" rel="stylesheet" href="{% static 'css/materialize.min.css' %}"  media="screen,projection"/>
        <link type="text/css" rel="stylesheet" href="{% static 'css/style.css' %}"  media="screen,projection"/>
      (html comment removed: Let browser know website is optimized for mobile)
        <meta name="viewport" content="width=device-width, initial-scale=1.0"/>
      (html comment removed: Import jQuery before materialize.js)
        <script type="text/javascript" src="https://code.jquery.com/jquery-3.2.1.min.js"></script>
        <script type="text/javascript" src="{% static 'js/materialize.min.js' %}"></script>
        <script type="text/javascript" src="{% static 'js/chat.js' %}"></script>
    </head>
    <body>
    {% block body %}
        <div class="section blue lighten-3">
            <div class="container white-text center-align text">
            <h2>Chat</h2>
            <p>A simple Chat App using DjangoRestFramework</p>
            <div class="chip">
                <img src="https://opbeat.com/docs/static/images/stacks/logo_django_alt.svg" class="white">
                Django
            </div>
            <div class="chip">
                <img src="http://materializecss.com/res/materialize.svg" class="white">
                MaterializeCSS
            </div>
            </div>
        </div>
        <div class="container">
            <div class="row">
            <div class="col s12 m8 l6 offset-m2 offset-l3">
                <div class="section center-block">
                <div>
                    {% block form %}
                    <h3>
                    Login
                    </h3>
                    <form id="login-form" class="form-group" method="post">
                        {% csrf_token %}
                        <div class="row">
                            <div class="input-field col s12">
                                <input name="username" id="id_username" type="text">
                                <label for="id_username">Username</label>
                            </div>
                        </div>
                        <div class="row">
                            <div class="input-field col s12">
                                <input name="password" id="id_password" type="password">
                                <label for="id_password">Password</label>
                            </div>
                        </div>
                        <div class="row">
                            <div class="col s8">
                                <a href="{% url 'register' %}">Register</a>
                            </div>
                            <div class="col s4">
                            <div class="right">
                                <button class="btn blue waves-effect waves-light pull-s12">Login</button>
                            </div>
                            </div>
                        </div>
                    </form>
                    {% endblock %}
                </div>
            </div>
            </div>
            </div>
        </div>
        {% endblock %}
    </body>
  </html>
Save it as index.html inside the a folder chat, inside templates folder.
templates/
└── chat
           └── index.html
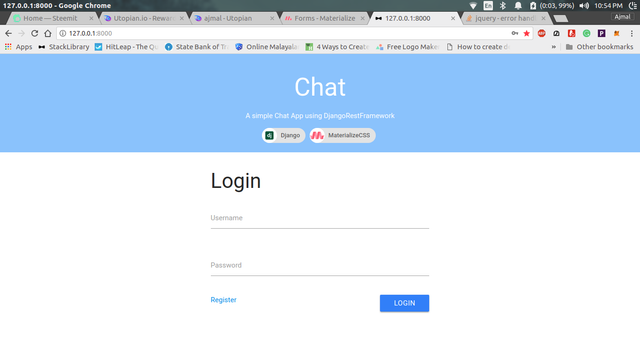
The above template will look like this:
We also need a way of registration for the new users. Let's create a registration view.
# Simply render the template
def register_view(request):
    if request.user.is_authenticated:
        return redirect('index')
    return render(request, 'chat/register.html', {})
URL:
urlpatterns = [
    ...
    path('register', views.register_view, name='register'),
]
Now template:
For registration page we can make use of the above template using Django Template Extension.
templates/chat/register.html
{% extends 'chat/index.html' %} (html comment removed:  Extending index.html )
{% block form %} (html comment removed:  Overriding block form )
    <h3>
    Register
    </h3>
    <form id="register-form" class="form-group">
        {% csrf_token %}
        <div class="row">
            <div class="input-field col s12">
                <input name="username" id="id_username" type="text" class="validate invalid">
                <label for="id_username" data-error="Username already taken">Username</label>
            </div>
        </div>
        <div class="row">
            <div class="input-field col s12">
                <input name="password" id="id_password" type="password">
                <label for="id_password">Password</label>
            </div>
        </div>
        <div class="row">
            <div class="input-field col s12">
                <input name="password2" id="id_password2" type="password">
                <label for="id_password2">Repeat Password</label>
            </div>
        </div>
        <div class="row">
            <div class="col s12">
            <div class="right">
                <button class="btn blue waves-effect waves-light pull-s12">Register</button>
            </div>
            </div>
        </div>
    </form>
    <script>
    //Script for validating user registration.
    $(function () {
        $('#register-form').on('submit', function (event) {
            event.preventDefault(); //Prevent the default behavior on submit.
            var username = $('#id_username').val();
            var password;
            if(username !== '') //Check if username in not blank
            {
                password = $('#id_password').val();
                if(password !== '' && password === $('#id_password2').val()) //Check if password is not blank and matches with the confirmation.
                {
                    register(username, password); //Calling register function, which we will define in 'chat.js'
                }
                else{
                    alert("The passwords doesn't match!");
                }
            }
            else
                alert("Please enter a valid username!");
        })
    })
    </script>
{% endblock %}
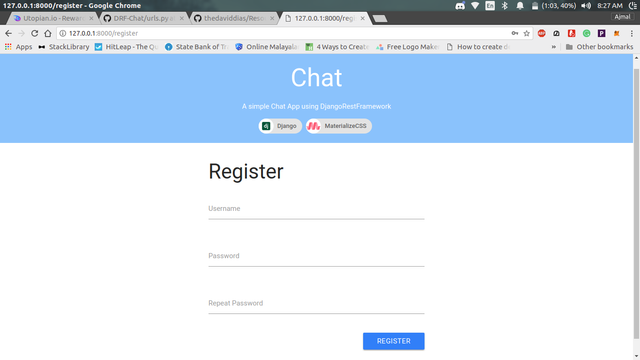
Registration page will look like this :
Now The chat console:
For chatting console, we need two views, one for just listing the users and selecting them and another for chatting with one particular user.
1. View for Listing the Users
View:
def chat_view(request):
    """Render the template with required context variables"""
    if not request.user.is_authenticated:
        return redirect('index')
    if request.method == "GET":
        return render(request, 'chat/chat.html',
                      {'users': User.objects.exclude(username=request.user.username)}) #Returning context for all users except the current logged-in user
URL:
urlpatterns = [
    . . .
    path('chat', views.chat_view, name='chats'),
]
Template :
Please note: The scripts for sending messages is included along with the template at the end of it.
templates/chat/chat.html
{% extends 'chat/index.html' %}
{% block body %}
<nav class="blue lighten-3">
    <div class="nav-wrapper container">
      <a href="#" class="brand-logo">Chat</a>
      <ul id="nav-mobile" class="right hide-on-med-and-down">
          <li><a href="">{{ request.user.username }}</a></li>
          <li><a href="{% url 'logout' %}"><i class="material-icons">power_settings_new</i></a></li>
      </ul>
    </div>
</nav>
    <div class="section" style="height: 80vh">
    <div class="row">
        <div class="col s3">
        <div class="card">
            <div class="collection">
                {% for user in users %}
                <a href="{% url 'chat' request.user.id user.id %}" id="user{{ user.id }}" class="collection-item row">
                    <img src="https://frontend-1.adjust.com/new-assets/images/site-images/interface/user.svg" class="col s4">
                    <div class="col s8">
                    <span class="title" style="font-weight: bolder">{{ user.username }}</span>
                    </div>
                </a>
                {% endfor %}
            </div>
        </div>
        </div>
        <div class="col s9">
            <div class="card">
            <div id="board" class="section grey lighten-3" style="height: 68vh; padding: 5px; overflow-y: scroll">
                {% block messages %}
                {% endblock %}
            </div>
            <form id="chat-box" class="form-group {% block hide %}hide{% endblock %}" method="post">
                {% csrf_token %}
                <div class="row">
                    <div class="col s11">
                        <div class="input-field">
                            <input id="id_message" name="message" type="text" placeholder="Type your message..">
                        </div>
                    </div>
                    <div class="col s1" style="line-height: 80px">
                        <button class="btn btn-floating blue lighten-2 waves-effect waves-light"><i class="material-icons">send</i></button>
                    </div>
                </div>
            </form>
            </div>
        </div>
    </div>
    </div>
    {% load staticfiles %}
    (html comment removed:  Including the scripts required )
    <script src="{% static 'js/chat.js' %}"></script>
    <script>
        // For receiving, set global variables to be used by the 'receive' function
        sender_id = "{{ receiver.id }}"; //Context variable for receiver
        receiver_id = "{{ request.user.id }}"; //Context variable for current logged in user
        //For sending
        $(function () {
            scrolltoend(); // Function to show the latest message, which is at the bottom of the message box, by scrolling to the end
            //Handling the submit event to send the message.
            $('#chat-box').on('submit', function (event) {
                event.preventDefault();
                var message = $('#id_message');
                send('{{ request.user.username }}', '{{ receiver.username }}', message.val()); //Send function will be defined within 'chat.js'
                message.val(''); //Clear content of the the input field after sending
            })
        })
    </script>
{% endblock %}
2. View to render template for Sending and Receiving messages
View:
#Takes arguments 'sender' and 'receiver' to identify the message list to return
def message_view(request, sender, receiver):
    """Render the template with required context variables"""
    if not request.user.is_authenticated:
        return redirect('index')
    if request.method == "GET":
        return render(request, "chat/messages.html",
                      {'users': User.objects.exclude(username=request.user.username), #List of users
                       'receiver': User.objects.get(id=receiver), # Receiver context user object for using in template
                       'messages': Message.objects.filter(sender_id=sender, receiver_id=receiver) |
                                   Message.objects.filter(sender_id=receiver, receiver_id=sender)}) # Return context with message objects where users are either sender or receiver.
URL:
urlpatterns = [
     ...
     path('api/messages/<int:sender>/<int:receiver>', views.message_list, name='message-detail'),
]
Template:
Note: The scripts for receiving the messages is included at the end of this template.
templates/chat/messages.html
{% extends 'chat/chat.html' %}
{% block hide %}{% endblock %}
{% block messages %}
    {% for message in messages %}
    {% if message.sender == request.user %}
<div class="card-panel right" style="width: 75%; position: relative">
    <div style="position: absolute; top: 0; left:3px; font-weight: bolder" class="title">You</div>
    {{ message }}
</div>
    {% else %}
<div class="card-panel left blue lighten-5" style="width: 75%; position: relative">
    <div style="position: absolute; top: 0; left:3px; font-weight: bolder" class="title">{{ message.sender }}</div>
    {{ message }}
</div>
    {% endif %}
    {% endfor %}
<script>
$(function () {
    //Highlighting the user that is currently selected for chatting in the users list
    $('#user{{ receiver.id }}').addClass('active');
    //Call receive function at an interval of 1 second to check for new messages in the database
    setInterval(receive,1000)
})
</script>
{% endblock %}
Logout View
Logging out a user is simple, we use the django's builtin logout method for this. Just import it in the chat/urls.py and create a suitable URL pointing to the method
chat/urls.py
urlpatterns = [
    ...
    path('logout', logout, {'next_page': 'index'}, name='logout'),
]
{'next_page': 'index'} is specified to redirect the User after logging out.
Database access and manipulation using AJAX
Create a javascript file chat.js inside ChatApp/static/js. Now we define the various JS functions we used in our templates:
- register function used in register.html
/* Register function takes two arguments: username and password, for creating the user. */
function register(username, password) {
     //Post to '/api/users' for creating a user, the data in JSON string format.
    $.post('/api/users', '{"username": "'+ username +'", "password": "'+ password +'"}',
        function (data) {
        window.location = '/'; //Redirect to login page if success
        }).fail(function (response) {
            $('#id_username').addClass('invalid'); //Add class 'invalid' which will display "Username already taken" in the registration form if failed
        })
}
- send function to send the message using AJAX:
// We define a variable 'text_box' for storing the html code structure of message that is displayed in the chat box.
var text_box = '<div class="card-panel right" style="width: 75%; position: relative">' +
        '<div style="position: absolute; top: 0; left:3px; font-weight: bolder" class="title">{sender}</div>' +
        '{message}' +
        '</div>';
// Send takes three args: sender, receiver, message. sender & receiver are ids of users, and message is the text to be sent.
function send(sender, receiver, message) {
    //POST to '/api/messages', the data in JSON string format
    $.post('/api/messages', '{"sender": "'+ sender +'", "receiver": "'+ receiver +'","message": "'+ message +'" }', function (data) {
        console.log(data);
        var box = text_box.replace('{sender}', "You"); // Replace the text '{sender}' with 'You'
        box = box.replace('{message}', message); // Replace the text '{message}' with the message that has been sent.
        $('#board').append(box); // Render the message inside the chat-box by appending it at the end.
        scrolltoend(); // Scroll to the bottom of he chat-box
    })
}
Rendering the variable text_box in a blank page will give you this :
So it makes sense to manipulate this variable to render the messages received and sent easily.
- receive function for receiving the messages
// Receive function sends a GET request to '/api/messages/<sender_id>/<receiver_id>' to get the list of messages.
function receive() {
    // 'sender_id' and 'receiver_id' are global variable declared in the messages.html, which contains the ids of the users.
    $.get('/api/messages/'+ sender_id + '/' + receiver_id, function (data) {
        console.log(data);
        if (data.length !== 0)
        {
            for(var i=0;i<data.length;i++) {
                console.log(data[i]);
                var box = text_box.replace('{sender}', data[i].sender);
                box = box.replace('{message}', data[i].message);
                box = box.replace('right', 'left blue lighten-5');
                $('#board').append(box);
                scrolltoend();
            }
        }
    })
}
Here also, we make use of the text_box, in order to render the messages received by the function.
The recieve() function is called repeatedly at a 1 second interval to check for new messages, in the messages.html
- scrolltoend function.
This is just an animation function in order to keep the latest message view-able without scrolling each time it arrives.
function scrolltoend() {
    $('#board').stop().animate({
        scrollTop: $('#board')[0].scrollHeight
    }, 800);
}
So That's all!
We have successfully created a working web-based Chat Application using Django-Rest-Framework. I hope this tutorial was useful. Any doubts and correction are always welcome.
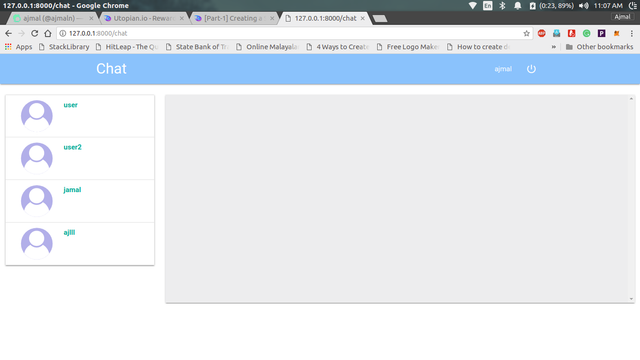
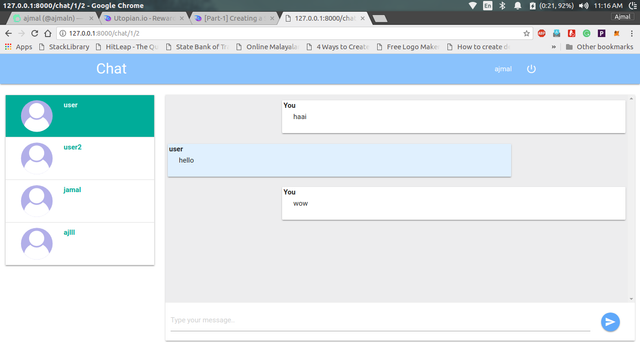
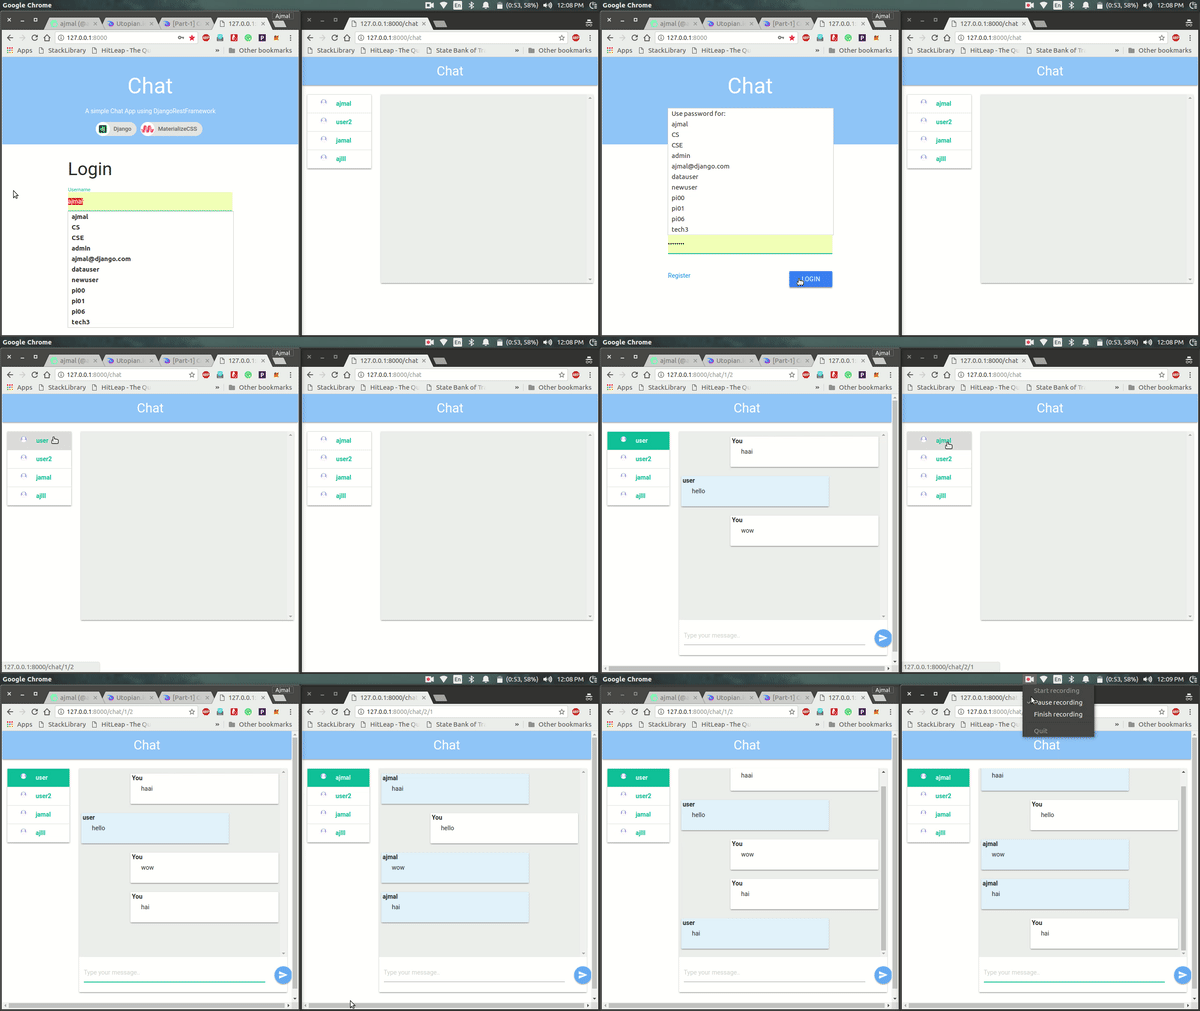
See The App in Action
And Finally...
Take a look at the Github Repo for DRF-Chat.
...Thank You...
Posted on Utopian.io - Rewarding Open Source Contributors

Your Post Has Been Featured on @Resteemable!
Feature any Steemit post using resteemit.com!
How It Works:
1. Take Any Steemit URL
2. Erase
https://3. Type
reGet Featured Instantly – Featured Posts are voted every 2.4hrs
Join the Curation Team Here
Wow, this is fascinating, @ajmaln! I never thought that someone like me with no training would be able to do something like this, but your instructions and resources make me feel like I could try it. I will have to keep this in mind for my website.
I have upvoted and resteemed this post for you. I found the link to this article on #thesteemengine.
Cheers!
@mitneb
Thank you.
Yes, I know that feeling. You just have to take an initiative to learn and practice, it's simple. Glad I could help you.
I agree with you that all it takes is a little initiative, and making the time to figure it out, ajmaln! Right now I am trying to figure out Discord and bot responses for my new Server. Oh, and also learning new job apps. Lots going on in the learning department right now.
Cheers!
@mitneb
Thank you for the contribution. It has been approved.
You can contact us on Discord.
[utopian-moderator]
So cool @ajmaln! I love the fact that you just jumped in!
If i want to send and receive media file, what else do i need to do apart from following?
Creating an attribute file in message model and adding the same attribute in MessageSerializer as well.
Hey @ajmaln I am @utopian-io. I have just upvoted you!
Achievements
Suggestions
Get Noticed!
Community-Driven Witness!
I am the first and only Steem Community-Driven Witness. Participate on Discord. Lets GROW TOGETHER!
Up-vote this comment to grow my power and help Open Source contributions like this one. Want to chat? Join me on Discord https://discord.gg/Pc8HG9x
This post has received a 0.10 % upvote from @drotto thanks to: @banjo.