[TUTORIAL] The ultimate guide, how to make posts so pretty that everyone must read it!

Content and style
A good content is very important but if you publish it in the ugly way, it will not make anyone want to read it.
This whole editing business might look a little complicated at first but if you spend some time to understand how to do it, you will be surprised, how easy it is. Come back to this post time-to-time when you forgot how to do something, make a cheat sheet of your own, more time you spend with learning, the more easier it gets.
We are what we repeatedly do. Excellence, then, is not an act but a habit. - Will Durant
Headlines
The headline is one of the most important parts. It have to be sexy, and cool but don't lie. If you lie in your title, the readers will notice it and they might quickly discredit your whole work, regardless of the truth in your post.
Just keep it short but not too short! A headline is for catching the eye, create interest, raise questions, astonish, etc. But the headline is not there to write your whole post in. Also if you write one word only, nobody will know what you want with it. 8-15 words are optimal.
Paragraphs, titles, and the use of pictures
People of the modern world have a very short focusing time. An email, a chat message, the tv in the background can make someone's attention slip from even the most important activities. It is not any different when they read your post. If you have a huge block of text, the reader might just get lost in the middle and never finishes. Therefore it is very important that you take your time and edit your post for not only to look pretty but to help the people to digest it. Break your text down to paragraphs, use line breaks if it's still too long, give a relevant title to every important part when possible.
The next thing after the headline and paragraphs is the thumbnail. The first picture in your blog is going to be used as a thumbnail. If you can not find any related photo to your topic, you can use any picture. Pixabay is a good source of free pictures which you can use at any time. Choose something nice. A green hill, or a snowy landscape, aquarium with colourful fishes, etc. depending on your desired audience's taste.
Here, I must mention that not every picture is free to use, actually most of the pictures on the internet, by american law, are automatically copyrighted as soon as they published. That's why you need to use some source where you can be 100% sure that it is free to use.

A proper editor
If you want to do good work, you need good tools. While you can use the editor on Steemit, my advice is that you should use an offline Markdown editor. I've heard many complaints from people using the editor on Steemit. It even happened with me that I've lost my post because of a bug on the homepage. When I clicked on Submit the post showed up in the "created" feed but it didn't got registered on the blockchain so after a page refresh it wasn't there anymore. If I weren't using and external editor, I would have to write the whole thing again.
Steemit is still in beta so you can find bugs if you are unlucky.
Anyway, the Steemit team is already working on the problem, so don't worry.
The tool you need: Minimalist Markdown Editor (MME).

I'm using MME since a while, to edit my work not only for blog post but sometimes for lengthy comments as well. It is not perfect because Steemit uses special styling CSS files which can not be used with this editor, so it will look a little different than it will on Steemit but that is not a big deal really.
MME is available offline as a chrome app and you can use the online version as well. I have not experienced any problems so far, so I as much as I know, it is a safe way of editing. If you're using the chrome app version, you can save your work to hard drive. If you are using the online version the site saves your work into a cookie, so if there is a blackout at your house and the computer shuts down, your work will be still there when you return to the editor.
The main reason of choosing MME is because it is simple to use. You are not distracted with any useless feature, just simply write your article and be happy. :) Also there is some function which is necessary to make your post absolutely perfect looking, professional style. Once you learned markdown, you will write your post simple and easy.
How can I use it?
When you open the app, you will see a window divided into two parts. On the left you write your text using markdown. On the right you will see the live preview. You have instant feedback on what you're doing, which is great.
At the top right corner of each side you will see some clickable menu. On the left you can open a quick markdown reference (cheat sheet), see the About page of MME and a settings button.
Please try those options yourself, I don't want to spend time to explain any of those, you can figure it out yourself very easily.
At the end of my tutorial (at justifying section) we will pay some attention to the right side options (HTML/Preview) which are going to be important.
Basic text formatting with Markdown
Heading:
If you want to give a title to your text or paragraph, you can do it by writing one or more hashtag # in front of your title. Don't forget a space between hashtags and the title.
If you type the following to the left side window in the editor:
# Heading level #1
## Heading level #2
### Heading level #3
#### Heading level #4
##### Heading level #5
###### Heading level #6
The result on the right will be:
Heading level #1
Heading level #2
Heading level #3
Heading level #4
Heading level #5
Heading level #6
I usually don't use level #1 heading because I find it too big. You maybe use it if you want something to be shouted out into the world!
Emphasis
A nice way to emphasise some part of your text is to use bold or italic formatting. It can be easily done with stars and/or underscores.
**two stars** or __underscores__ for bold
*one star* or _underscore_ for italic
*you can __combine stars and underscores__ however* you want
_you can **combine stars and underscores** however_ you want
~~two waves~~ for strike-trough
For the results:
two stars or underscores for bold
one star or underscore for italic
you can combine stars and underscores however you want
you can combine stars and underscores however you want
two waves for strike-trough
Line break
Between paragraphs you can leave and empty line. But in a long paragraph, sometimes you want to use line breaks to separate thoughts. It makes it easier to read.
If you want a line break you need to use two trailing spaces:
long, long, long paragraph⋅⋅  <--two trailing spaces than enter
next thought.
Result:
long, long, long paragraph
next thought.
Tables:
You can "draw" tables too, it's easy. Notice the second row where the alignment is set. - means left-, :-: means centered, and -: means right-aligned column. The number of dashes are irrelevant, the width of each column is set automatically.
| Tables        | Are           | Cool  |
| ------------- |:-------------:| -----:|
| col 3 is      | right-aligned | $1600 |
| col 2 is      | centered      |   $12 |
| zebra stripes | are neat      |    $1 |
Will give you the result:
| Tables | Are | Cool |
|---|---|---|
| col 3 is | right-aligned | $1600 |
| col 2 is | centered | $12 |
| zebra stripes | are neat | $1 |
Horizontal line
Using horisontal lines is another way to separate things. You need to type three stars.
***
Block quote
If you have a quote to share, you can use "quotation marks" of course, but if you have something longer than a few words you want to use quote box. Just type a > at the beggining of the line and paste your quote afterwards.
> Look at a stone cutter hammering away at his rock, perhaps a
hundred times without as much as a crack showing in it. Yet at the
hundred-and-first blow it will split in two, and I know it was not
the last blow that did it, but all that had gone before.
(Jacob A. Riis)
Look at a stone cutter hammering away at his rock, perhaps a hundred times without as much as a crack showing in it. Yet at the hundred-and-first blow it will split in two, and I know it was not the last blow that did it, but all that had gone before.
(Jacob A. Riis)
Links, Pictures and Videos
Links are simple
In markdown links and pictures can be created almost the same way. For a link, you need to define a visible text and the address:
[My profile](https://steemit.com/@neander-squirrel)
You will only see the visible text: My profile
You may emphasise the visible text as you wish according to the section above.
Pictures
Creating pictures are not so much different. You must start with an exclamation mark, after that everything is the same as a link. Your defined text only appears if the picture can not be loaded.

pic. 1:

pic. 2:

You will learn more about picture positioning in the HTML <Tags> section.
Picture uploaders
If your picture is not online (you don't have a link for it), you can use online picture uploaders like TinyPic, IMGUR, or Pasteboard.
You can choose from hundreds of available services but be careful because you need to copy the direct link of the uploaded picture! Some sites prefer to give you a so called "viewer" link where you can see the picture on a dedicated webpage. You have to make sure your link pointing directly to the picture: 
.jpg, .jpeg, .png, or .gif, just to name a few, the link is most likely good for use.
What if my picture is too big?
Unfortunately there is no method in Markdown for resizing pictures but you can use the following prefix to do the job:
https://img1.steemit.com/0x0/
Include this before your link to the picture and change the /0x0/ part to have desired picture size.
For example let's make the picture we used before appear to be only 50 pixel wide:

Notice that I left the second argument (height) on zero and it is automatically adjusted depending on the width (50) by keeping the original ratio. (No distortion)
You can not magnify images with this method it will only show in original size if you request too big dimensions!
If you need to magnify an image or you don't want to use this method above, you can use an online image resizer, like Bulk Resize Photos.
Videos
To embed videos you only need to paste the link for it. Steemit will get the thumbnail of the video from YouTube.
https://www.youtube.com/watch?v=Y1H_ml946uQ
Unfortunately you can not manipulate the size of the video display.
HTML <Tags>
As everything in the universe, Markdown too, has it's own limitations. Markdown is perfect for text styling but it can not affect the overall appearance of a paragraph, resize or position a picture. Yet, you need these things to make you blog look beautiful.
HTML is a programming language and HTML tags are the building blocks of most of the webpages.
We will use tag pairs to affect a section of our blog. Everything we write between the tag pairs, will have the desired effect.
Tag pairs are really two tags, one opening and one closing. The difference is only a lille "slash" / character before the name of the closing tag.
If it's not clear, I will explain it better with the <center></center> tag pair. Keep reading.
Center
When you use Markdown to show a picture or you type some text, it is by default, anchored to the left. Center aligning images, text, titles, paragraphs or anything you want with the use of <center> and </center> tag pair. Anything between these tags will be centered on the page. You always have to close the tag with the closing pair. If you forget, the affect will be extended throughout the rest of the document. Or in worst case it will mess up with other thins and something will not show correctly. So don't forget it:)
Example:

The result is:

The picture and this text is center aligned!
Floating pictures
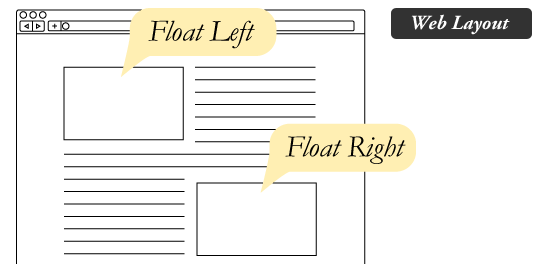
If you want to float pictures on the side of your paragraph you can use another tag pair. They crate a container around the picture and Steemit can make this container float on the side and your text will nicely flow around it.
For float on the left, the code is the following:
<div class="pull-left"></div> You might have noticed that this is a tag pair.
<div> and </div>. That is our container what I was mentioned earlier. The class="" part is the modifier. In this case it modifies the behaviour of the container to float on (pull to) the left: class="pull-left".Now that we have the container we have to put the picture inside. Guess what? We have to type the picture between the
<div></div> tag pairs. Like this:
You should see as you picture is floating on the right:
This is the paragraph we want the picture to be floating in. Hope
it doesn't sound very complicated because it is really simple to
do. All you have to remember is a few <tags> You can write these
down to sticky note and stick it onto your computer screen. :)
Floating on the right is the same thing just a little change in the modifier:
<div class="pull-right"></div>
Floating will not show correctly in Minimalist Markdown Editor because "pull-right" is a Steemit feature and not a standard. In MME you will only see the link to the picture shows above your paragraph. But I can assure you, if you have done the code correctly, it will be perfect on Steemit.
Justify
This is the last but maybe the most important effect you can use while beautifying your post. If you want 100% good looking post you must justify the text so it is pleases the eye.
You only have to do this once, when you're finished with your work on the article and there is nothing else left to do. Do you remember in MME we have those menus on the top, right? Please click on HTML view. (I've marked it with red on this picture)

Now you should see your post in HTML format on the right. Go to the very first character at the first line and type the following:
<div class="text-justify">
Than press enter. This is a <div> container with class="text-justify" modifier. You might have recognised it, you used similar when we were floating images. Because the <div> tag we just typed, misses his closing tag, we shall go to the end of the document. After the very last character in the very last line, press enter and type:
</div>
Now we are included the whole document into this container so all the texts will be nicely justified throughout the post.
<div class="text-justify">   <-- to the beginning of the file
[...] your post is here [...]
</div>                       <-- to the end of the file
Now that you're done with that, don't modify anything on the left side of the window because that will re-write the HTML code of your article which means your justification tag will be gone, you will have to type it again to the beginning and the the end of the HTML code.
That's it. We are done with editing.
Publicise on Steemit
Congratulation, you have made it to the end of the process. You can pad yourself on the shoulder, you've done a great job. The last thing we have to do is to copy the whole thing into Steemit. The easiest way to do this:
- Click on HTML view (if you are not already there)
- Press Ctrl+A key combination to select all text. (alt.: right click - select all)
- Press Ctrl+C to copy selected to clipboard. (alt.: right click - copy)
- Go over the Steemit homepage click Submit a Story
- Type in a title for your story.
- Click on the "Write your story..." section with the mouse than press Ctrl+V for paste what's on the clipboard. (alt.: right click - paste)
- !!! Now check your story in the preview !!!
This is important as you might have missed something in the editor. Now you have the last chance to check if everything looks great, don't miss it! - Give it maximum 5 tags.
- Press the Post button.
- Check in your Blog if your post made it online.
Sometimes happens that posts are not get processed. Probably a bug in Steemit. You have to make sure, it's all good. If not, you can restart this process from step 4.
Last words
Creating a good content takes time. Even if you write about something you know well. Think about what you want to write and how can you represent your idea on the best way. I wrote this post for 3 hours, I did research for additional 3 hours and spent with designing, spell checking another hour. This is what it takes for me. Maybe you are faster, but don't put out an article without thinking. Good luck with your career on Steemit!
Thanks for reading and have a nice day!

FOLLOW ME!
This article was made with the use of the following resources: pictures: https://pixabay.com/en/paper-paper-stand-inscription-table-2199502 | https://www.iconfinder.com/icons/1564532/clocks_hour_time_timer_icon | https://pixabay.com/en/happy-face-smiley-flashing-v-35164/ | | used material: https://github.com/adam-p/markdown-here/wiki/Markdown-Cheatsheet | https://steemit.com/steemit/@rossenpavlov/easy-resize-images-inside-the-steemit-editor | https://steemit.com/steemit/@primus/how-to-use-new-hidden-steemit-features-for-custom-formatting-within-post-content-floating-right-left-and-justifying
wow! Thats a lot of good info! I have to dog tag it and re-read it when I have more time. Upvoted and re-steemed!
Thanks @myroadtours!
I hope you will find it useful!
Thanks for re-steeming too, you are awesome;)
Really comprehensive, nice
Thank you @benniebanana!
Thank you! Such a great post! I can't stress how much this has helped me and I'm so happy I found it!
This is my First post/comment and I'm glad it's on such an informative post :) I'll definitely be using these useful tips, I'm so excited, thank you :)
Hi @pj-junior,
Welcome on Steemit!
I'm glad you liked my post, I'm happy if I can help:)
Thanks for your feedback.
Congratulations! This post has been upvoted from the communal account, @minnowsupport, by neander-squirrel from the Minnow Support Project. It's a witness project run by aggroed, ausbitbank, teamsteem, theprophet0, and someguy123. The goal is to help Steemit grow by supporting Minnows and creating a social network. Please find us in the Peace, Abundance, and Liberty Network (PALnet) Discord Channel. It's a completely public and open space to all members of the Steemit community who voluntarily choose to be there.
If you like what we're doing please upvote this comment so we can continue to build the community account that's supporting all members.