Stunnel - how to Secure your connection(Step by Step guide with configuration files)
When you setting up a service which is supposed to receive and transfer important data, one of the main concerns is security and basically how to keep the data safe when it is passing an unsecure network. There is a lot of ways to secure your connection like using different protocols like https, SSL, TLS, etc… but sometimes you are dealing with a service which does not support any of those protocols, in this case you have to use another service as a third party to address this issue. The real question is what protocol is going to fulfill your needs as a fast, flexible and multi platform service!

Introducing Stunnel
Stunnel is a third party application which can help you to secure your data by encrypting it with different protocols outside your main application.
Let’s put it in a scenario to understand how it really works
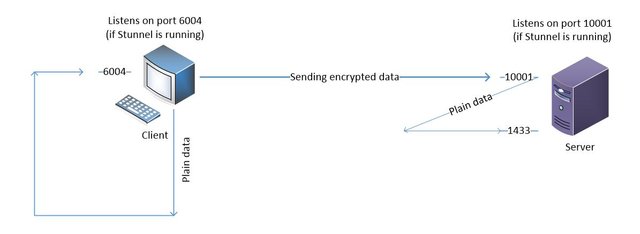
Imagine you have a database which is listening on the port 1433 and you want your users to connect to the database in a secure and encrypted network
At first you have to run stunnel on your server side with the IP address 192.168.1.100(note that if your service supports protocols like SSL, you don’t need to have the server side, just install stunnel on the client) and configure it in a way that the stunnel process listens on a specific port (like 10001) and sends data received on that port to the main service port (in this case 1433)
And on the client side you should install stunnel and configure it in a way that the stunnel receives on a specific port (let’s say 6004) and send the data to the server 192.168.1.100 port 10001.
Finally you need to configure your service on the client side to start the session on its IP(127.0.0.1) and port 6004.
Let’s list all the actions that happen when you start your service
- Client request to connect to its local IP on the port 6004
- Stunnel receives the connection request and pass it to 192.168.1.100:10001
- Server receives the request and send it to its local IP on the port 1433

As you can see stunnel is exactly in the middle and encrypts all the data
Ok enough about the concept, now we are going to dirty our hands with installing and configuring the stunnel. Before installing stunnel we need to install openssl as a perquisite and for making certificate.
Installing openssl
(I added installaition of openssl just in case if you needed that to generate certificate)
To check whether the openssl is installed on your server simply run following command:
openssl version
Result should be something like this:
“OpenSSL 1.0.1e-fips 11 Feb 2013”
If it couldn’t find the openssl command then you need to install it first.
mkdir /src
cd /src
wget https://www.openssl.org/source/openssl-1.0.2-latest.tar.gz
tar -zxf filename
cd openssl-1.0.2a
./config
make
make test
make install
To make sure that you are using the latest version even if you had an older version already installed
mv /usr/bin/openssl /root/
ln -s /usr/local/ssl/bin/openssl /usr/bin/openssl
Now check your openssl version again
openssl version
Now you should see an output like this:
“OpenSSL 1.0.2k 26 Jan 2017”
Installing Stunnel
Download the latest version
cd /src
wget https://www.stunnel.org/downloads/stunnel-5.40.tar.gz
Keep in mind that the version might change, if you get error go to the stunnel download page and see the latest version number
tar -xvf stunnel-5.40.tar.gz
yum install gcc
./configure
make
make install
stunnel -version
Now you got your stunnel installed
Generating the private key
Stunnel have provided some scripts in its source to make it easier for users to create certificate pairs
cd /src/stunnel-5.40/tools
./makecert.sh
Note that you can fill the requested questions or simply just press enter

This command is going to create a stunnel.pem file including the private key and certificate
Now we need the configuration file for stunnel which by default resides in /src/stunnel-5.40/tools
Remember that to start stunnel you need to pass the conf file as a parameter to the command
(Example: stunnel /src/stunnel-5.40/tools/stunnel.conf)
You can create the configuration file as server mode, client mode and both, also you can have different options and protocols for your stunnel but here to keep it simple and show you how it is done, I am going to create two config file with the basic configuration
To do that you need a stunnel.pem(for server) file and a certificate.crt(for client) file
Go head and edit the stunnel.conf
vi stunnel.conf
debug = 7
output = stunnel.log
cert = stunnel.pem
[test]
accept = 127.0.0.1:10001
connect = 127.0.0.1:1433

Now create a file
vi client.conf
debug = 7
output = stunnel-server.log
[test]
client = yes
accept = 127.0.0.1:6004
connect = 127.0.0.1:10001
CAfile = certificate.crt

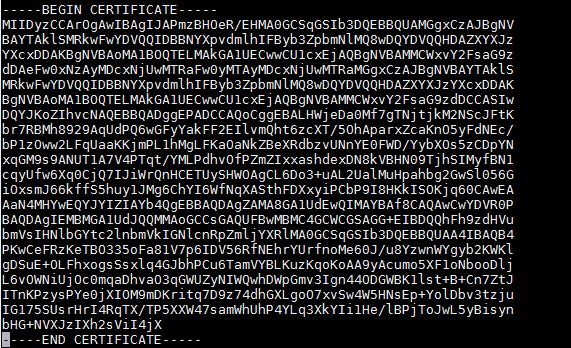
To create certificate.crt you can easily copy the certificate from the .pem file
Your certificate.crt file should look like this:

For more options and details click here
In this video I am going to show you the data captured from port 10001 which is encrypted and port 1433 which is plain
(something was wrong with youtube, so I had to share it by drobbox)
That is it, now you have stunnel service up, running and working properly in basic level
I hope you guys find it useful enough to upvote and resteem
This post is 100% powered up


Hello @meysam,
Congratulations! Your post has been chosen by the communities of SteemTrail as one of our top picks today.
Also, as a selection for being a top pick today, you have been awarded a TRAIL token for your participation on our innovative platform...STEEM.
Please visit SteemTrail to get instructions on how to claim your TRAIL token today.
If you wish to not receive comments from SteemTrail, please reply with "Stop" to opt out.
Happy TRAIL!

thanks
Upvoted, followed and Resteemed. Thank you
@alexandergomez
thank you sir, I appreciate the support
followed back
very informational
#bookmark