Beginner's Guide To Build A Chatbot Tutorial Part 3
Introduction
This tutorial is a part of tutorial series Beginner's Guide To Build A Chatbot, here we will learn how to make our bot more like a human by which robot asking a question towards the user, getting some information from the conversation and to do follow up questions.

What Will I Learn?
- Action and parameters
- Contexts
Requirements
Should read the first part of tutorial "Beginner's Guide To Build A Chatbot Tutorial Part 1" Link towards part oneTutorial Contents
To understand the concept more it will better start with a real-life conversation. let us consider our chatbot to be a doctor and the patient to be a user(here I named the chatbot as Samantha).Patient: Hello Doctor
Samantha: Hello, what's your name?
Patient: My name is Krish
Samantha: okey Krish what's your problem?
Patient: I am sick
Samantha: do you feel a headache?
Patient: Yes
Samantha: Krish please take these medicines (medicines name) you will be fine
Patient: Thank you, doctor
In the above conversation, you can see chatbot Samantha get the patient name by asking his name, for such purpose we use arguments. Next one is context it's very tricky to understand but check this conversation Samantha asked the patient "do you feel a headache" then patient replied "Yes" and now look the replay of Samantha "Krish please take these medicines (medicines name) you will be fine", now my question is how do the chatbot know that patient replay "yes" is from the particular conversation line or conversation structure. In such situation we use context then chatbot will understand user's replay is from which conversation structure.Below I had explained the steps to do for building such a conversation structure.
Step to do
- First of all, create an agent and name it Doctor
- Create an intent and name it "Hello-Doctor"
- At training phases enter the possible user questions (eg: Hello doctor, Hi Doctor)
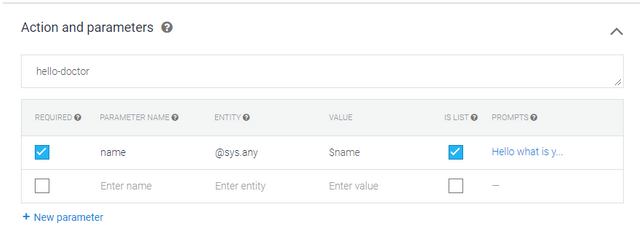
- Below training phases you can see Action and parameters at their just copy paste the intent name in this case "Hello-Doctor"
- Fill other columns as in the above image and click on define prompt, then enter the prompt "Hello, what's your name?"
- Then at Text response enter "okay $name what is your problem?"
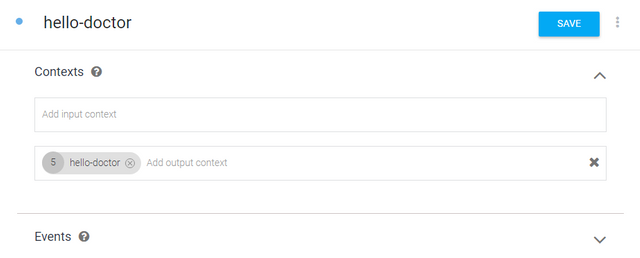
- Now we move on to Context, below intent name you can see two columns they are input context and output context just look at the below image for reference and also fill the output context as shown in the image (ie enter this intent name at output context "hello-doctor")
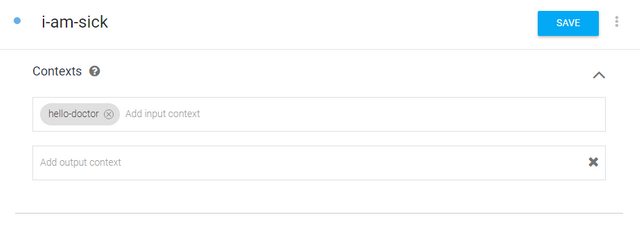
- Now create another intent and name it i-am-sick and fill the input context as "hello-doctor" check the below image for reference
- Next is to fill the Text response of the intent i-am-sick as "#hello-doctor.name do you have a headache?",we are using context as a connector between two intent then chatbot will understand that this specific intent is a follow up of a particular conversation
- Finally test your bot with startup conversation "Hello Doctor"
This is the end of this tutoria on the next part, we will deal with some advanced way of texting with Dailogflow


