Ethereum Dapp Tutorial, Part 1 of 3: Solidity Smart Contract
Note: We highly recommend viewing this tutorial in Light Mode. Steemit does not support dark themes for inline and code blocks, making this page difficult to read in Night Mode.
In this tutorial series, we will be creating a dapp for Ethereum. It will be broken into three parts:
- The Smart Contract (this part)
- Web front-end with Metamask integration
- Ledger integration
We’ll be creating a simple dapp called ‘Message of the Moment,’ which will display a message that anyone is welcome to change.
Full source code for Part 1 is at the bottom of the post.
Part 1: Solidity Smart Contract
This tutorial will utilize the following references and resources. Don’t worry about collecting them all right now; we’ll refer to them inline as we use them.
- Solidity Documentation
- Remix IDE
OwnableClass Code- Metamask Browser Extension
- Ropsten Testnet Faucet
- EtherScan - Ethereum Block Explorer
Setting Up the Environment
1. Launch the Remix IDE.
Remix is a web-based IDE for Solidity, Ethereum’s smart contract language. It’s quite capable; however, you may also consider using Truffle.
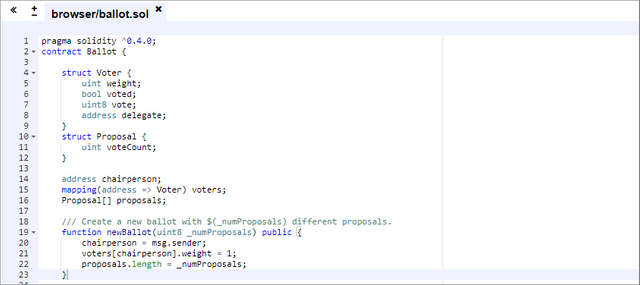
Remix has a ‘Ballot’ contract as its default example. Select all the default code and delete it.
Coding the Contract
2. Copy the Ownable class from OpenZeppelin's GitHub and paste it into Remix.
Solidity contracts often leverage existing standards like this Ownable class. These are well-tested implementations for commonly used logic, and reuse is encouraged.
Note the pragma statement at the top of the code. This indicates which compiler version(s) are compatible with the code. For more on using pragma, see the official documentation.
Remix supports multiple files; however, for simplicity, we will be doing everything in a single file. If you are working on a complex smart contract, you may want to create a separate file for each class.
3. Below the Ownable class, create a class for our contract.
contract MessageOfTheMoment is Ownable {

}
Only one ‘contract’ is selected when you deploy a smart contract. This will be ours. The contract’s name is arbitrary.
is Ownable means that the contract includes (inherits) everything contained in the Ownable contract, both data (the owner) and methods (like transferOwnership).
4. Add data types to the contract.
contract MessageOfTheMoment is Ownable {
    string public message;
    uint public maxLength;
}
In our example, we have:
- A
messagetype, which anyone can change - A
maxLengthfor the message - An
owner, which is inherited from theOwnerclass we copied above.
Let's take a closer look at some of the function elements.
maxLength
A string in Solidity can be of any length, so we will be capping it ourselves using this property.
public
The public keyword indicates that anyone, including other dapps, can view this information easily.
uint
The uint data type is an unsigned integer, meaning the maxLength may not be negative. It is an alias for uint256, specifying the number of bits the data type stores. To save on space and gas, consider using uint8 instead.
5. Create a constructorto initialize the contract’s data.
Our constructor will set the message and maxLength properties.
The Ownable class’s constructor is automatically called as well. This sets the owner to the address that deployed the contract.
contract MessageOfTheMoment is Ownable {
    string public message;
    uint public maxLength;

    constructor() public {
        message = "Hello World";
        maxLength = 280;
    }
}
The constructor is called only once, when the smart contract is initially deployed. We use this to initialize data as appropriate. Constructors may be passed arguments, allowing you to pass in the default “Hello World” instead of hard coding it.
6. Create a function for anyone to change the message. Use require to halt execution if the new message is too long.
contract MessageOfTheMoment is Ownable {
    string public message;
    uint public maxLength;

    constructor() public {
        message = "Hello World";
        maxLength = 280;
    }

    function setMessage(string _message) public {
        require(bytes(_message).length <= maxLength, "That message is too long.");

        message = _message;
    }
}
You can name your functions whatever you like; just remember that they will be referenced by other dapps or anyone attempting to interact with the contract.
Let's take a closer look at some of the function elements.
_message
The underscore used for the _message parameter is a convention often seen with Solidity. It’s used to indicate the difference between function parameters and data stored by the smart contract.
bytes(_message)
In Solidity, strings are stored as an array of bytes. We cast the string to the bytes form in order to check its length. Note that if you are using UTF-8, foreign language characters may consume multiple bytes, so this approach to measuring string length may overestimate its actual character count. Also, we are not checking for a minimum length, so someone may clear the message.
require()
require will rollback any changes if the statement passed to it evaluates to false. Function calls execute as all or nothing; in other words, we could have placed the require statement at the very end of the function code and it would have the same effect. The string we've passed as the second argument will be the error message thrown if the require check fails.
7. Create an owner-only function to change the maxLength.
    function setMaxLength(uint _maxLength) public onlyOwner {
        maxLength = _maxLength;
    }
The onlyOwner modifier is implemented in the Ownable class. This will cause the function call to fail if the caller is not the owner, preventing any data changes.
Deploying and Testing in the Remix Environment
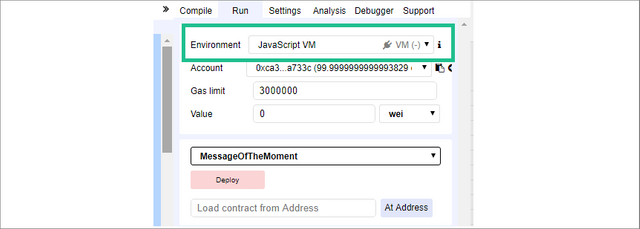
8. Select the ‘Run’ tab in Remix and change the ‘Environment’ to ‘Javascript VM’.
Javascript VM will simulate Ethereum locally. This is a very fast (and free) way to test your contract.
9. Select the contract, ‘MessageOfTheMoment’, and click ‘Deploy’.
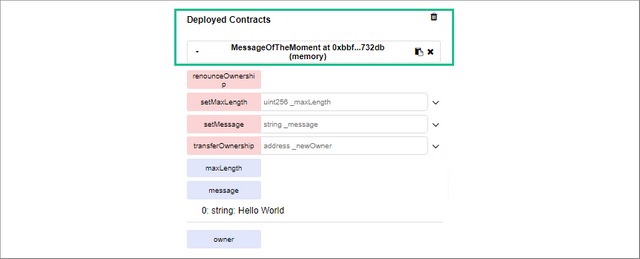
The contract will appear in ‘Deployed Contracts.’
Deployment will work the same way when using another environment, such as testnet or mainnet, but will not appear until the transaction has been accepted into a block.
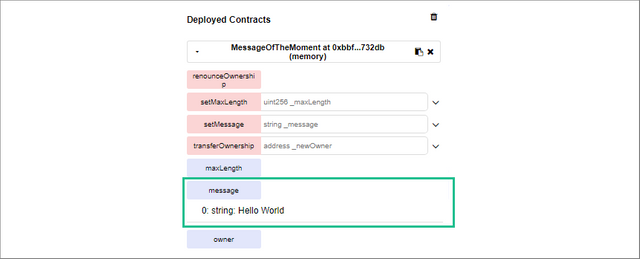
10. Click on ‘message’ in ‘Deployed Contract’ to view the current message.
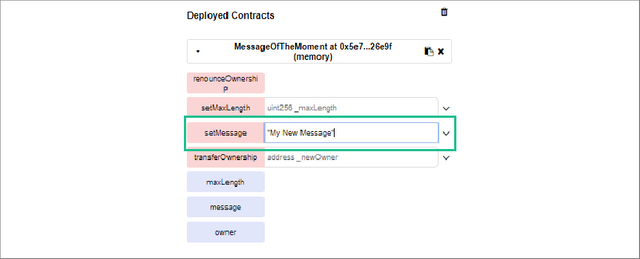
11. Use the setMessage method to change the current message.
Find the ‘setMessage’ box and enter a new message in double quotes. Click on ‘setMessage’ to create the transaction.
Check the console for status. If there is an error, you should get more information there.
12. Click ‘Debug’ by the transaction in the ‘Console’ to step through the code.
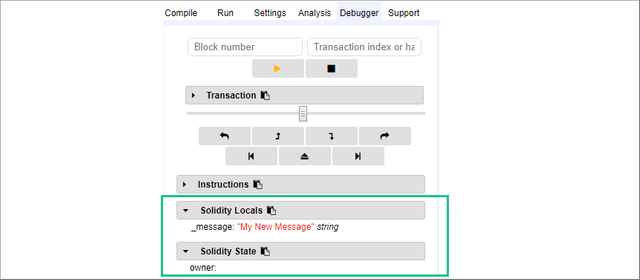
Use the buttons or the slider to step through the transaction. Note the 'Solidity Locals' and 'Solidity State' dialogs.
This can be very useful when tracking down bugs. You can see exactly what is happening in your code line by line. Plus, you can step forward or backwards while debugging. Note that the ‘lines’ are actually Solidity bytecode and may not align line-for-line with your code.
'Solidity Locals' include the function parameters and any other locally scoped variables. 'Solidity State' shows all the data saved by the smart contact.
Deploying to an Ethereum Testnet
13. Install the Metamask broswer extension and select one of the testnets (We are using Ropsten).
Metamask makes interacting with Ethereum dapps simple.
You'll need some testnet money for the next steps; get some free from a faucet such as the Ropsten faucet.
14. In Remix, switch the environment to ‘Injected Web3’. Deploy the contract and test again.
Metamask will prompt you to confirm transactions like setMessage or setMaxLength, which write to the contract; however, read-only calls such as message are always free.
Transactions on testnet and mainnet will take much longer than they did in the Javascript VM environment. Keep calm and check the status in the console.
15. Verify & publish source code to the Ethereum Block Explorer.
This step is optional, of course; however, I believe all smart contracts and dapps should publish their source code for transparency.
Copy the deployed contract’s address and search for it on EtherScan.
Select the appropriate network (e.g. Ropsten) from the 'MORE' tab underneath the search field.
Click the ‘Code’ tab and then the ‘Verify and Publish’ link.
You'll have to enter some information. The contract name refers to the name of the class - in our example, 'MessageOfTheMoment'. The compiler version can be found in Remix’s ‘Compile’ tab by selecting ‘Details’.
Deploying to Mainnet
16. Switch to mainnet and make your final deployment.
Change your network in Metamask to 'Main Ethereum Network' and deploy the contract from Remix.
Note: You may want to wait on this until after the dapp is created and tested. It’s common to need a new feature or encounter a bug while working on the front-end.
That’s it! Hope this was helpful. In Part 2 we will be creating a website front end with Metamask integration.
Source Code - Part 1
pragma solidity ^0.4.24; /* indicates compatible compiler version(s) */


/**
 * @title Ownable
 * @dev The Ownable contract has an owner address, and provides basic authorization control
 * functions, this simplifies the implementation of "user permissions".
 */
contract Ownable {
  address public owner;


  event OwnershipRenounced(address indexed previousOwner);
  event OwnershipTransferred(
    address indexed previousOwner,
    address indexed newOwner
  );


  /**
   * @dev The Ownable constructor sets the original `owner` of the contract to the sender
   * account.
   */
  constructor() public {
    owner = msg.sender;
  }

  /**
   * @dev Throws if called by any account other than the owner.
   */
  modifier onlyOwner() {
    require(msg.sender == owner);
    _;
  }

  /**
   * @dev Allows the current owner to relinquish control of the contract.
   * @notice Renouncing to ownership will leave the contract without an owner.
   * It will not be possible to call the functions with the `onlyOwner`
   * modifier anymore.
   */
  function renounceOwnership() public onlyOwner {
    emit OwnershipRenounced(owner);
    owner = address(0);
  }

  /**
   * @dev Allows the current owner to transfer control of the contract to a newOwner.
   * @param _newOwner The address to transfer ownership to.
   */
  function transferOwnership(address _newOwner) public onlyOwner {
    _transferOwnership(_newOwner);
  }

  /**
   * @dev Transfers control of the contract to a newOwner.
   * @param _newOwner The address to transfer ownership to.
   */
  function _transferOwnership(address _newOwner) internal {
    require(_newOwner != address(0));
    emit OwnershipTransferred(owner, _newOwner);
    owner = _newOwner;
  }
}

contract MessageOfTheMoment is Ownable {
    string public message;
    uint public maxLength;

    constructor() public {
        message = "Hello World";
        maxLength = 280;
    }

    function setMessage(string _message) public {
        require(bytes(_message).length <= maxLength, "That message is too long.");

        message = _message;
    }

    function setMaxLength(uint _maxLength) public onlyOwner {
        maxLength = _maxLength;
    }
}



Thank you so much for doing these tutorials @hardlydifficult

I am taking them slowly, I'm only past the part 1/3 :)
Awesome, let us know how it goes.