TUTORIAL: [automatic|scheduled|manual] - How to Create Your Own Backup Program to Backup Your Files - [Added "Backup done! All files have been updated" message]
Why buy an expensive backup program or app if you can create it on your own? Here's a few simple steps to create your own backup program.
This tutorial will utilize the ever reliable "MS-DOS" based program called XCOPY that is "built-in" in every windows computer. We are going to make our own program to eliminate the daunting task of copy and pasting individual files and folders on your computer. After you have finished this tutorial you just have to double click it to run the program then the program will do the rest of copying or create a time based schedule to automate your backup. The program will automatically close itself after it has done copying.
IMPORTANT:
Create a folder inside your drive D then name it destination if you don't have a drive D on your computer just create it in your drive C. We will use the "desktop" directory/folder in this tutorial because most of use love to put our files in our desktop.
NOTE:
Don't worry about your multiple folders inside a folder the program will automatically create them for you.
Let's start...
Step 1
Open Notepad, chose "File -> Save as"
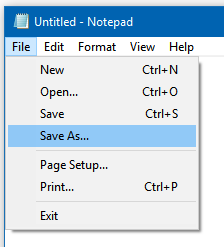
Step 2
Type "sample.bat" in File name, choose "All files" in Save as type, then choose "UTF-8" in Encoding then click Save to save it to your desktop. Make sure you saved it to your desktop for easy access.

Step 3
After you clicked save, type the following in your sample.bat, pay attention carefully in this step...
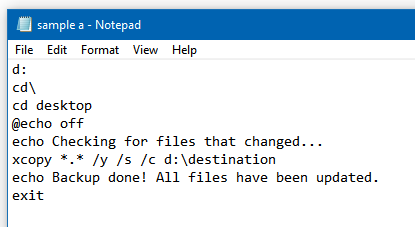
d: - means you are pointing your path to your computer's drive d.
cd\- means you are going to the root directory of your drive d.
cd desktop - means you are entering the desktop directory of your computer.
@echo off - means the word "echo" will not be display
echo Checking for files that changed... - means the "Checking for files that changed" will be displayed while the program is looking for files that changed.
xcopy - the copy program utility the will initiate or do the copying.
*.* - means you are going to copy all the files in your desktop directory. If you only want to copy a specific file, for example a JPEG picture, use *.jpg instead. If you want to copy only excel files use *.xlsx .xlsx and .jpg are called extension name. If you are unsure about the extension name of a file just use *.*, still if you want to be specific you can ask your friend Google.
/y - will suppress prompting to confirm you want to overwrite an existing destination file.
/s - will copy directories and subdirectories except empty ones.
/c - will continue copying even if errors occur.
/d - copies files changed on or after the specified date. If no date is given, copies only those files whose source time is newer than the destination time.
d:\destination means your files will be copied to the folder named "destination" inside your drive d. If you don't have a drive d and created your destination folder in drive c, just change it to c:\destination
echo Backup done! All files have been updated. - means that the program have finished backing up your files.
exit means the program will automatically close itself after the copying is done.
NOTE: I have relocated my desktop directory in my drive D that's why I used the command "d:" to access my computer's desktop. If you did not relocate your desktop directory type the following command below instead
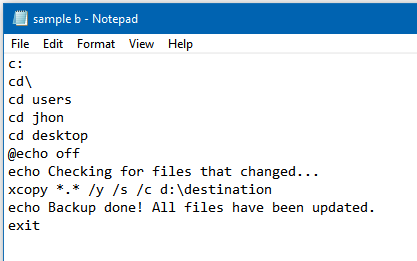
Just change jhon with you own windows username
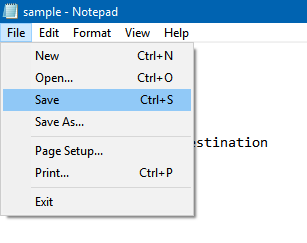
Step 4
Save the changes you made in your sample.bat go to "File - Save''
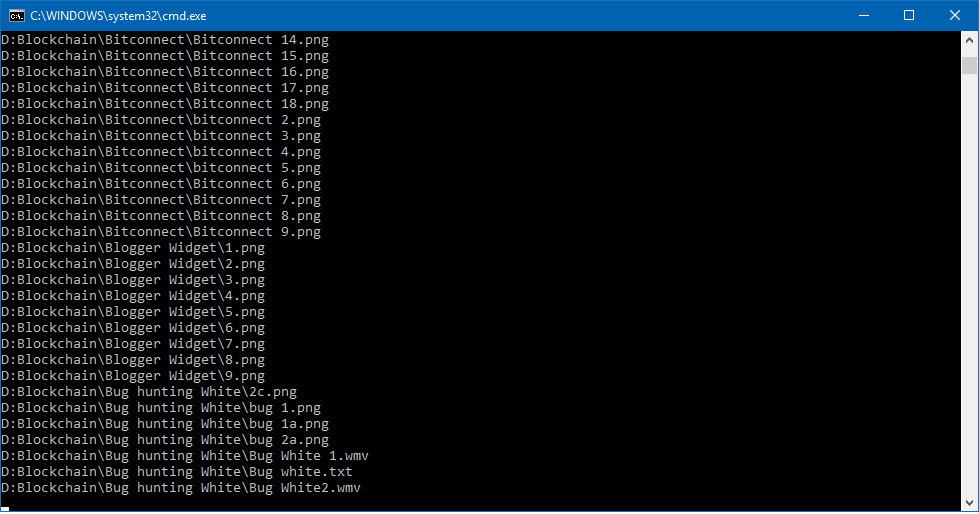
Let's test it if it is working. Go to your desktop and find the file "sample" and double click it to start your backup. It should look like the screenshot below. If you see a message asking you to press D for directory and F for files, choose or press D on your keyboard.

You should see something like this now while it is copying files
Let's make it a scheduled/automatic backup
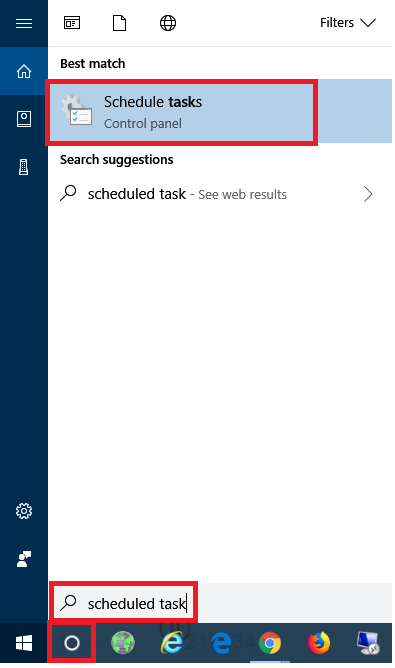
Step 5
Open Schedule Tasks in Windows 10. Click Cortana, type "Schedule Tasks", then click "Schedule Tasks" that will appear at the top. See screenshot.
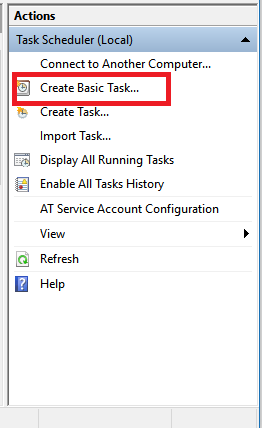
Step 6
At the right corner click "Create Basic Task"
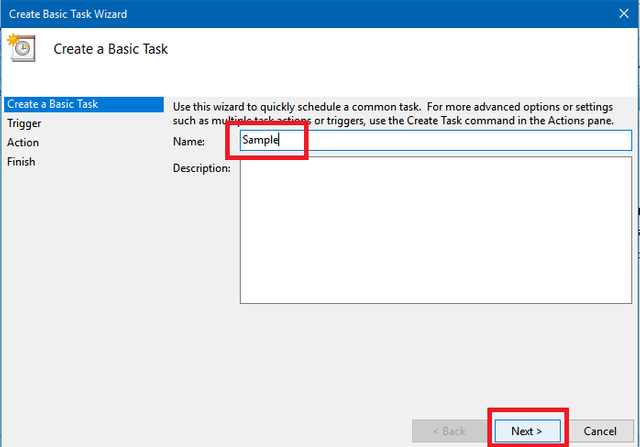
Step 7
Let's name it Sample then click next
Step 8
Let's make it daily then click next. If you want you can make it weekly then change it.

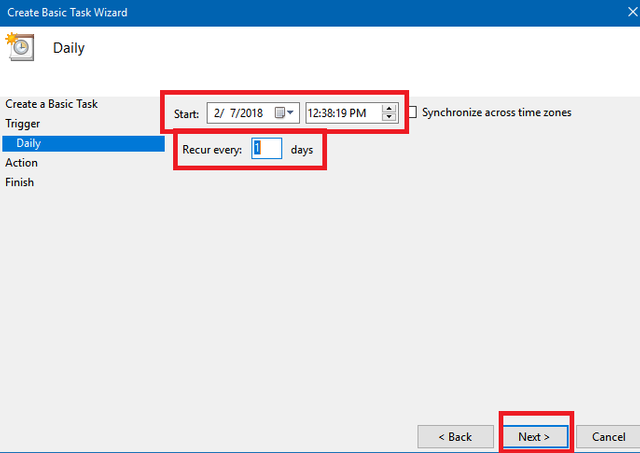
Step 9
Edit the time if you want to specify a time on when the program will start, change "Recur every" if you want to make it every 2 days or 3 days then click next.
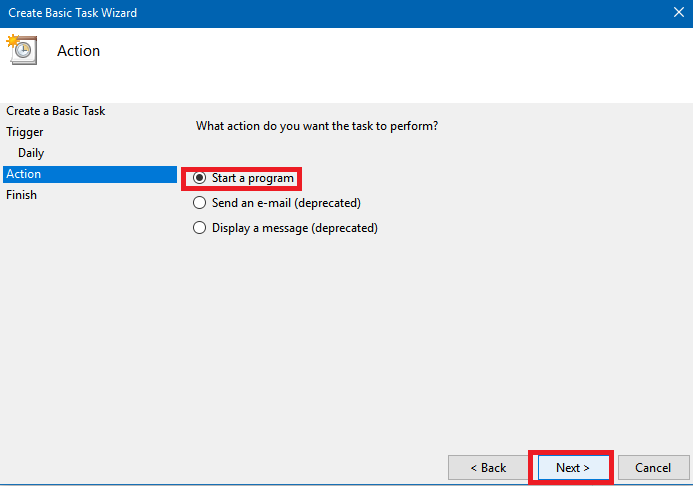
Step 10
Choose "Start a program" then click next
Step 11
Browse for the "sample" that we made earlier then click next.

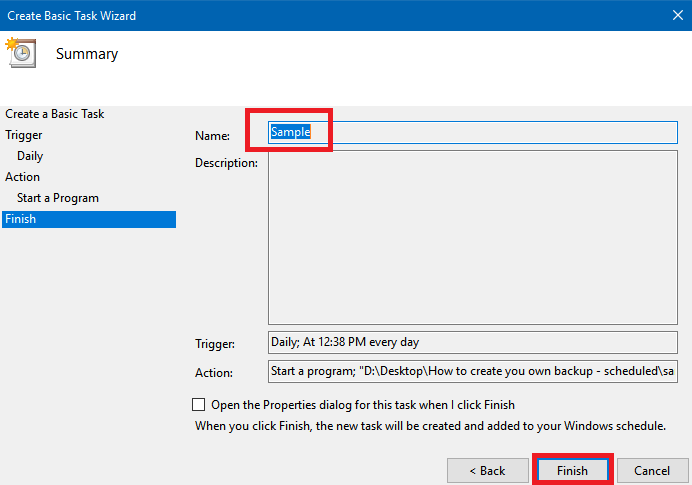
Step 12
Click finish
 \
\
Step 14
Look for it below, you should see something like the screenshot below.
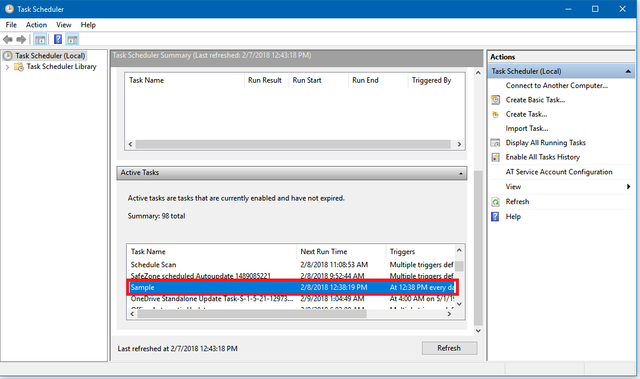
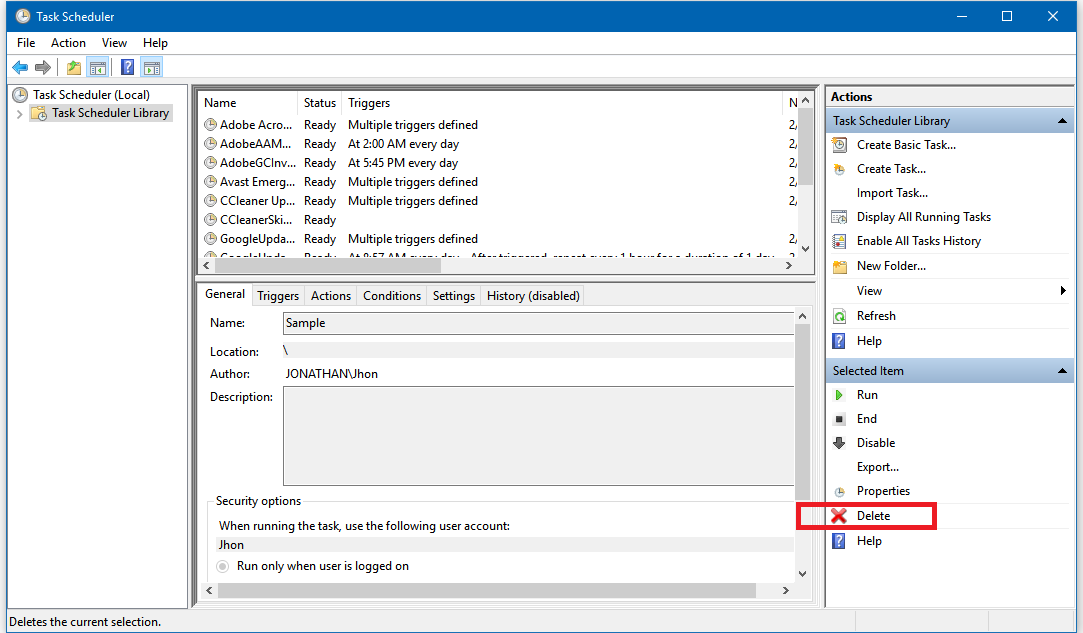
Step 15
If you want to delete it just double click it then choose delete at the right.
That's it guys, it's done. Enjoy
Related articles:
- TUTORIAL: [scheduled backup/backup only files that changed] - How to Create Your Own Backup Program to Backup Your Files - Time triggered/initiated Backup
- TUTORIAL: [backup only the files that changed] - How to Create Your Own Backup Program to Backup Your Files - Double click the program and it will do the rest of copying
- TUTORIAL: [Scheduled automatic backup] - How to Create Your Own Backup Program to Backup Your Files - Time triggered/initiated Backup
- TUTORIAL: How to Create Your Own Backup Program to Backup Your Files - Double click the program and it will do the rest of copying

I will be featuring it in my weekly #technology curation post for the @minnowsupport project and the Tech Bloggers' Guild! TBG is a new group of Steem tech bloggers and content creators looking to improve the overall quality of the niche.
If you wish not to be featured in the curation post this Saturday, please let me know. Keep up the hard work, and I hope to see you at the Tech Bloggers' Guild!
Thank you very much. It will be an honor to be featured in Tech Blogger's Post
Congratulations! This post has been upvoted from the communal account, @minnowsupport, by afterglow from the Minnow Support Project. It's a witness project run by aggroed, ausbitbank, teamsteem, theprophet0, someguy123, neoxian, followbtcnews, and netuoso. The goal is to help Steemit grow by supporting Minnows. Please find us at the Peace, Abundance, and Liberty Network (PALnet) Discord Channel. It's a completely public and open space to all members of the Steemit community who voluntarily choose to be there.
If you would like to delegate to the Minnow Support Project you can do so by clicking on the following links: 50SP, 100SP, 250SP, 500SP, 1000SP, 5000SP.
Be sure to leave at least 50SP undelegated on your account.
Thank you very much.