How to purchase an EOS account via TokenPocket wallet
 Themerkle
The EOS blockchain is not the easiest to use and for an absolute noob coming into the blockchain space, this might not be the blockchain you probably want to introduce them with. Although, they sure have some nice pecks which include fast transaction speed, easy deposit address, easy to use Dapps, free transaction (well not actually free), and many others.
Unlike other cryptocurrencies where the receiving address is quite long and requires you to have a backup at all times, the EOS coin is different as it only involves a 12 letter word which is custom made by you or randomly made depending on your choice. It can be solely alphabet or alphanumerical, you choose. This is one of the many benefits of using the EOS network but the process of creating/owning an account on the EOS blockchain is a little complex and requires you to spend a few bucks or get someone who is willing to gift out few of his/her EOS coin.
For the benefit of all and especially those isolated from other users or nobody within range to spare a few EOS coins, we shall be looking at one of the easy ways to create an EOS account and get it running.
More of a DIY
Requirements
Paypal, Alipay, or WeChat depending on what is available to you.
A valid email, one you have access to
TokenPocket app installed on your device
- Download TokenPocket
TokenPocket is a multichain crypto wallet that allows users to store their crypto assets freely and also give the users absolute control to their funds with the use of a private key, mnemonic phrase words and others. What this means is that users can easily import their account or restore whenever the need arises. TokenPocket also provides an easy to use Dapp browser that allows its users to access multiple types of Dapps available on Ethereum, IOST, EOS, and others.
TokenPocket is available on IOS, Android, and PC.
- Upon successfully downloading, installing and launching the TokenPocket app, go to this web page and make payment to receive an activation code
Remember to use an email address you have access to as the activation code will be sent to that email address
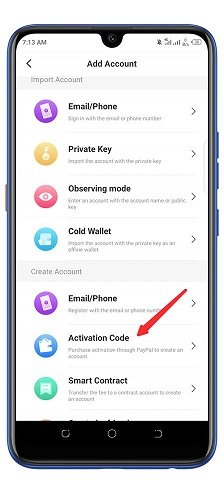
Launch the TokenPocket app once again and click on the EOS wallet section
Remember, you don't just create a new account using TokenPocket, you can also import, view, and create an account via TokenPocket
From the EOS Add account menu, scroll down and click on create an account with Activation code
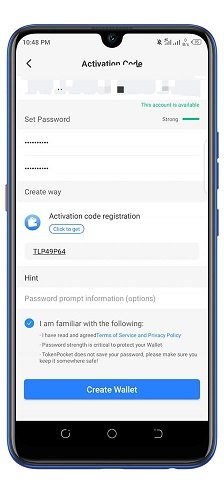
A new page will come up
Like I earlier said, users are able to create a custom account using any name of their choice or if this is a little tasking for you, then the random option to choose a name is available as well.
EOS account names are 12 letters long, involving alphabet, or alphanumerical it all depends on your preferences.
On the next page, the first bar is to type in a username, this will serve as your account name and also your deposit address when you need to receive EOS coin or its tokens
Next, is a password, this password is limited to TokenPocket, whenever you need to complete a transaction on the EOS chain via TokenPocket, this password is required, so choose something you can remember
Confirm your password by retyping the same word you used above
Activation code is the code you earlier received on your email after making the $2 payment
Password hint can be ignored or if you need a form of reminder then feel free to use this option
Accept the terms and click create wallet
Your screen should look something similar with the screenshot below
After clicking create a wallet, a new page will come up, click next and your private key will be shown to you.
The private key is like a signature to a bank, your bank number, withdrawal slip, pin to an atm debit/credit card, the atm credit/debit card itself. Well, you get the picture, you need to save this private key in a safe and secure place as it gives you access to your account any and every time, with this you can easily restore your account or export the account to another wallet as you see fit. So on no occasion should you give your private key out to any user, be it an admin of any app or platform. Your private key is yours to use and view alone.
After backing up the key, click next and confirm you successfully backed it up by pasting/typing the private key once again.
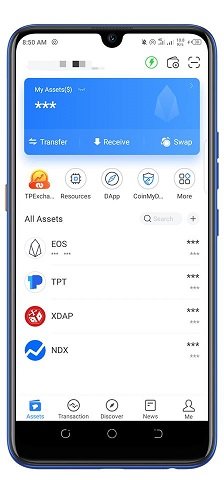
If all was successful, congrats you now own an EOS account, feel free to explore the TokenPocket wallet as you wish and access the various types of Dapps available on the EOS chain.
If you have any question as regards to the above, you can leave a comment behind and I will get to it ASAP
You can as well reach TokenPocket team via the below links
Join their telegram group here https://t.me/tokenPocket_en
Follow their recent tweet here https://twitter.com/TokenPocket_TP