Tiny House Episode 14: Random Bathroom Projects
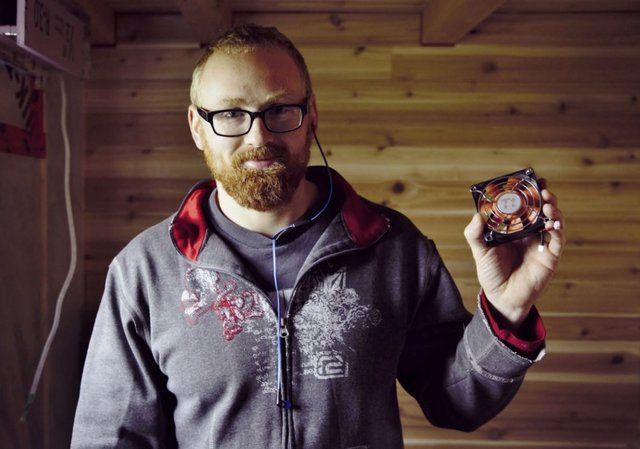 Bathroom vents aren't normally vented using a computer fan. Of course I'm not normal and neither is my house so it is a good fit.
The space restrictions, weight restrictions and self imposed 12v DC restrictions made things difficult when it came to designing our bathroom. Standard building materials and methods weren't going to work so I was forced to get creative. This is why I tell people that, in a lot of ways, tiny houses are harder to build than normal sized ones.
As you can see, we have a decent sized shower for the space we are in. It definitely isn't one of those cramped RV ones. It is fairly standard to put aqua board behind showers in normal houses. Aqua board is a water and mold resistant material similar to drywall in thickness and weight. This would have been too heavy and there was the potential for cracking; both good reasons not to use it for our shower. But if not that then what material could we put behind a shower surround then?
I ended up using coroplast which is a plastic corrugated material normally used to make signs. I also used some 1/4" plywood covered in a waterproof membrane where the shower taps were going to be installed to provide something solid to attach them to. I'm still not sure if this was the best idea but it did provide a secondary waterproof layer behind the shower surround. The last thing I wanted was water leaking down into the trailer area where I wouldn't notice.
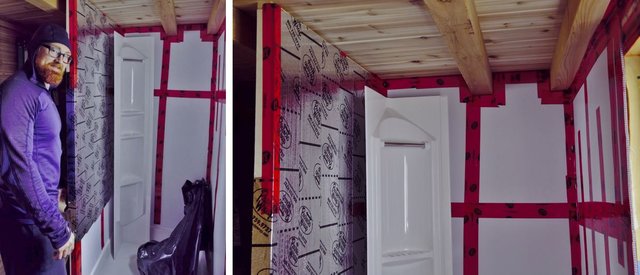
The shower itself was a combination of materials. The shower base was a fairly standard one but the surround that went with the base wasn't going to work because it was made with a fiberglass like material that was too tall for the short ceiling under the loft and that would have been difficult to trim. I ended up using a tub surround that was made of a softer material and trimmed it both in height and length to fit the dimensions of the shower. I think it turned out pretty good! What do you think?
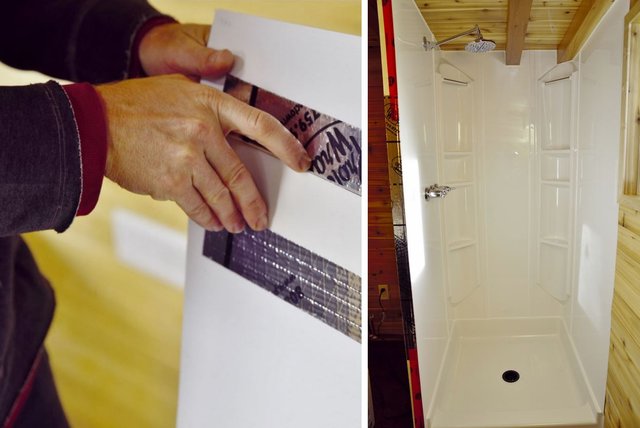 Left: Before gluing everything together I made sure to test all the materials with the glue I had to make sure everything adhered properly. Right: The shower more or less complete.
While the shower head was a standard one, I used a tub facet set to control the water for the shower. What I ended up figuring out is that the center knob, that would normally act as the selector for the shower head or the tub faucet, could be capped at one end which would create an on/off switch for the water. This would allow us to adjust the water temperature and then turn the water on and off, between soaping and rinsing, to conserve our limited water storage.
We chose a wide sink and vanity set from Ikea. This was one area where we had room to use standard house materials and we liked the look of the wide sink. The vanity is wide but not deep which afforded us some space savings in the bathroom.
 If you are wondering about the floor it will be discussed in an upcoming post!
Next to the shower was a space for our washer and dryer combo machine. Yeah, it does both! I will be covering this appliance in a future post as well. We did need to install an exhaust vent for the dryer in this area and that is where the foam board was used as I discussed in a previous blog post. I used a hole saw to cut a clean hole through the foam board and outer wall and installed some dryer duct. I would later install a damper on the outside.
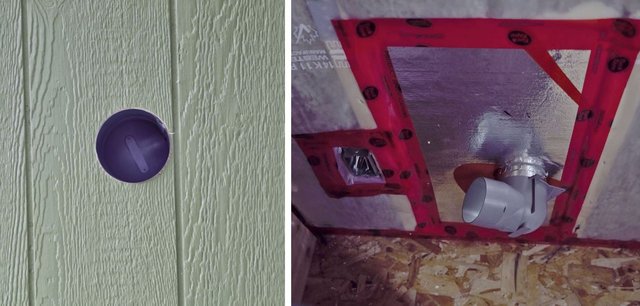 Looking at the dryer vent from the outside wall. Pretty good fit, eh?
Our bathroom fan was quite a job. I used the same foam board trick for the fan as I did for the dryer but added a second damper in the wall to prevent drafts. Since we also had no ceiling space to mount a fan and run the duct, I ended up creating a square duct out of foam board and then building a little bulk head over it. The bulkhead sits right over the back of the toilet and is far enough back that when you stand up from using the toilet there is no risk of banging your head.
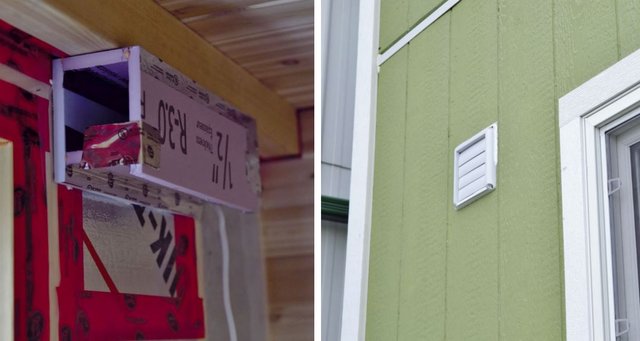
Wanting a 12v fan did present a problem, however. I searched really hard for an RV bathroom fan that would fit the bill but most of them were designed to go in the ceiling of the RV and wouldn't work for our unique situation. At first, I tried a computer fan but it didn't have enough power to open both the inner and outer dampers that were installed. My dad ended up finding a similar sized fan at an automotive store, although neither of us know its intended purpose. It is significantly more powerful and has no trouble opening both dampers but the downside is how loud the fan is while running. I ended up deciding to use it anyway because so far I haven't been able to find another suitable option.
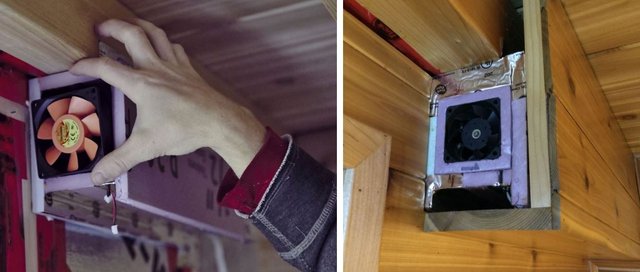 Left: Computer fan. Right: Slightly smaller fan but boy is it powerful and noisy! You can also see that the bulkhead is complete in this photo.
That's it for the bathroom, for now, I am sure there will be more to discuss in future episodes so stay tuned!
You did an amazing job on the tiny house bathroom! Your are right, sometimes we need to improvise to get the job done. And usually that works better than finding a ready made solution. I often need to improvise here on our homestead just because what I am looking for isn't available in this country and to bring it in would be cost prohibitive.
Thanks, there is definitely a lot of improvising on a homestead too and that is without having access to many of the things available in Canada and the United States.
Coming together nicely. What are your future plans for it? Where will you place it? Or will it remain mobile? Will it be your second home or are you thinking of permanently moving in there? (So you can sell your first home for Bitcoin, of course)
Actually we are living in it right now. I didn't have time to blog when I was building it so we just took a bunch of pictures and video. We have been in it for about a year and a half now and have twins now so space is tight. I will be building a regular although still Fairly small house next summer we will probably move the tiny house out to that site so I can work on it more and not have to commute as much.
We will probably keep it as a guest house for when people come to visit or we might sell it.
Wow! That is absolutely amazing!!
excellent work!
Thanks
Thank you for sharing the bathroom portion of your tiny house. You have a family of four in there! You must have some awesome minimalist tips - browsing your blog :)
yeah, I'm not sure how we are doing it lol
nice post bro @canadianrenegade
@originalworks
The @OriginalWorks bot has determined this post by @canadianrenegade to be original material and upvoted it!
To call @OriginalWorks, simply reply to any post with @originalworks or !originalworks in your message!