Tiny House Episode 27: Planing Salvaged Cedar
When I started building the tiny house, I never thought that I would end up buying a planer. What better excuse to buy new tools than free lumber?
It all started when, one day I noticed a pallet, containing long cedar boards, tucked off to the side of the yard at work. I went over to take a look and there was about a dozen rough boards that were 7 1/2 to 11 3/4" wide and 12 to 16 feet long. I wasn't sure what they were for but if I had to guess, I would say they were for some sort of exterior trim. I thought this was some pretty nice lumber but I sort of forgot about it for a while.
A few weeks passed and I noticed that the boards were still in the same spot, untouched so I asked the operations manager about them. Apparently, they had been kicking around the yard for several months and had previously been up on some outdoor racking out of sight. The boards were left overs from a job and there was no immediate use for them.
 The condition of the wood before planing.
Previous to this, Aimee and I had made an effort to find and use salvaged materials but most of the time it didn't pan out. What we found was that, although we could save money on salvaged materials there either wasn't enough to make much from it or it would just be too time consuming to recondition the salvaged material to a standard that would satisfy me. With these boards however, there was plenty of them in useful lengths and I knew that I could find a good use for them.
I offered to buy the boards from the company because they were just sitting in the yard deteriorating. My operations manager told me he would give me a good price, that I could take them in advance, and we would figure out payment later. He had always been fair and easy to deal with so I agreed to take them.
After getting the boards home I thought about the different projects I could use them for. The tiny house was nearly complete but there were a few items that remained unfinished. One item I wanted to tackle was the closet doors. The closet in our tiny home is an odd size and I was having trouble finding an off-the-shelf set of doors for it.
I had come up with a rough plan for the doors and picked a few boards out of the ones I salvaged. This was a little difficult though because, although these were nice looking boards, they had inconsistent thicknesses. I began to sand the weathered finish from the boards and match the thickness, I sanded and sanded. After about two hours I had enough! I thought surely, there must be an easier way.
I remembered using a planer in shop class back in high school and that seemed like it would be just the tool for the job. I started by looking for a planer to rent but I couldn't find anything which seemed a little odd. I didn't really want to buy a planer but I couldn't really see another option if I wanted smooth uniform wood from these boards. It was either that or go with an old rustic look.
In the end, I decided to bite the bullet and buy a planer. I have aspirations to mill my own lumber at some point. I would need a planer for smoothing out the rough cut lumber if I also wanted to do finishing work with it. Plus, I figured it was a good excuse to add to my tool collection!
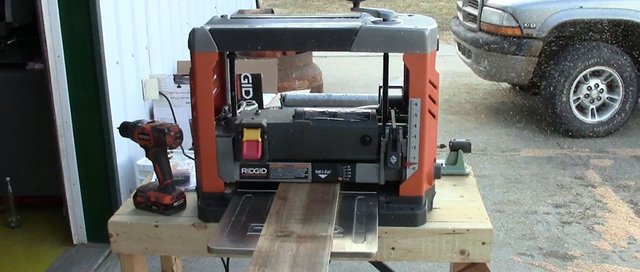
I did a bit of research and ended up settling on a Rigid Planer. They aren't top of the line but are a good mid-priced option. They had decent reviews and the blades are reversible so you can plane twice as much before needing to sharpen or buy new blades. It's a good thing too because the salvaged wood had a bit of dirt on it and I am pretty sure the dirt prematurely dulled the first side of the blades. I was able to finish planning all the wood though so it is nice that I can start my next project with fresh blades without having to purchase more.
 The planer I purchased in action!
Before I started to plane I cut the boards into more manageable lengths; as I mentioned earlier, the boards were between 12 and 16 feet. I also removed any pieces that were split, cupped or too dirty to plane.
As you can see in the video, the operation of the Rigid planer is pretty simple. You need to adjust the height of the planner first, it can't remove more than about 1/16 of an inch per pass. Once the height is set, turn on the machine, and insert the board into the front. I set up the rolling stand at the same level as the planer to catch the pieces of wood as they exited. This is important because if the board moves up or down the blades will "bite" into the wood and make a little rut.
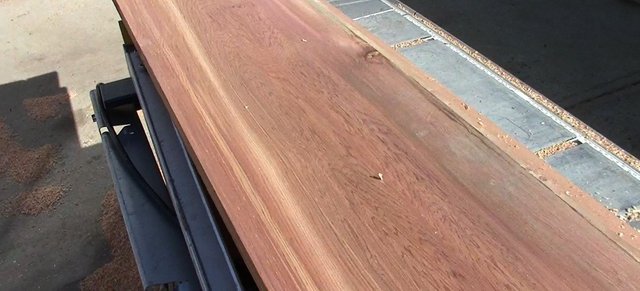
 The finished product was better than I expected!
In the end, even though I don't like spending recklessly I am confident that buying the planner was a good decision. The cedar boards ended up having a beautiful grain to them and buying pre-finished wood like that would have cost at least the $400 I spent on the planer.
In future posts, you will get to see what I did with the cedar boards. I didn't end up using them for the closet door like I originally planned but I did make our bathroom shelving, pantry, and more recently a TV shelf out of them. There are still a few boards left in storage just waiting for another project to come around.
Oh and I almost forgot, I never did end up having to pay anything for this lumber! I've reminded my operations manager about it a couple of times but I don't think he cares.
Thanks for reading/watching everyone! Please upvote, follow and resteem to support this work. As always, comments are welcome and I would be more than happy to answer any questions you may have about tiny houses.
▶️ DTube
▶️ IPFS
excellent working!