How to create your own dataset for machine learning
Hello,
This is the fifth article of my serie "automating games with python"
You can find on my account How I made my own python bot to automate complex games (part 1) Which explains my motivation and the game I'm automating itself. the part 2 is How to control the mouse and keyboard with python for automation
Which digs into the core functions that are needed for automation. Part 3 which talks about a wrapper that I made to easily implement image searching within your python program and how to use it : Image recognition with python.
Part 4 : Why I had to use machine learning for bypassing the anti-bot security explains why I needed machine learning and how simple image recognition was not enough.
Data preprocessing
The issue with machine learning tutorials is that they often completely skip an important part of a machine learning project : data preprocessing, how we grab the data, format it into arrays etc. It's often like "run this command and it'll download mnist" or whatever. And IMO that's a problem because once you are on your own you have to deal with problems you've never encountered before.
Like how many images should we take ? Is it okay if they are small ? How should I stack them in my numpy array ? etc etc
So we need 2 datasets, a training set, and a test set, for those not familiar with machine learning, we want to split those two so we can train the algorithm on the training set and then test if it was correctly trained on the test set. If we were to train on the whole data, we would have a problem that is called overfitting basically the algorithm learns and tests itself on the same data over and over. And in the end he won't be able to detect things that are not in his dataset.
This is a huge problems that resulted in the writing of countless papers. Now we have lots of techniques to reduce overfitting but separating the training and test set is still the best way to reduce it.
Images are numbers
To understand how we are going to store the data we need to understand what is an image. An image is simply an array of values. For instance here is a black and white 1 :
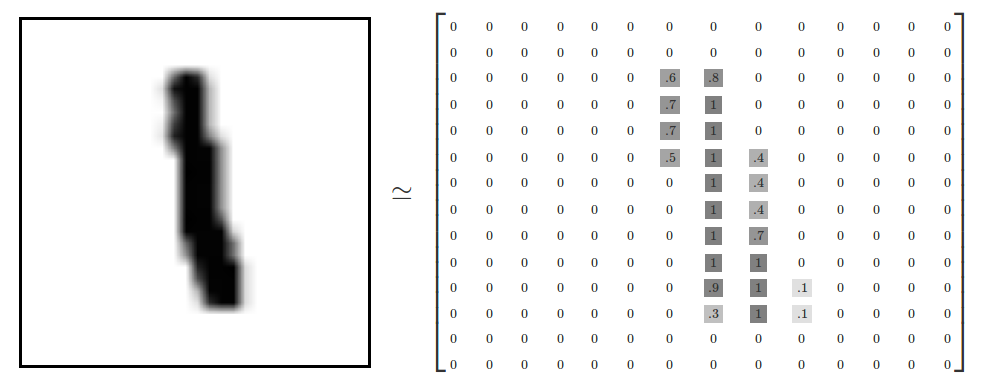
Colored images are the same except they have several channels so it's a three dimensional array, for instance a 28*28 colored image will be a matrix of this shape : 28,28,3
And then we simply stack those arrays to get our dataset like so :
I'll explain the numbers later
But stacking a three dimentional array makes it a four dimentional array which can be pretty annoying to deal with.
So we flatten it out into a vector (a single dimension array aka : [0.4,0.5,0.1......]) and then stack those into an easy to use two dimensional array.
784 represents the number of pixels in a 28x28 black and white image. and 55 000 is the number of images. So here we have a representation on how 55 000 images are stacked in an array.
To give you more intuition it's like that :
[ # array containing all the images
[0.4,0.6,0.8.......] # image 1
[0.7,0.9,0.4.......] # image 2
......
.....
......
]
Labels
In order for the algorithm to learn he needs the labels for each image (aka "this image is a 7") so he knows that the first image is a 1, the second is a 3, etc and learn by example.
To do that we will create a two more arrays for the training and test set. The most straightforward thing to do would be to put them like so :
[1,5,6,3] : image 1 is a 1, image 2 is a 5, image 3 is a 6 etc
But for some reasons that I'm going to develop in the next post, it's better to use what is called one hot encoding.
This is a way of representing numbers that looks like this :
[1,0,0,0,0,0] = 1
[0,1,0,0,0,0] = 2
[0,0,1,0,0,0] = 3
Get it ? It's an array filled with zeroes. with a 1 at the index of the number basically to represent a 3 you put a 1 in the third position.
In the end you get a two dimensional array like so :
[
[1,0,0,0,0,0]
[0,1,0,0,0,0]
[0,0,1,0,0,0]
]
wrapping up : we need four arrays :
Data and labels for the train set.
Data and labels for the test set.
So let's apply this to our particular problem !
Grabbing the data
So if you remember my last posts, we want to classify those squares :
and they are laid out this way :
So the first idea what to basically manually take a screenshot and then crop it out manually, which turned out to be a nightmare very fast.
We need to grab the images at exactly the same position each time and of course be able to do that automatically once it's going to be in production.
So my solution is kind of straightforward :
do you see the little arrow, red around the cat and blue around the character ? Well I search for it using traditional imagesearch.
Since the distance arrow -> square is always the same, I can precisely capture all the squares.
I can't directly put the positions of the square because the character is never exactly at the same position so you have to work with offsets relative to something else.
Coding the image grabber
The code is simple :
We save them under the name 1.png, 2.png.... in the directory "unclassified", to make sure that we don't have twice the same file number, we simply get the number of files in the directory and add 1.
For instance, if the directory contains 1.png, 2.png, 3.png then there will be 3 files so the next file will be named 4.png
def saveimage(img):
    files = [f for f in listdir("unclassified") if isfile(join("unclassified", f))]
    filename = "unclassified/" + str(files.__len__() + 1) + ".png"
    img.save(filename)
The capture function just grabs the squares and saves them.
def capture(event):
    pos = imagesearch("character.png")
    print("saving images")
    x = pos[0]
    y = pos[1]

    saveimage(ImageGrab.grab(bbox=(x - 43, y - 24, x - 8, y)))
    saveimage(ImageGrab.grab(bbox=(x - 87, y - 2, x - 52, y + 22)))
    saveimage(ImageGrab.grab(bbox=(x - 43, y + 19, x - 8, y + 43)))
    saveimage(ImageGrab.grab(bbox=(x + 1, y + 40, x + 36, y + 64)))
    saveimage(ImageGrab.grab(bbox=(x + 43, y + 19, x + 78, y + 43)))
    saveimage(ImageGrab.grab(bbox=(x + 87, y - 3, x + 122, y + 21)))
    saveimage(ImageGrab.grab(bbox=(x + 43, y - 24, x + 78, y)))
You probably noticed that I have an "event" variable that I don't use. It's because I use a GUI. This way I can trigger the image grabbing easily with a hotkey :
if __name__ == '__main__':
    root = tk.Tk()
    my_image = Image.open("background.png") # just to make it pretty
    filename = ImageTk.PhotoImage(my_image)
    panel = tk.PanedWindow()
    panel = tk.Label(root, image=filename)
    root.bind('<F1>', capture)
    panel.pack(side="bottom", fill="both", expand="yes")
    root.mainloop()
I can do my things and whenever I trigger the anti-bot protection I grab images with F1. (I'll do a tutorial on GUI programming with python later)
Once I grabbed enough images I have to manually sort them. This can be a pretty tedious and long task. Since I want to have around 100 images for each number ranging from 1 to 8, that's 800 images at 0.5 images per second that's almost 30 minutes. And you have to classify all of them without an error. So I did a few and then thought : "Hey since I grab like 10-20 screenshots from the same antibot session, they always come in the same order" so I can manually classify the first 8 and then automatically classify the rest.
so here's the code, read it and read the comments to understand on the go :
# global vars
img = None
root = None
indexes = [] # the order of the images

def save(index, image): # here index is the class of the image eg 2,3 etc
    mypath = str("images/" + index)
    files = [f for f in listdir(mypath) if isfile(join(mypath, f))]
    file_id = files.__len__()
    filename = mypath + "/" + str(file_id + 1) + ".png"
    image.save(filename)


def key(event):
    global img
    global root
    indexes.append(str(event.char))
    root.destroy() # we destroy the current gui window so the next can     appear


if __name__ == '__main__':
    files = [f for f in listdir("unclassified") if isfile(join("unclassified", f))]
    ordered_files = sorted(files, key=lambda x: (int(re.sub('\D', '', x)), x)) # sorting them in the numerical order and not alpha order
# because in alpha order 10 < 2


    for i, file in enumerate(ordered_files):
        if (i == 8):
            break # we got the pattern we can sort automatically now
        root = tk.Tk() # create a gui
        image = Image.open("unclassified/" + file) # open the image

        my_image = image.resize((360, 250), Image.ANTIALIAS)
        filename = ImageTk.PhotoImage(my_image)

        panel = tk.PanedWindow()
        panel = tk.Label(root, image=filename) # display the image
        root.bind('<Key>', key) # bind any key to the function
        panel.pack(side="bottom", fill="both", expand="yes")
        root.focus_force() # put the window in focus
        root.mainloop() # wait for events


    # we got the order of the files so we save them
    i = 0
    for file in ordered_files :
        image = Image.open("unclassified/" + file)
        save(indexes[i], image)
        i+=1 # loop through each iteration of the pattern
        if (i == 8 ): # and start again
            i = 0
    print("done")
Ok so now I got my data, in file format in directories so all the 1's are in 1/* all the 2's are in 2/*
Here is a sample of the content of the "2" folder :
Now ! I realize this article is aready way too long but we still don't have our datasets. Luckily it's not that complicated.
The core idea is simple : read all the content of the directory containing all the images. And for each image, read it, flatten it into a vector, and then add it to the dataset array. For the labels, we know from where the image comes from so we can easily know it's label.
Ok ? Let's see the code then !
side note : we have 9 categories although we have 8 numbers because we also want to recognize the crosses.
this :
They are found around the cat and will be usefull later, you'll see.
I made a class so it's easier to use my data preprocessor :
class Capchat:
    data_dir = "images/"
    nb_categories = 9
    X_train = None # X is the data array
    Y_train = None # Y is the labels array, you'll see this notation pretty often

    train_nb = 0 # number of train images

    X_test = None
    Y_test = None
    test_nb = 0 # number of tests images

    index = 0 # the index of the array we will fill


    def readimg(self, file, label, train = True):
        im = cv2.imread(file); # read the image to PIL image
        im = cv2.cvtColor(im, cv2.COLOR_BGR2GRAY).flatten() # put it in black and white and as a vector
        # the train var definies if we fill the training dataset or the test dataset
        if train :
            self.X_train[self.index] = im
            self.Y_train[self.index][label - 1] = 1
        else :
            self.X_test[self.index] = im
            self.Y_test[self.index][label - 1] = 1

        self.index += 1

    def __init__(self):
        total_size = [f for f in listdir(self.data_dir + "1/") if isfile(join(self.data_dir + "1/", f))].__len__() # ge the total size of the dataset
        self.train_nb = math.floor(total_size * 0.8) # we get 80% of the data to train
        self.test_nb = math.ceil(total_size *0.2) # 20% to test

        # We fill the arrays with zeroes 840 is the number of pixels in an image
        self.X_train = np.zeros((self.train_nb*self.nb_categories, 840), np.int32)
        self.Y_train = np.zeros((self.train_nb*self.nb_categories, 9), np.int32)

        self.X_test = np.zeros((self.test_nb*self.nb_categories, 840), np.int32)
        self.Y_test = np.zeros((self.test_nb*self.nb_categories, 9), np.int32)


        # grab all the files
        files_1 = [f for f in listdir(self.data_dir+"1/") if isfile(join(self.data_dir+"1/", f))]
        files_2 = [f for f in listdir(self.data_dir+"2/") if isfile(join(self.data_dir+"2/", f))]
        files_3 = [f for f in listdir(self.data_dir+"3/") if isfile(join(self.data_dir+"3/", f))]
        files_4 = [f for f in listdir(self.data_dir+"4/") if isfile(join(self.data_dir+"4/", f))]
        files_5 = [f for f in listdir(self.data_dir+"5/") if isfile(join(self.data_dir+"5/", f))]
        files_6 = [f for f in listdir(self.data_dir+"6/") if isfile(join(self.data_dir+"6/", f))]
        files_7 = [f for f in listdir(self.data_dir+"7/") if isfile(join(self.data_dir+"7/", f))]
        files_8 = [f for f in listdir(self.data_dir+"8/") if isfile(join(self.data_dir+"8/", f))]
        files_9 = [f for f in listdir(self.data_dir + "0/") if isfile(join(self.data_dir + "0/", f))]


        for i in range(self.train_nb):
            # add all the files to training dataset
            self.readimg(self.data_dir+"1/"+files_1[i], 1)
            self.readimg(self.data_dir+"2/"+files_2[i], 2)
            self.readimg(self.data_dir+"3/"+files_3[i], 3)
            self.readimg(self.data_dir+"4/"+files_4[i], 4)
            self.readimg(self.data_dir+"5/"+files_5[i], 5)
            self.readimg(self.data_dir+"6/"+files_6[i], 6)
            self.readimg(self.data_dir+"7/"+files_7[i], 7)
            self.readimg(self.data_dir+"8/"+files_8[i], 8)
            self.readimg(self.data_dir + "0/" + files_9[i], 9)

        self.index = 0

        for i  in range (self.train_nb, self.train_nb + self.test_nb):

            self.readimg(self.data_dir+"1/" + files_1[i], 1, False)
            self.readimg(self.data_dir+"2/" + files_2[i], 2, False)
            self.readimg(self.data_dir+"3/" + files_3[i], 3, False)
            self.readimg(self.data_dir+"4/" + files_4[i], 4, False)
            self.readimg(self.data_dir+"5/" + files_5[i], 5, False)
            self.readimg(self.data_dir+"6/" + files_6[i], 6, False)
            self.readimg(self.data_dir+"7/" + files_7[i], 7, False)
            self.readimg(self.data_dir+"8/" + files_8[i], 8, False)
            self.readimg(self.data_dir+"0/" + files_9[i], 9, False)
And that's it !
When I want to get my data I simply call :
cap = Capchat()
A few notes :
- I know this is not scalable, I should do a more generic function but since I only had 9 classes I went for the quick&dirty.
- This assumes that there is the same amount of images for each class.
- It might be slow, but since my dataset is relatively small (900 images) I did not have the need for optimization, getting all ready takes about 5-6 seconds.
- I guess there are probably libraries that can do that for you but I wanted to get my hands dirty.
I know this is a lot of code so feel free to ask me questions in the comments.
See you next time to see how we'll use this to train and use our machine learning model !
Great post thank's to share this informations with us , I have followed you !
Thanks a lot for the kind words sir :)
I knew nothing about this topic, and you laid it out in an understandable and interesting way. I'm actually going to go back and read the others in the series!
Nice work
Thank you so much for your comment, tell me what you think about the rest of the serie :)
Excellent post, I liked it, I follow you to read what you publish, you pass by my profile, maybe something that interests you too, keep posting like this :D
Congratulations @howo! You have completed some achievement on Steemit and have been rewarded with new badge(s) :
Click on any badge to view your own Board of Honor on SteemitBoard.
For more information about SteemitBoard, click here
If you no longer want to receive notifications, reply to this comment with the word
STOP