How to make textures on the canvas with modeling paste
Both modeling paste and gesso contain resins or acrylic polymers, but the latter is a little more fluid and is basically used to print the canvas and give minimal textures, while the paste has a consistency that allows it to adapt better to different shapes and to higher reliefs.
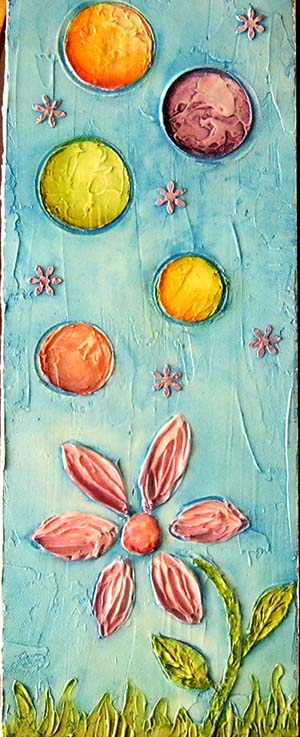
To see this technique in a practical way, I made a small painting with a childish motif, without many pictorial pretensions but with great richness in texture, since I needed to do it quickly to decorate the room of a baby who was about to be born. Here is the result:
And now I explain step by step how I made the texture with the paste:
- I apply with a spatula the modeling paste, which is available in artistic or craft supply stores, on a canvas. If you are going to do something with a lot of thickness it would be more advisable to use a rigid support.
- As it was a small surface I applied it quickly throughout the canvas. In the case of large sizes and special reliefs should be applied in parts because after about two or three minutes begins to have a drying process and if we pass the spatula again unwanted effects are generated (for some purposes it is necessary that is already hardening a little).

- I quickly made the circumferences of the "planets" with the mouth of a small container. Depending on what you want you can use other objects that we find, it's all a matter of creativity and trial, but you have to have them on hand before applying the paste, lest it dry out and we have not yet found them!

I made the flower "hand-raised" by applying paste and shaping it with the tip of the spatula. You could also let the first layer of pasta dry and then make the drawing on top or use a template to have a better guide when applying the paste.
The grass I did with the tip of the spatula with very little load applying it as if it were cleaning it on the edge.

After this I let it dry for about three hours and I highlighted the planets and the stem of the flower.
Finally, the "flying flowers" I made with a small template that I took with a punch for handicrafts. We can also make our own designs in a cardboard.

How I applied the oil painting:
To start painting, I waited 48 hours to make sure it was completely dry.
For the painting I wanted to obtain child-like colors and pastels, but they did not look very opaque, so I applied the variant of the glazes that I mentioned in the article on "Methods and Techniques to paint in oil", which consists of applying paint and then rub the surface with a clean rag (that does not detach threads or lint) to remove the paint that is more external, so the texture is highlighted:
I applied the paint of the desired color over the entire painting, and then removed it by rubbing with bits of cloth. If you have more time, I recommend doing it for parts, to avoid unnecessary stains that are made accidentally.
The next day I applied some colors to give some contrasts and nuances and I removed the excess paint in the same way.

- Since I did not have time to frame it, I applied paste to model on the side edges of the painting and painted it in the same way.

Tricks:
If you are going to make too thick reliefs, you have to do it in layers since you can crack the paste.
Use work clothes and avoid getting your hands dirty, since it adheres a lot and it is difficult to remove it. It is very similar to those liquid correctors that were used in school, mixed with white glue ...
The paste, as well as in the case of gesso, can be mixed with acrylic colors (not oils) to obtain a colored background.
We can obtain beautiful textures using leaves of plants, rollers with patterns, templates, textured papers, stamps, and a great variety of materials that we can find at home or in DIY stores - painting. In most cases you will have to print some oil on the surface of the object so that it does not stick.
If we do not like the paint we apply, we can quickly remove it with the dry cloth and then moistened with turpentine, but we must do it quickly since the paste starts to "melt a little" due to the action of the solvent.
This technique offers great possibilities to create unique and striking oil paintings, it is only a matter of being creative and practicing. In future articles we will see some other examples where texture and color are harmoniously combined.

¿This is yours?
This is here:
http://pintar-al-oleo.com/texturas-con-pasta-para-modelar/