Non-Destructive Testing: Principle, Procedure and Applications.
Greetings Steemians!
Sorry it took me longer than usual to make another post. Believe me, my heart lies here but, I guess you can’t just cheat the body and nature. Well, I am back and feeling much better now. By the way, I hope the previous days have been good for you. It’s good to have you here once again.
Lately I have been discussing engineering and today will be no exception. Last time we delved into corrosion, particularly its adverse effects and how we can tackle them. Today, we will be looking at an aspect of Industrial and Production engineering. Though the industrial era is undergoing revolution, some things are still in place and remain vital to an industry.
But first allow me present you an analogy.
As a child, I fell and broke my left arm as the rest of my body rested on it in that process. How sad, I had fractured my left arm. I tried to get up. The rest of my body responded but my left arm had disown the others. An x-ray scan was recommended by the doctor to reveal what went wrong. It confirmed the obvious problem – Fracture, but it was able to reveal the extent of the fracture which lies beyond sight.
Well, today my left arm is working fine. You wouldn’t even notice I had an accident with it before.
Forgive me, this is already looking personal or medical. Don’t worry, I am neither writing about myself nor medicine. I only wanted to note something.
When I broke my arm, it was easy to conclude that I had a fracture. However, the extent of the fracture could not be evaluated. The bone lies beneath the flesh which is out of sight and so we required what could see through the skin.
A silly idea is to cut through my skin and see what’s going on, but of course that is silly. Even if it does not cause more harm, it will leave me with a big scar. That is, in the process of evaluating the extent of my fracture, my skin was tarnished.
In engineering to evaluate the mechanical properties of a material such as its hardness. We have to subject the material to impact. This impact will result in a dent and the extent of the dent determines the hardness of the material. An interesting fact to note is that diamond is the hardest material on earth.
Such impact test which results in a dent in the material is called a Destructive test by obvious reason. However, there are situations where we cannot afford to dent or distort the material and we need to evaluate some features within the material. In such case we have to utilize a group of testing techniques called Non-destructive tests. Such process is called Non-Destructive Testing (NDT).
DEFINITION
Non-Destructive testing (NDT) as the names suggests, is any testing technique that is used to inspect a material or evaluate its properties, without damaging or compromising the material or its function.
Inspection is vital to industrial engineering as it is vital to maintenance and quality control as it helps such department keep track of the status of products or equipment in their jurisdiction. By doing so, they can determine if the product meet the required standard or when an equipment is likely to fail or that which is already showing the symptoms of failure.
In other words, we use NDT for quality control so as to reduce the distribution of defective products to the consumers. Maintenance departments on the other hand utilize NDT to determine defects in plant equipment to ensure minimum breakdown and prevent production losses. Also, material properties such as thickness can be determined using NDT.
Unlike destructive testing, where the product or equipment is damaged, the utilization of NDT preserves the article in question.
PRINCIPLE OF NON-DESTRUCTIVE TESTING
Now, how does NDT works? How do we obtain what we require through NDT?
Various NDT technique utilize different mechanism. However, the principle behind all is similar. All NDT techniques produces an appropriate input which is delivered to the test piece (material, product or equipment in question) and as a feedback an output or response containing the required information is returned from the test piece.
The deviation of this output or response from the output or response from a test piece with no defect is a measure of the flaws within the test piece under investigation.
The information received from the test piece is not always in a form that the uninitiated could easily deduce anything from. The operator on the other hand has been trained and is able to make a correct inference from the information received. They are able to identify deviations in the output from the reference output.
NDT TECHNIQUES
There are a number of NDT techniques available today, but we will be discussing the most employed ones. They are;
- Radiographic Inspection
- Ultrasonic Inspection
- Magnetic Particle Inspection
- Hydrostatic Inspection
- Dye – Penetrant Inspection
RADIOGRAPHIC INSPECTION
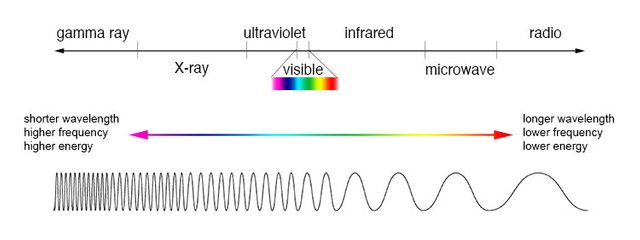
Radiographic NDT is a technique which utilizes high frequency electromagnetic radiation to evaluate material properties or the integrity of a product or equipment. Basically, Gamma- and X-rays are the two used electromagnetic radiation for radiography. Gamma and X-rays can be found on the extreme of the electromagnetic spectrum as shown. They have high frequency and thus energy, which gives them enough penetrating power. It is noteworthy that gamma rays are more powerful than X-rays.
- Set-up and Procedure
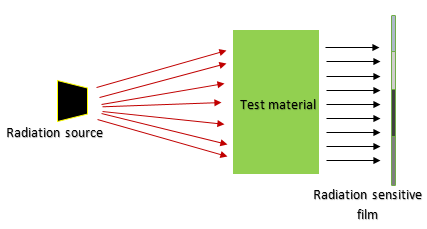
Setting up radiographic inspection requires three (3) main components – the radiation source, the test material and a Radiation sensitive film.
The Radiation source utilized depends on the application – such as the size of the material, material thickness, density and so on. Gamma rays are gotten from radioactive elements such as Iridium – 192 and Cobalt – 60. X-rays are generated using X-ray machines.
.png)
Now, how do we put these together? Here is it.
The radiation source is placed on one side of the test piece and the Radiation sensitive film is positioned on the other side. The Radiation source and film must be properly aligned to allow for proper exposure of the film.
When all precautions as well as safety measures are in place, the radiation source is turned on and a beam of radiation is allowed through the material under test and from there the emerging beam hits the radiation sensitive film.
The more dense the material, the more it will retard the beam passing through it. The Beam emerging from the test piece will then proceed to the radiation sensitive film and an image called a Radiograph is formed on the film (although the film has to be developed first in similar manner as photographic films). The Radiograph which usually consists of numerous light and dark portions is a graphical representation of the internal structure of the material and thus any defect present will be exposed.
Note: Techniques to convert the image formed into digital form are now been used.
Darker portions are an indication of more exposure of the film and this signifies that the emerging ray from the material which hits this portion of the film had passed through a region of low density or free of defects within the material. Lighter region, is the reverse. It shows that the beam had passed through a region that is denser or have defects. By interpreting the Radiograph, a trained operator is able to make inference about the integrity of the material tested.
- Application and Advantages
Radiographic inspection is applied to metal structures - weld deposit, pipeline, machined parts etc. They are used to evaluate the mechanical properties of castings and to determine the presence of defects and inclusions in the casting. Non-metallics like Plastics, concretes etc., can also be inspected using Radiography.
Radiographic inspections is a versatile technique and finds a wind range of application. There are various benefits of using Radiography viz: Capability to inspect any kind of material; radiography becomes the best option when material thickness or density becomes high; assembled parts can be inspected using this technique, minimum material surface preparation is required and so on.
- Limitations
One obvious limitation of this technique is its hazardous nature due to the use of ionizing radiations. Consequently, extensive and expensive shielding of the test area from other areas are required. Sometimes, the shielding might not be possible and instead there’s need to transport the equipment or material to be tested to a safe location. Aside these, Radiographic inspection remains the most powerful NDT technique.
Another limitation of this technique is that it requires high skill operator to conduct the test and interpret the Radiograph.
ULTRASONIC INSPECTION
Ultrasonic testing is similar to Radiographic testing in one sense – they both depend on waves. However, instead of electromagnetic waves as in Radiographic testing, ultrasonic testing employs high frequency sound waves. Perhaps one familiar place where you must have heard of ultrasonic testing is in the scan of a pregnant woman to check on the status of the baby and the mother. It is called obstetric ultrasonography.
Ultrasound waves behaves just like normal sound waves. In fact ultrasound waves are just sound waves beyond the auditory capacity of humans. It has been determined that any sound beyond a frequency of 20, 000 Hz (20 kHz) cannot be perceived by humans. Thus, 20 kHz is taken as the lower limit for ultrasound waves. The specific frequency utilized depends on the application.
- Set-up and Procedure
The major elements needed for ultrasonic testing are – Ultrasonic transducer, Test material and a display.
The ultrasonic transducer (a transducer is any device that converts one form of energy into another) is simply a piezoelectric material. The transducer uses the piezoelectric effect to generate ultrasonic sound waves. Wondering what a piezoelectric effect is? It is the conversion of electrical energy into sound energy or vice versa.
Electrical pulses are sent to the transducer and this causes it to vibrate. By virtue of this process, sound waves with high frequency are generated.
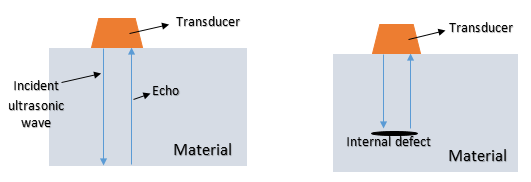
The generated ultrasonic wave is directed through the material and the corresponding echo is received by the transducer. The nature of the echo, particular the time of arrival is an indication of the internal structure of the material. The transducer reconvert this echo into electrical pulses which may be turned into an image or in form of graph displayed on a screen for analysis.
.png)
Let’s look at the illustration to the right for a better understanding of the concept. The transducer sends an Ultrasonic signal into the material. If the material is free of defect, the signal bounces off at the other surface and it is received by the transducer. However, if the sent signal encounters a defect in its path, it is reflected before it reaches the bottom.
By comparing the echo with defect with that without defect a trained operator can characterize the defect. The overall material depth can also be determine for a material without defect is it is of interest to the operator.
Note: An echo is the reflection of sound.
- Application and Advantages
As in Radiography, ultrasonic testing finds application in the inspection of metallic components. They are used to inspect welds in particular. Porosity, cracks, slag, holes and any other discontinuity can be easily detected using ultrasonic testing. Other classes of materials can also be inspected using ultrasonic testing.
A typical application of Ultrasonic testing is in the evaluation of the effectiveness of self-healing concrete technology as deduced from a publication by Ahn, et al. (2017). They examined the applicability and limitation of various Ultrasonic test methods used for determining the effectiveness of self-healing concrete technologies.
Aside the powerful nature of Radiography, ultrasonic testing would have been the best technique for NDT due to the fact that it gives no harmful radiation as in radiography.
- Limitations
Ultrasonic testing is a one dimensional type of test such that if defects lies parallel to the sound signal sent into the material, it won’t be revealed. Thus only defects perpendicular to the signal are revealed. Also, if the piece inspected is constructed from series of layers, the interface between these layers could be interpreted as defect. The thicker each layer is the more accurate the result given by this technique.
Therefore, there need to have well skilled operator, who can identify what is acceptable from that which is not. Also, Ultrasonic testing can only cover only a small test area at once. A typical area is 4 inches by 8 inches.
CONCLUSION
Allow me close the discussion for now as I wouldn’t want you to be overwhelmed. Next time, we will visit the other techniques of NDT.
In the meantime, I hope you have been able to grasp the concept of NDT. We have seen how Radiographic inspection and Ultrasonic inspection are basically performed. In actual sense, the test approach may vary from application to application but all revolves around the above explained concept.
Thanks for reading. I hope to have you here next time.
REFERENCES
- Ismaila, S.O. Lecture on Mechanical Maintenance. Federal University of Agriculture Abeokuta.
- Hijazi, A. Introduction to Non-Destructuve Testing Techniques: Radiographic Testing.
- Kouche, A. E. and Hassanein, H. S. (2012). Ultrasonic Non-Destructive Testing(NDT) Using Wireless Sensor Networks. pp 136 - 143.
- Ultrasonic Flaw Detection
- Casting Quality Test Methods
- Gamma Radiography
- Piezoelecricity - Wikipedia
- Principles and Applications of Ultrasonic-Based Nondestructive Methods for Self-Healing in Cementitious Materials


.png)

Specialists rely on NDT accuracy when deciding whether to operate, repair or replace a component and I have come to know that the NDT Technician will be able to work in specific industries, such as aerospace, motorsport, power generation and distribution, manufacturing, railways, oil & gas (on- and offshore), marine and construction.
Job well done @temitayo-pelumi
You are absolutely right @whytepresh, NDT span across all manufacturing and production industries. Like in the power station i had industrial training, we had any issue with tube failure in the steam boiler. we had to replace the failed part by welding a new one in its place. Thereafter, we used dye - penetrant inspection to verify the integrity of the weld. i will discuss dye-penetrant inspection in my next article.
Thanks for your contribution.
No qualms bro... You're welcome
Hello! I find your post valuable for the wafrica community! Thanks for the great post! @wafrica is now following you! ALWAYs follow @wafrica and use the wafrica tag!
👏 👏 👏
This is by far one of the most interesting post I've read in a while. You're just good with how you took us through the journey...
As noted, material properties and capabilities need prior check to deliver us the desired & standard quality.
This awesome technique would really be very advantageous and cost reducing. Destructive techniques would tell us the property of a sample but might not capture everything as NDT would.
But, is the environmental & cost implications of carrying out the techniques worth it as compared to other less environmentally hazardous techniques?
Well @mrbreeziewrites, only Radiography presents such substantial hazard. However, there are cases where its use is justified. You cannot have a very expensive equipment and want to you destructive technique to evaluate whatever you are interested in finding out. The best way is to go for what will preserve your resources.
Thanks for the feedback.
True tho. NDT becomes vital in most cases.
Believe me when i say i was writing this just this afternoon. With the hope of trying to complete it soon.. You didn't mention visual inspection though. It is one of the non destructive test.
You did a good job. Now i have to find another topic. 😄
Visual inspection is dependent on the human operator. I decided to skip it for others that utilize more than a human operator. But now that you have mentioned it, i will discuss it with the others listed in the sequel.
Thanks @adetola.
Yes it is dependent.. I would be writing on a ndt technique. Very soon it would be released on my blog. Its about an advancement on the current technique using a special sensor to overcome the subsurface limitation. Stay tuned to my blog for it.
A lot of information here. Thanks for all work.
Thanks for the kind words.
This is quite insightful for those of us not in engineering department. Welcome back and feel free to engage other authors within the community.
i do love to read other Authors' article and leave comments in them. My engagement dipped only because i had to stay away for a while due to my health, but i'm now back ready to continue from where i stopped. Thanks for dropping by sir - its an honor.
This is top notch bro. In manufacturing, I know there are a handful of quality control techniques and I have always wondered how the engineering world undergoes her control techniques. NDT is without arguement the quality test that can be applied always. Right?
There are a lot of quality control test and analysis in which NDTs are among. The one employed depends on the the quality to be evaluated.
Thanks for dropping by.
Oh oh. Okay
Thanks!
Are there any health hazards that comes with using this technique?
Yeah... Radiographic inspection is hazardous and requires some shielding and safety procedures due to the ionizing nature of gamma and x-ray. Ultrasonic on the other hand is safe.
And once again, memories of my undergraduate days. I'm sure Dr. Ismaila will be proud of you sir 😁
Thanks for dropping by sir. Undergraduate days were really an experience.
Enigineering is not really my thing.., but i'd be damned if this was not an interesting read,
Thanks for dropping by pal.