Who Says You Cannot Make your Own Airplane? Series #4: You've Got Attitudes, Aircraft Got Some Too
We all want to know how to build an aircraft by ourselves quickly but the truth is you cannot build what you do not understand yet - @teekingtv
Welcome back guys. So we are getting there gradually. I know of that feeling; many of us want us to go straight into the building aspect. I'd want that too, but like I do say, you cannot build what you do not understand how it is built. Just keep following these series and in no time, we are there. Okay now, let me give a brief recap of our previous series for the benefit of those that are just joining us.
Jet engines have been the successful drivers of aircraft for nearly a century now. There are several types of them, as we have most of modern aircraft that run on Two Spool Engines, we have some that even use what we call Three Spool Engines (especially the big aircraft). The jet engine work with the same principle that makes the air-filled balloon work - yes! Newton's Third Law Of Motion. As the jet engine suck in the massive air, the high temperature air are coming out as output thus, propelling the aircraft forward. The engines heat the incoming air to a very high velocity thanks to the Combustion Chambers. These engines are specifically called Turbo Jet Engines.
Thrust is not only used to move the aircraft forward. in fact, it is very important in breaking action while the aircraft is landing. But this time, it is called reverse thrust. The reversal doors are opened not automatically but by the pilot himself by activating the Levers which then open up the reversal doors.
The four forces of flight aside, another very important factor that effects the flight is atmosphere. Conventional jet aircraft are limited to fly up to the Stratosphere , light propeller aircraft fly inside the Troposphere, some special aircraft are designed to fly within the Mesosphere while only the space rockets are able to fly in the Thermosphere.
Wow! We had lots to discuss. If you are just joining this page for the first time, I strongly request that you check out the previous series: Series 1 | Series 2 | Series 3.
So in this series, we are going to start exactly where we stopped in the last one. First and foremost, I need to let you understand that the concepts we are going to discuss here have lots of terms we are all going to have to understand pretty well. The purpose of these series in the first place is to guide us on building an aircraft of ours by ourselves and that we cannot do unless we understand the mechanism behind flight. So I request you get your jotter or something to write these out so you can make more researches about them later after this lesson. Pardon me for acting like a tutor and a boss here, but trust me, I am (chuckles). Okay, something just crossed my mind now. I am going to be highlighting these terms (like make them bold) so we can see them easily. So let us get on it guys!
Soon we shall build our own aircraft. We are getting there gradually.
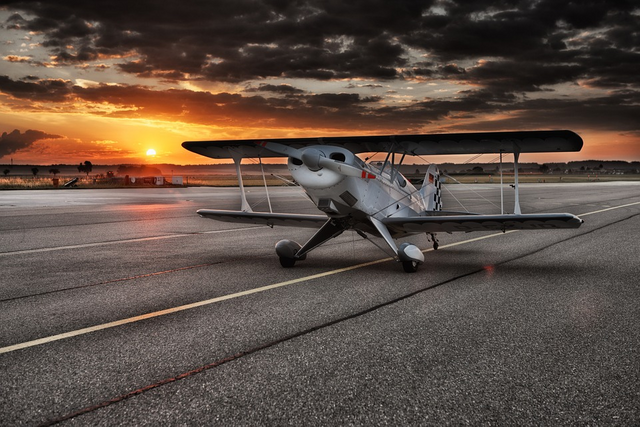
Pixabay Image - (CCO Licenced)
Equilibrium
This is a state where an object is neither accelerating nor decelerating. An aircraft moving in a straight position and has a constant speed (the speed is neither reducing nor increasing) is said to be in an equilibrium state. Or an aircraft climbing (ascending) or descending at a constant speed. However, an aircraft in a turning motion at a constant speed or height above the earth surface is not in equilibrium state. This is because during a turning motion, the plane is always accelerating towards the center of the turn.
When talking about equilibrium, we need to understand the followings:
There are different ways to attain equilibrium. Roll or movement above the plane's Longitudinal Axis is controlled by ailerons. When an aircraft is rolled, one aileron is depressed and the other (opposite one) is raised. This downward aileron increases the position of the wing, giving it more lift, pushing back wing up. Conversely, the up aileron reduces the camber and the effect of lift which create a roll around the axis. The ailerons are controlled by the left and right movement of the plane's control column. When the control column is moved to the left, the left aileron is raised and vise versa.
Pitching is the movement of the aircraft around the lateral axis and this is controlled by the elevators. Backward movement of the control column raises the elevators producing a force that causes the nose to rise and the tail to go down. Forward movement of the control column produces the opposite effect.
Yaw is the movement around the vertical axis and is controlled by the rudder which is hanged to the fin or the vertical stabilizer of the aircraft. Full pressure on the left rudder pedal causes the rudder to move to the left. This directs a massive air to flow to the left. The result is the tail of the plane moves right while the nose moves to the left. Using the right rudder pedal produces the opposite effect.
Aileron Drag or better still Adverse Yaw occurs when the ailerons are used. For example, during a turn, the down aileron is subjected to more induced drag as a result of the increased camber. This causes a momentary yaw opposite the direction of the turn.
There are other devices to help the pilot control the plane. They include Trim Tabs, flaps, Slots and Slats.
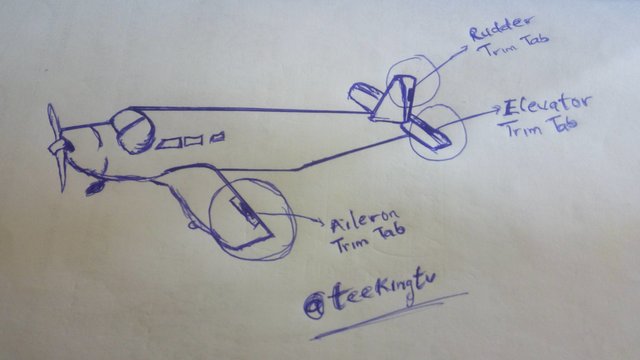
A sketch demonstrating how Trim tabs work at the ailerons and rudder of an aircraft.
SKETCHED BY ME
Click on image to zoom in.
Trim Tabs improve the control and balance of the aircraft. They are small auxiliary control services attached to the trailing edges of ailerons, elevators and the rudders. They may be fixed or hinged. Fixed Trim Tabs are preset on the ground while hinged Trim Tabs are controlled by the pilot. In larger aircraft, hinged Tabs are fitted to all control services to compensate for lateral or shapes. They also provide a better control in the event of engine failure in a multi-engine aircraft.
We have already discussed about flaps in series 1 but I will explain them again. May be this will help you in understanding how they work better.
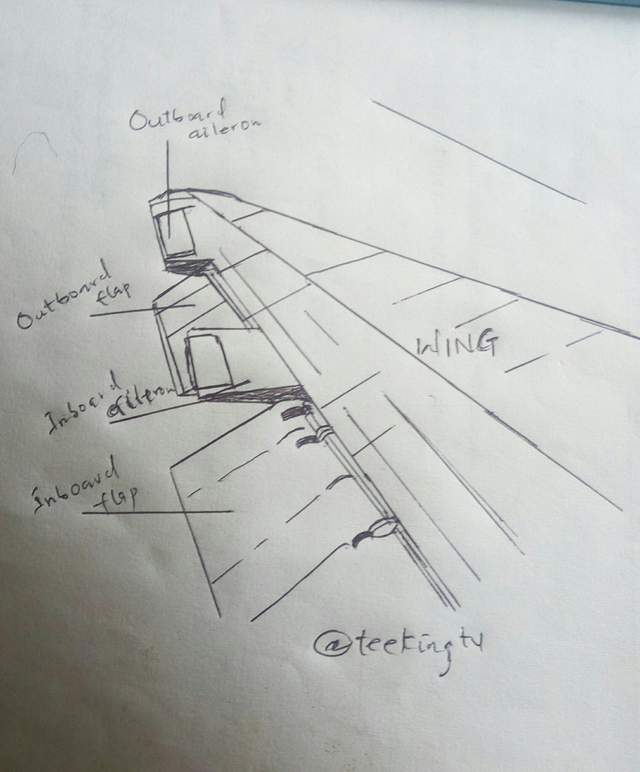
A sketch demonstrating how an aircraft flaps look.
SKETCHED BY ME (Already used in Series 1)
Click on image to zoom in.
Flaps are controlled by the pilot and improve lift by increasing the camber of the large portion of the wing. Flaps are for other advantages such as decreasing the stalling speed and ensuring a shorter take-off runs. They also allow a better approach to landing without an increase in airspeed and visibility is improved on approach to landing due to the lower nose position of the aircraft. When pilot sets the flaps position, both flaps go up or down together. When fully retracted, flaps conform to the shape of the wing. Flaps must be used cautiously. Especially when near the ground because of the sudden loss of lift and change in the plane balance that can result.
There are several types of Flaps. They include: Plain Flap, Slotted Flap, Split Flap, Fowler Flap, Double Slotted Flap and Leading Edge Flap.
Slot and Slat are devices on the leading edge of the wing which improve the airflow or laminar layer of air over the wing at lower speeds. This may be effect or controlled by the pilot and are generally found on airplanes with special performance requirements. On some aircraft, the tail plane can be varied in flight to turn the aircraft longitudinally. This is done by the stabilizer and the effect is similar to turning the elevators on the aircraft with the fixed tail plane. If the plane has differential breaks, that is independent breaking system for each main landing wheel, they may be used to on landing roll or give directions and control on the ground. Pressure applied to the left break pedal slows the left wheel and turns the airplane to the left and vise versa. To stop straight, equal pressure must be applied to both break pedals.
Another concept we need to take a look at before we leave equilibrium is what we call the Gyroscopic effect.
Gyroscopic effect
A spinning gyro will remain in rigid in space even though the platform it is placed on changes in attitude.
The above principle is the one upon which the attitude indicator and heading indicator is based. But the gyroscopic effect also has effect on aircraft in flight. The spinning aircraft engine and propeller act as a gyro wheel and try to remain rigid in space. They are also said to have gyroscopic precession. This occurs when a force is applied to a spinning object. The object will react as if force is been applied at a point 90 degree from a point where it was actually applied. this effect can be quite noticeable on a tail equipped aircraft because when the tail raises, the propeller pushes forward. And because of gyroscopic precession, the aircraft yaws to the left. Now that we are through with equilibrium, we are moving to the next principle of flight. This time, it is non other than Stability. Stay with me guys.
Stability
An aircraft is considered to be stable when it successfully return to its original position after being subjected to an air disturbance such as turbulence. Recall that we discussed about the three modes of rotation of an aircraft above, such
pitching or lateral movement, yawing of vertical movement and rolling or longitudinal movement. Stability in flight is achieved through its design.
Lateral stability can be achieved by using a Dihedral design. In this feature, the wing tail is higher than the central section of the wing. This causes the turbulent air to move to the down wing, exposing it to more airflow than the up wing. Because the down wing also has a higher angle of attack, it produces more lift and the aircraft returns to a level state.
Directional stability controls the yawing motion of the aircraft. The vertical stabilizer contributes to the directional stability of the airplane.
Longitudinal stability is perhaps the most critical characteristic of an aircraft. It is affected by air dynamic and physical factors. The greatest influence on longitudinal stability is the center of gravity. Other factors that influence it are changes of speed, power and attitude. Turbulent air, operation of flaps and other controls can also affect longitudinal stability. This problem is primarily resolved by the horizontal stabilizer and aided by the vertical stabilizer. Because these stabilizers are a long way from the center of gravity of the aircraft, they have a great leverage. Even the small force on them produces a large correcting movement.
The basic center of gravity of an aircraft is calculated from empty plane. Obviously, the center of gravity of a plane will change according to how it is loaded. It is the responsibility of the pilot to make that the center of gravity of the aircraft remains within the range set out in the weight and balance report. You can seriously affect the control ability of an aircraft by improperly loading it. To simplify loading problems, most manufacturers of light aircraft provide pre-calculated graphs, chats or other examples. Improper loading can lead to serious balance and control problems even if the maximum permissible weight is not exceeded. Factors that must be considered when calculating the center of gravity include the weight of the fuel, pilot, passengers, baggage and other payloads.
Now that we have understood fully well the principles of flight, it is time we start discussing our first approach on handling an aircraft. How about we look into taxing?
Taxiing
Taxiing is the term used for the movement of aircraft on land or water. You taxi the aircraft into position to take-off and to returning it to the stand or hanger after landing. Understanding the runways and taxiways is important for someone who wants to build an aircraft just as it is important for him to know how to fly it. In strange airports, ask the control tower or ground control for assistance if you have any doubt about correct taxiing procedure. At all controlled and some uncontrolled airports, taxiways are identified by names from the phonetic alphabets. These are Alpha (A), bravo (B), Charlie (C), Delta (D) and so on. At smaller or less complex airports, they may be identified by numbers. Airports with only one taxiway may have no special identifier at all.
When taxiing, be sure to use the coalition light and navigation light on your aircraft to make it more visible. Clearance to proceed are granted by the tower. The clearance gives you permission to taxi your aircraft to the runway but not onto it. In this example, you do not have to ask for permission to cross on the runway but it is your responsibility to make sure you are cleared before proceeding the cross. When a tower wants you to report runways crossing, the controller will say so in your taxiing clearance.
Now, let us get your aircraft moving. To start taxiing, it takes more engine power than it takes to keep the aircraft moving. Reduce the power once the aircraft starts to move. Also, test the break to determine what condition it is in. Most single engine aircraft have steerable nose wheels or tail wheels that are connected into the other systems. Generally, you should be able to use these aircraft using these wheels alone without using break to resist turning. To turn the aircraft right, press the right rudder pedal forward. Using the left pedal turns the aircraft left. To go straight ahead, neutralize the rudder pedal.
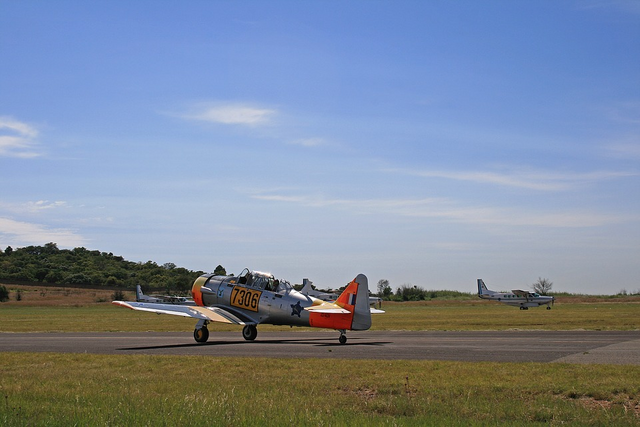
An aircraft taxiing on the taxiway.
Pixabay image - (CCO Licensed)
An aircraft with differential breaking systems that has separate break for each wheel, a turn may be assisted by applying a break on the same side as the rudder pedal being used. However, use the break lately. Do not try to turn an aircraft by having the by having a pelvic around the stationary main wheel. This puts a twisting string on the wheel. The amount of rudder needed to turn the aircraft will depend upon the radius of the turn, condition of the taxiways service, speed of the aircraft and wind condition on the ground. It also depends on whether the aircraft has a nose wheel or tail wheel. Wind has the most influence on how much rudder is required.
One thing to watch out for if you are taxiing an aircraft with a tail wheel landing gear engine is weathercock. Weathercock is the tendency of an aircraft to want to head into the wing. Aircraft with tail wheel engines are far less acceptable to weathercock. As you move the aircraft along the taxiway, control the speed with the power settings. Do not use the break to control the speed as it puts unnecessary wear on them. Taxi slowly as slow moving aircraft are easier to stop. Keep in mind that it takes a few seconds from the time you change the speed and direction of the aircraft until the change actually occurs. Before moving the aircraft, make sure the taxiway is clear. In a tail wheel aircraft, this may need zigzag movement to make sure there is nothing in your way.
As mentioned earlier, wind is the greatest variable on how you control your aircraft during taxiing. If you are moving directly into a cross wind, turning the Control Column into the direction of the wind will deflect the ailerons to help you maintain directional control. Applying the rudder will help you keep the aircraft from turning into the wind and maintain a straight path down the taxiway. If you want to turn your taxiing into wind, use the control column to assist you. If you want to turn to the right, turn the control column to the left and for a left turn, turn the control column the to the right. Special care is needed when taxiing into the wind. For example, you are taxiing due South and the wind from the North-East or North-West will be a quartering tailwind, when taxiing in strong quartering tailwind, make sure the elevator is down, and the aileron at the side from which the wind is coming is also down. As well, avoid sudden break in power and shaft breaking.
In the case of strong quartering headwind, the aileron from the side the wind is coming from should be up and the elevator should be neutral. Some makers of nose wheel aircraft recommend adequate use of ailerons in quartering winds. Always follow the manufacturers recommendations. When you turn from downwind into the wind, make sure you slow down. This is because speed will activate the tendency of the aircraft to turn into the winds.
The amount of power you will need to taxi depends on the condition of the taxiway. A soft or barely rough surface will require more power. Unless indicated otherwise, it is best to taxi with the control column firmly handed. You will find the response to steer the aircraft varied according to the wind. With the wind conditions, it may take a bit of time between your actions and the effect on the aircraft. Also, if you are taxiing a tail wheel aircraft, you may find a need to anticipate actions before they are required. For example, when turning into the wind, you will have to anticipate a need to apply opposite rudder pressure to slow the turn.
Safety should govern your taxiing speed. Make sure you are taxiing at a speed that gives you a full control of the aircraft as well as an ability to stop and turn when necessary. A good term to always remember is:
The stronger the wind, the slower the taxiing speed.
If you are taxiing on a soft surface, maintain a slow steady speed to avoid hurting your aircraft. When you start to taxi a nose wheel aircraft, first move forward slowly. This will prevent you from facing another aircraft or nearby obstruction. Even a minor collision on ground can cause expensive damage to your aircraft. Use outside help when you are taxiing. Keep your eyes on the signal man at all time and obey his signals. Make sure you are familiar with the standing system of mastering signals. While taxiing in a clear area, there are three things you should check. These are the turn and bank indicator, the attitude indicator and the heading indicator. The attitude indicator should remain steady at all time when you are taxiing. While taxiing straight, the 'turn and bank' should be straight. The heading indicator should hold steady. In a left turn, the 'turn and bank' meter should move to the left and the 'turn and bank' ball should be to the right. The heading indicator will surely decrease in degrees. When turning right, the opposite should occur.
One last point under taxiing: Never block the taxiway unnecessarily. In a case of engine malfunction or other fault discovery, move out of the taxiway to fix whatever problem you discover with the aircraft.
Now before we move to the next concept on this series, I strongly request you read what we have discussed so far once again while I take a cup of coffee (as usual). Trust me, it is for your benefit (even this coffee that I am taking right now).
Okay, we are back and now we are going to take a look at the different attitudes of the aircraft and the movements necessary to produce and control them. We will also learn how to control yaw.
Aircraft attitudes
All aircraft attitudes are considered as being relative to the horizon. The basic attitude of an aircraft is termed basic attitude. By the book:
Basic Attitude is defined the attitude necessary for level of flight at a constant speed and airspeed using the power settings recommended for cruise range.
At cruise attitude, the wings are parallel to the horizon. Cruise attitude is the reference point to which other attitudes of flight are related. The attitudes of flight are grouped into two categories: Pitch attitude and Bank attitude.
Like we mentioned earlier, pitch is the movement of the aircraft around its lateral axis. A pitch attitude is any attitude of the aircraft nose above or below the reference plane. If the nose is above the plane, the aircraft has a nose up attitude. If the nose is below the plane, it has a nose down attitude. The pitch attitude will be reflected on the flight instruments. In a 'nose up' attitude, you will notice a decrease in airspeed and the aircraft will be above the horizon bar of the attitude indicator. Conversely, in a 'nose down' attitude, the airspeed increases and the aircraft will drop below the horizon bar of the attitude indicator. Pitch is produced and controlled by the elevators. When you raise the elevators by pulling back on the control column, the nose pitches up. If you push the control column forward to lower down the elevators, the nose pitches down.
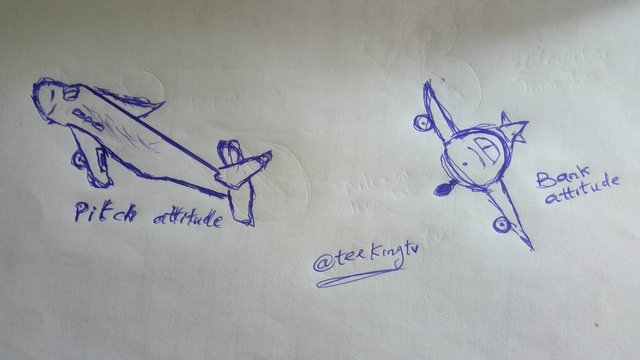
A sketch showing two aircraft displaying attitudes. The one at the LHS displays PITCH ATTITUDE while the RHS displays BANK ATTITUDE.
Manage the drawing, you can't expect good drawings from someone like me. LOL.
SKETCHED BY ME
Bank attitude refers to the attitude of the wings relative to the plane. It is caused by the rolling movement of the aircraft along its longitudinal axis and is produced and controlled by the ailerons. Again, you will see the banking attitude reflected on the instruments. When the aircraft is banked, the aircraft in the attitude indicator will bank in relation to the horizon bars. The turning bank indicator needle will be deflected in the direction of the turn. In the coordinate turn, the ball will be centered. The heading indicator will show a change in direction. For a left turn, it will show a decrease in degrees of heading. For a right turn, you will notice an increase in degrees of heading. As mentioned earlier, the banking attitude is produced and controlled by the ailerons. The ailerons are controlled by the left and right movement of the control column. When the control column is turned right, the aircraft rolls to the right. Turning the control column to the left causes the aircraft to roll to the left.
During flight, you might put the aircraft in both roll and pitch attitudes. The instruments will reflect in correlation to what we have already discussed.
Conclusion
I intend to break every concept discussed here to to the absolute basics as I believe my readers are not graduates from aviation schools. At the end of these series in general, we are all going to understand everything related to flight. Someone who follows these series with utmost attention should be able to pilot an airplane and together, we will build an aircraft that will surely fly at the end. Just keep your spirits high and stay focused. Let us take a break now as we shall meet again soonest.
References
- Conditions for equilibrium
- Gyroscopic effect
- Taxiing
- Wind Correction During Taxi
- Stability and control
- Aircraft design
Previous Lessons In The Series
- Series #3: Understanding How Jet Engines Work And Effect Of Atmosphere In Flight
- Series #2: Understanding The Thrust Mechanism And How The Engine Works
- Series #1: Understanding The Mechanism Behind Airplanes And The Misconceptions

Hey! Do you write posts that are related to Science, Technology, Engineering, and Mathematics (STEM)?
Then join #steemstem on on discord. Click here.
Check this blog post by @steemstem to understand the guidelines on how to become a member of @steemstem.
Also check on this post by @steemstem to understand the use of images so as to avoid copyright infringement.
And in case you are writing from Nigeria, you can include #stemng tag in your posts. Details on @stemng blog.
Thinking of delegating SP to @steemstem to support this great initiative? All you have to do is to use the links below:
50 SP | 100SP | 500SP | 1,000SP | 5,000SP | 10,000SP | 50,000SP
However, ensure you have at least 50 SP left in your wallet.
I am @teekingtv, the no.1 Global Meetup analyst

Go to @bible.com
You're an engineer in the making.
My head will start swelling now 😂
Thanks bro.
Something i took away today. Well done @teekingtv
Oh... How?
Thank you for checking by.
Wow, really educating.. Keep it up.
Thank you.
Hi @teekingtv!
Your post was upvoted by utopian.io in cooperation with steemstem - supporting knowledge, innovation and technological advancement on the Steem Blockchain.
Contribute to Open Source with utopian.io
Learn how to contribute on our website and join the new open source economy.
Want to chat? Join the Utopian Community on Discord https://discord.gg/h52nFrV