Quantum Information Science Kit - Preparation: The Main Gates Used in Quantum Programming
Hello Steemstemers, Utopians, and Quantum Enthusiasts Alike :]

Self Generated Image
As classical machines rely on series' of logical gates, quantum computers rely on specifically designed 'quantum gates', to emulate traditional architecture, as well as enforce a few quantum theories like entanglement. Today, I really wanted to get into building a program, as there are lots of fun things you can do with this toolkit these days, however, I started writing, and then I started explaining, and finally I got to the point where I realized that I should probably just do another introductory lesson, on how the kit works, and the different gates that are commonly used.
This is how I learnt, and I do think it is the right way to start, rather than just jumping in. Now, there is massive documentation out there for the Qiskit, though it is loosely spread out, and honestly not always that accurate unfortunately, as this is quite a complex subject. Researchers are still learning lol. Before we get into it, I would like to mention, the official documentation can be found here, and there is quite a bit of useful info there, but this should sum up what you will need to know for my first few tutorials. Now, the first thing I'd like to talk with you all about is the composer. Here is the link to the composer. Register now if you have not yet.
The Composer: A Visual Interface

Screenshot
The composer, though somewhat confusing at a first glance, is a rather intricate, and eloquent tool, that we can use to create our own quantum programs. The best part of this, is that a user barely needs to know any programming languages to use the tool, as it is more familiar to music than code. Now, the composer is not what we will be using to create our programs, however it does provide an excellent way to visually grasp what is being done in the machine, and I feel this is the best tool to learn the gates with.

Screenshot
In the above image, we have a blank composer. This composer, was custom designed with only two qubits. Having only two qubits, simplifies the equation a great deal, as there are only four possible states that these qubits can represent. These states, just like classical bits, are 00, 01, 11, and 10. The composer, quite differently from programming, plays left to right, rather than top to bottom, and each qubit is initiated in the state of 0. From there, we must involve at the very least, one measure gate to a qubit. You can test this by placing a measure gate on the qubit's score line that you would like to measure, like so:

Screenshot
Now, when you press simulate, using the example above, you will definitely receive the result of '00', as the qubits were initialized to 0, and have never had anything done to change their states, thus when measured, will still be in the state of '0'. Select the blue 'Simulate' button on your page, and you will see a result much like mine.

Screenshot
Now, that was just a small example to show you all how a program plays out on the composer from start to finish, and how the qubits act when they are left untouched, however that is not very interesting, or effective at all. Regular machines use all sorts of different logic gates to achieve their desired outcome, and a quantum computer is no different. Lets carry on through a few of the main gates we will be using throughout these guides.
Pauli X Gate
The 'Pauli X Gate', or more commonly known as the 'X gate', or bit flip, is quite a simple one, and as you can imagine, it takes whatever input is fed into the gate, and flips it. Passing through this gate, a '0' will become a '1', and vice versa, a '1' will become a '0'. Each gate has many different use cases, and we will not be going through them here, but this largely simulates a classical logical not gate, in a classic circuit. Lets do an example with the composer now. We will use a 2 qubit simulator, as well as one 'X Gate', and two 'Measure bars', like so:

Screenshot
Since we know that both qubits are initialized to '0', then we can assume that when we place a not gate on Qubit 0, then we will receive an outcome of '10', or something similar. The outcome will actually be slightly different, as it seems that Qubit 1 is measured before Qubit 0. Go ahead and set your composer up like in the image above, then hit 'Simulate'! The results should be the same as mine below.
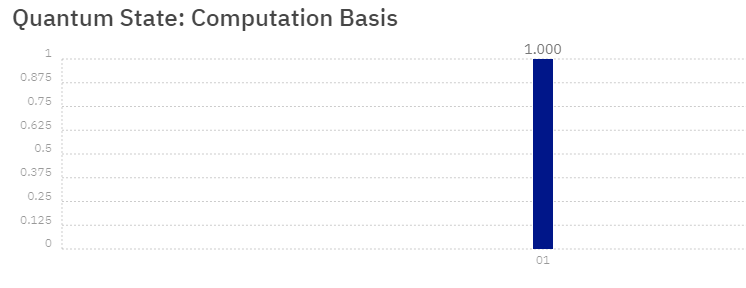
Screenshot
Now for a final test, go ahead and move your X gate onto Qubit 1's score bar, or add a second one altogether. Should you move your X gate from Qubit 0, to Qubit 1, then your result should be '10' instead. If one were to add an X gate to cubit 1, instead of switching places, then the accompanying result would be '11'.
Pauli Y Gate
So, the 'Pauli Y Gate' is a bit more complicated, but fairly similar to the X gate. This gate applies a bit-flip, as well as a phase-flip. What this means, is that aside from applying a bit flip to the input, the qubit will also be rotated on the Y axis of the 'Bloch Sphere'. There is a LOT of math involved in these equations, and to be frank, I am not a arithmetician, and alot of the calculations/equations do throw me for a loop. If you are a programmer, stick to the basics of how you know a computer works, and it will make sense in time, though one should learn as much about the 'bloch sphere' and the angles involved as possible. For now, This is an amazing external link, for those looking to learn more in depth about the mathematics involved in these gates. Lets carry on with an example.

Screenshot
In the image above, we have placed a Y gate, on Qubit 0, in front of our measure,and judging from our first experiment, with the x gates, we can assume that this too will be similar result to '01', so lets run it, and see what we get. Go ahead and run this in the simulator now, you should see a result the same as mine.
Screenshot
As you can see, both of these gates so far have been quite similar, though both with their own use cases. Just like in our previous example, you can play around with this by adding another Y gate, or swapping the existing one. Heck at this point why not throw in an X on top and see what happens? This is an excellent way to get a grasp on the different gates and their functions, should you be having trouble.
CNot Gate
The CNot Gate, or Controlled-Not Gate, is quite a handy one as well. CNot gates, are flexible little creatures, that allow you to base one qubits position, on anothers. A controlled not gate, includes a Target Qubit, as well as a Control Qubit. The Target Qubit, is the one that you would like the gate to control. The Control Qubit, is the Qubit that The CNot Gate checks to see what it should do with the target. A CNot Gate will flip a Target Qubits value, but only if the Control Qubit is a '1'. If the Control Qubit is a'0' then nothing will happen to the Target Qubit.
This might sound a bit confusing at first, but put in simple terms, if Target Qubit has a value of '0', and Control Qubit has a value of '0', then nothing will happen to the Target Qubit, and it will remain with a value of '0'. However, were the Control Cubit to have a value of '1', then our Target Qubit's value of 0, would be flipped to '1'. And again, vice versa, if the Target Qubit had a value of '1', when Control Cubit has a value of '1', then Target Qubits Value would be flipped to '0'. Lets see an example of this now.

Screenshot
In the image above, we have a two qubit simulator, with two measures, as well as a controlled-not gate. Now, you can go ahead and run this if you like, but I'm not going to include an image of that, as well, these test results are rather plain right now, and I can tell you for a fact, the result will be '00'. We can determine this, from the fact that a controlled-not gate will only flip a bit, when the control's value is '1', and knowing that both Qubits are initialized to '0', then we will know that nothing will change during this simulation.
Not to see the CNot gate in action, we will need to flip our Qubit 0's value, from '0', to '1'. When the controlled not gate see's that our Control Qubit has a value of '1', then it will most definately produce a reaction from our Target Qubit. Now that we know that to flip a bits value, we need to use an X gate, lets throw one on the composer.

Screenshot
Go ahead and hit 'Simulate', once you have set up the composer like the one above, and you should get a result just like mine. When Control Qubit has a value of '1', and Target Qubit has a value of '1', then the CNot gate will of course, flip Target Qubit's value of '0', to a new value of '1', giving us a result of '11', like in the image below.

Screenshot
The Cnot gate, allows us to be quite a bit more flexible in our circuits, compared to a simple x or y gate, but all of these gates mentioned so far, have classical counterparts. The next, and likely final gate that I would like to mention, before we start making a real program in Pycharm, is the 'Hadamard Gate', and if you cant tell yet, most of these gates are named after the physicists/scientists/mathematicians who founded the theory.
Hadamard Gate
The Hadamard Gate, is a very important one. This gate is used to put a Qubit into a state of 'superposition', meaning both '1', and '0'. Now, when a qubit is in superposition, it can be classified as both a '1' and a '0', though only until it is measured, at which time the qubit must decide what its value is, much like the idea of 'Schrodinger's Cat'. Lets take a look at a simple equation in the composer.

Screenshot
In the above equation, our composer consists of a 2 qubit circuit, as well as a hadamard gate, and two measurements. The H gate, placed on Qubit 0, will turn that qubit into a state of superpositon, meaning its value is now both '1', and '0' at the same time. When measured, the qubits ultimate value will be decided, and recorded. This means that around 50% of the time when this runs, we should receive an outcome of '00' and the other 50% of the runs, the result will be '01'. You can see this in the example below.

Screenshot
So, to explain a bit further, when the simulator runs through, it does multiple runs of your program/equation. Since quantum computing has quite a bit of randomness to it, it is best to do these same tests over and over, to ensure that the result is accurate. The standard execution is 100 shots, though you can change this up to ~8000. Higher is better for accuracy. Do to the fact that these machines are still in massively early developmental phases, we aim to be as accurate as possibl, and prevent all types of 'noise' in the machines, through many different processes.
Now, if one were to add a second H gate, to Qubit 1's bar score, then the result would be quite a bit more interesting. This one I am going to run through with you. Go ahead and place your second X gate onto Cubit 0 now, and you should have a composer that looks much like mine below.

Screenshot
When this equation is run, both Qubit 0 and Qubit 1, will be put into a state of superposition. This means now, that either Qubit can have a value of either '0' or '1' when measured. The results will be getting a bit more interesting now too you will see. Since both qubits are insuperposition we can expect to see four results, rather than two, as each cubit is now cabable of representing two values.
The values that these cubits are able to represent, actually mentioned above I belive, are 00, 01, 11, and 10, and judging from how our last test went with a single hadamard gate, we can assume that we will receive an equal amount of each result, but lets go ahead and run this to check. Hit the 'Simulate' button now.

Screenshot
As we imagined, we received the expected result. Now one thing to mention, as to the fact that these are not all even numbers, is that there are a significant amount of factors that can interfere with a quantum computers results, and this is what is referred to as 'noise' in quantum systems. Researchers are doing everything they can to effectively eliminate noise, but as always these tests should be run multiple times. It is also worth mentioning that we are currently practicing using the simulator, and that these same equations can be run on the real time machine should you prefer, though I would not waste the credits on it.
Conclusion
So to wrap this up guys, I would like to clarify that this is in no way all of the gates that can be used, it is just the main ones to get you started, and to get you used to using them, and their functions. We will be learning more of them in the future, but I would like to get into some actual coding in the next guide, so this will probably be the end of the strictly informative parts of the series. Next time we will all be working in our preferred python environment, so lets get into the right mindset for that :)
As you can probably tell, this is quite a bit more advanced than simple scripting, and will most definitely take some getting used to, however keep at it, and I know you will be a quantum master in no time. These computers, though can be used for simple programs like 'Hello World', are designed to solve much more complex equations, and breakthroughs in the technology are happening quite consistently these days.
.jpg)
Image Source: Pixabay
It has been great writing this for you all, and I hope you had at least as much enjoyment reading it, as I did when writing, and I hope that it has made this topic a bit more readable, as when I was learning from the documentation, (Something you should still do!), it was quite confusing to be honest. Though I must mention, so much good work has gone into the system, as well as the Qiskit, even just in the last few months alone, and I'm sure it will only get better from here.
@resteemator is a new bot casting votes for its followers. Follow @resteemator and vote this comment to increase your chance to be voted in the future!