[HOWTO] Use Steempunknet API Data in LibreOffice Calc
This is a rough #linux #howto guide showing how I accessed the Steempunk.net API data from LibreOffice Calc. I am using LibeOffice v5.1.6.2 and OpenJDK v8 (1.8.0 rev 181) for this #howto, and I cannot guarantee the same results on any other versions. In fact, I cannot guarantee the same results even if you are running the same versions as I am. Java is a messy thing, and I normally try to avoid it. 😄
❶ Check your Java
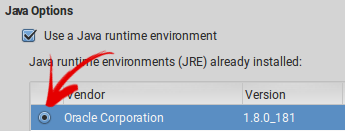
I will assume that you already have both of the packages above aleady installed. The scope of this #howto doesn't include installing any software, sorry. One thing you should check, however, is that Java is enabled in LibreOffice before we go any further. To do this, go to Tools ⇨ Options ⇨ LibreOffice ⇨ Advanced and make sure that the radio-button beside your installed Java runtime environment is selected, as per the screenshot.
❷ Install the extension
Now, I told you a little lie to make you feel at ease about this procedure. Unfortunately, there is a little bit of software to be installed. We need the third-party extension itself which will enable LibreOffice to handle JSON data streams. For this part, I am using the LibreOffice GetRest Plugin by Dmytro Bazunov. You can download the latest version of the *.oxt file (LibreOffice extension filetype) from here (direct link, 2.5MiB). Once you have downloaded the file, you need to install it in LibreOffice. To do this, go to Tools ⇨ Extension Manager... ⇨ Add in LibreOffice and locate the *.oxt file which you downloaded. Once it is installed, it should look something like the screenshot here.
❸ Connect to the API
The next step is to connect to the #Steempunknet API endpoint that you are interested in. For this example, we are going to use the new list of SPN Fighters, with their usernames and registration dates (https://www.steempunk.net/api/spn/v1/fighters?details=1). In a new spreadsheet, in cell A1, type...
=𝙶𝙴𝚃(𝙷𝚈𝙿𝙴𝚁𝙻𝙸𝙽𝙺("𝚑𝚝𝚝𝚙𝚜://𝚠𝚠𝚠.𝚜𝚝𝚎𝚎𝚖𝚙𝚞𝚗𝚔.𝚗𝚎𝚝/𝚊𝚙𝚒/𝚜𝚙𝚗/𝚟𝟷/𝚏𝚒𝚐𝚑𝚝𝚎𝚛𝚜?𝚍𝚎𝚝𝚊𝚒𝚕𝚜=𝟷"))
When you press ENTER ⏎ the URL should resolve, and you should see an unformatted string of JSON data, as in the screenshot.
❹ Request data from the API
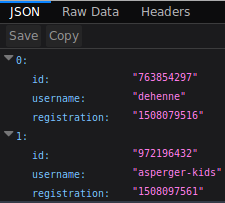
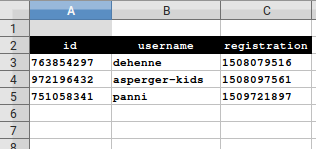
The next step is to specify which data from the unformatted string of JSON data in cell A1 we want to display in each cell. Before I do this though, I have added some column headings and a bit of formatting to my spreadsheet. I have opted to shrink the JSON output in cell A1 to fit the cell width, and to hide it away using matching foreground and background colours. Simple but effective. You can make yours white on white if you like, but I made mine grey to visually remind us that cell A1 is where the JSON data is. At this point it is a good idea to open the JSON data in your web browser as well, so that you can easily see the names of the fields that you want to work with. In cell A3, type...
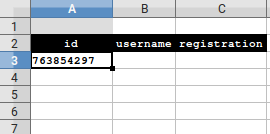
=𝙿𝙰𝚁𝚂𝙴𝙹𝚂𝙾𝙽($𝙰$𝟷,"𝚐𝚎𝚝(𝟶).𝚒𝚍")
When you press ENTER ⏎ the URL should resolve, and you should see the ID number of the zero'th element of the array of JSON data. If you change the 𝚐𝚎𝚝(𝟶) to be 𝚐𝚎𝚝(𝟷) instead, then you will end up with the "oneth" elementh. That is not quite the same as the "first" element, because arrays start their numbering at zero, not one. Anyway, the same applies for 𝚐𝚎𝚝(𝟸), 𝚐𝚎𝚝(𝟹), etc. Also, to specify a different field, just change the fieldname after the 𝚐𝚎𝚝() part of the instruction. For example, we can get the .𝚞𝚜𝚎𝚛𝚗𝚊𝚖𝚎 field for the "zeroth" element of the array by typing in cell B3 the following...
=𝙿𝙰𝚁𝚂𝙴𝙹𝚂𝙾𝙽($𝙰$𝟷,"𝚐𝚎𝚝(𝟶).𝚞𝚜𝚎𝚛𝚗𝚊𝚖𝚎")
You now have all the tools you need to fill up your spreadsheet with rows and columns. To make things easier, you can copy/paste the formulas between the spreadsheet and a text editor and use macros or search/replace to generate the rest of the formulas you will need to populate the rest of the spreadsheet. I hope this is useful.


 The textual content of this post is licensed as a Free Cultural Work using a Creative Commons Attribution-ShareAlike 4.0 International (CC BY-SA 4.0) license, which grants all the four freedoms listed in the definition of free cultural works, including: ① The freedom to use and perform the work; ② The freedom to study the work and apply the information; ③ The freedom to redistribute copies; and ④ The freedom to distribute derivative works. This license places three key restrictions on those freedoms: ⑤ 𝐍𝐨 𝐃𝐑𝐌 𝐨𝐫 𝐓𝐏𝐌: You must not restrict access to the work using technical measures, or otherwise attempt to impose limitations on the freedoms above; ⑥ 𝐀𝐭𝐭𝐫𝐢𝐛𝐮𝐭𝐢𝐨𝐧: You must give proper attribution to the author (𝓣𝓻𝓲𝓼𝓺𝓾𝓮𝓵𝓦𝓱𝓪𝓻𝓮) and retain the license notice; and ⑦ 𝐂𝐨𝐩𝐲𝐥𝐞𝐟𝐭: You must release derivative works under an identical or similar license.
• The image used for the post thumbnail is a remix by 𝓣𝓻𝓲𝓼𝓺𝓾𝓮𝓵𝓦𝓱𝓪𝓻𝓮. It includes the dog-1773712 image created by GraphicMama-team, which has been released under a Creative Commons Public Domain Dedication 1.0 Universal (CC0 1.0) license.
• The image used for the horizontal rule separators throughout this post is an original created by 𝓣𝓻𝓲𝓼𝓺𝓾𝓮𝓵𝓦𝓱𝓪𝓻𝓮, using the (previously) red, white, and black triskellions, inspired by Māori tukutuku
 panels.


Congratulations @trisquelwhare! You have completed the following achievement on Steemit and have been rewarded with new badge(s) :
Click on the badge to view your Board of Honor.
If you no longer want to receive notifications, reply to this comment with the word
STOPTo support your work, I also upvoted your post!
Awesome!
Can I still try it if I don't use Linux?
You could download Oracle VM and the Ubuntu.ISO file and install linux inside a virtual box.
Sounds complicated, is actually simple. Dm if you want me to help you with that ;)
A step-by-painful-step video tutorial would be better. :P
I probably will scream for help, so be prepared, lol. Thanks.
Hmmm I could do a screencast video of setting this up...is the idea you are giving me x)
I could chuck out ideas all day, lol. Whether any of them are quality is another story. :D
I hope you can make it this time aswell :)
Awesome tutorial trisquel!
Thanks @cryptonik, sorry that I didn't see your reply here earlier.