Dare to Learn with me! Step by step tutorial, hand Hamsa and hand of fatima in a pendant elaborated under the technique of the dress and with touch

Hello hello I am happy to write once again, these days the 5 different ways to make the hand, this is my portion, although in the variety, the taste may be to me I do not like other people, What I try with these tutorials is ignite that creative flame that we all have, that this is only a link to get your creativity and touch that personal touch that you are. good I bring you the hamsa hand at the request of @tesmoforia desire ideas to make them too ... this is one of the few things that I will do little by little you will see the difference in the post that will follow this.
https://www.mano-de-fatima.com/
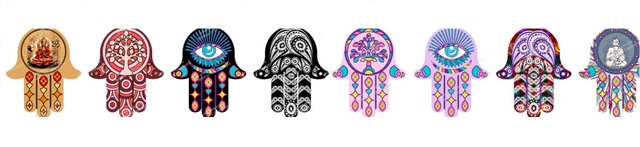
This is a symbol formed by a hand with five fingers, which has the middle finger right in the center, the fingers to the heart are the index finger and the ring finger, being these a little shorter than the heart, but in turn they have the same size between the two. On the sides of this symbol there are two thumbs, also the small size between them and that have an inclination toward the outside. This symbol is used in various Jewish cultures.
For example, in the Arab countries the word "Hamsa", eye of Fatima, hand of Fatima, hand of the Hamsa, Jemisa and Khamsa, in India is known as "Humsa", the Jews call it "Mano de Miriam" in reference to the sister of Moses and Aaron, to the Shiites the five persons of man (Muhammad, Fatima, Ali, Hasan and Husayn) and the Hindus call her "Abhaya"
In the Hebrew and Muslim religions they represent the fifth letter of the Hebrew alphabet "Heh" and the five books of the Torah, that is, the first five books of the Bible, Genesis: the beginning, Exodus: names, Leviticus: and called, Numbers: in the desert and Deuteronomy: words and things.
Let's start:
MATERIALS:
Soutache thread or Rayon braid
Scissors
Liquid silicon
Lighter
Nacre leaf figures
4 mm rhinestones
Turkish eye to your liking
Thick or semi-leather fabric for the base
Fine tip eyebrow tweezers
Stickers

STEP 1 and 2: make the drawing of the hand on a sheet, cut it out and transform it into the fabric or leather that you will use as a base.
STEP 3: place liquid silicon along the edge of the drawing and cut a thread of 44 cm long each and we will place that edge today with care not to lose the shape.
TIPS: With the help of the clamp it will be much better and thus you do not dirty the piece.
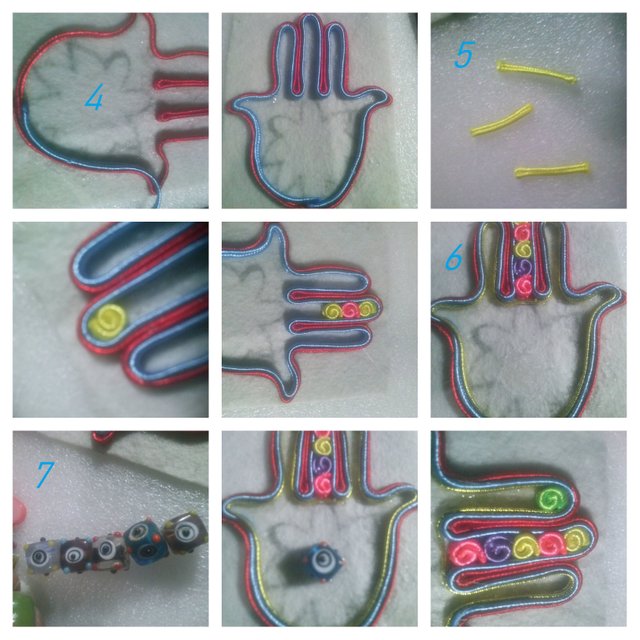
Step 4: Do the same procedure from step 3 this time with the second thread.
STEP 5: Cut several pieces of 2 cm thread. Each one, by choice, several colors of the same color, I did it in several colors so that I can clearly distinguish what I did. Wind the threads with your fingers placing a little liquid silicon and sell one by one
STEP 6: Cut a thread of 44 cm and stick it all around in the inside this would be the golden thread.
STEP 7: In this step you use the eyes that are on the floor, which is what you have easier to use, what you have is to stick it in the center of the hand with a little liquid silicon.
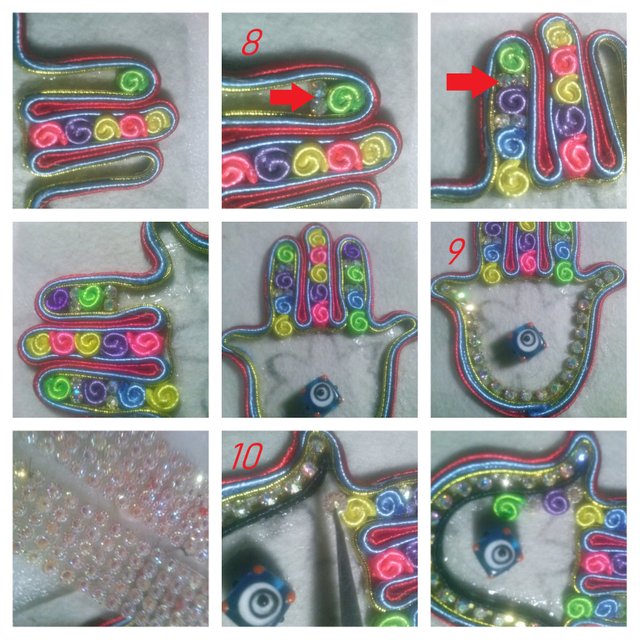
STEP 8: Place more thread in the form of circles and between them we will place 2 rhinestones, you can also use another material such as beads
STEP 9: In the part of the palm of the hand placing the edge silicone liquid and sticks 21 stones of strass or 11.5 cm.
STEP 10: after gluing the strass we will place a thread to separate the strass from the other part of 9.5 cm and now we begin to stick the stickers with the help of the fine tip, between each sticker placing a circle of thread of the color of your choice, until you reach the other end.
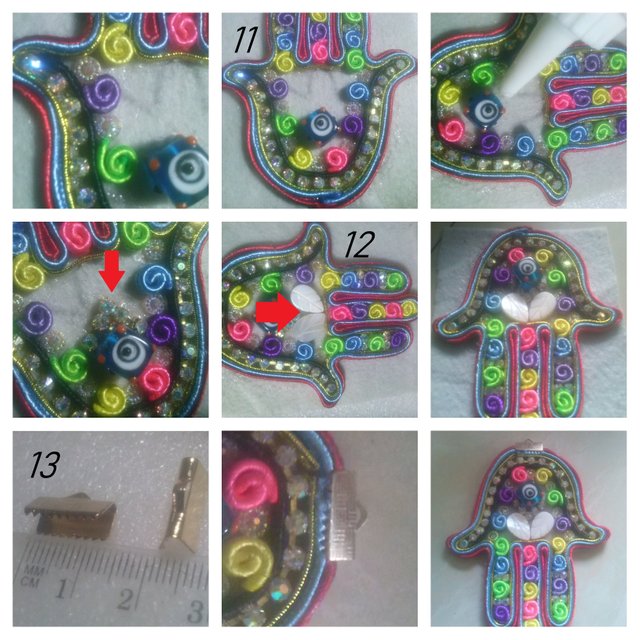
STEP 11: It must be like this now on the Turkish eye place a little silicone and one side the stones 3 rhinestones and another side 2 rhinestones so that it looks like I show you in the image with the arrow.
STEP 12: In the remaining space we will place more liquid silicon and stick the mother-of-pearl leaves.
STEP 13: To finish at the top where are the tips of the threads, we will place a suitcase of 1.2 cm, tighten carefully not to mark it and you can only insert a ring or ring to use it with your usual chain .
I hope you like it.
i will love to learn with you
It will be excellent. I'm to order
WOW! It looks beautiful! You're good at it.
Thank you if I really like to work the crafts and design
Congratulations! This post has been upvoted from the communal account, @minnowsupport, by Marleyn from the Minnow Support Project. It's a witness project run by aggroed, ausbitbank, teamsteem, theprophet0, someguy123, neoxian, followbtcnews, and netuoso. The goal is to help Steemit grow by supporting Minnows. Please find us at the Peace, Abundance, and Liberty Network (PALnet) Discord Channel. It's a completely public and open space to all members of the Steemit community who voluntarily choose to be there.
If you would like to delegate to the Minnow Support Project you can do so by clicking on the following links: 50SP, 100SP, 250SP, 500SP, 1000SP, 5000SP.
Be sure to leave at least 50SP undelegated on your account.
This is a great guide. I like that you take your time making it and are so willing to help people learn.
Thank you, I love my work and it makes me happy to teach and show that with a little love, creativity and desire you can achieve many things
great tutorial - keep it up
Thank you very much for your words and support