Lesson 1 – The Interface pt. 1
The Interface Pt. 1
I'm using Photoshop cc2017 for this course.
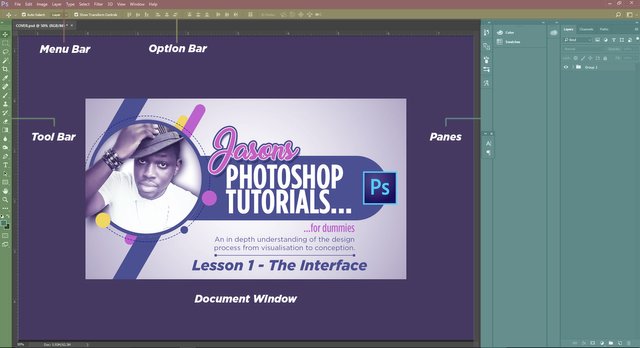
The image below has been colour coded for easy identification and reference.

Horizontal bars (side to side)
Red: Menu Bar
Yellow: Option Bar
Vertical bars (top to bottom)
Green: Tool Bar
Cyan: panes
Purple: document view
Menu Bar 
As the name implies the menu bar contains a list of important buttons that are necessary to save, open, close, paste, copy, cut, etc your document (or elements in your document). In my personal opinion, the most important ones to concentrate on for now are:‘File’ ‘Edit’ and ‘Help’. The rest we will understand as the tutorials advance.
But on your own, do not be afraid to experiment with all the menus. This will help you grow.
File – New: Provides options for opening a new document. That is document size, colour format, etc
File - open: This gives you the ability to open accepted file formats from any directory on your computer.
File – Open Recent: Similar to ‘Open’, this gives the user the ability to open recent documents
File – save: Saves all files in various formats. To eliminate uncertainty as to which formats to save your files in, I advise you use the.psd, .png and .jpeg formats.
Edit – keyboard shortcuts: This will give you the opportunity to learn Photoshop’s keyboard shortcuts. I suggest a lot of time be given to understand shortcuts since they greatly increase workflow and speed.
Help: here we have Photoshop online help, Photoshop learn and support. Etc. Don’t be shy to use these to your advantage. As I stated earlier on, I’m also here to learn from you so whatever you pick up, I’ll be glad to hear it.
Option bar

This bar gives you the properties pertaining to a particular tool you pick on the tool bar. It therefore changes depending on which tool you pick. For instance, if you pick up the move tool, all the properties of the move tool will appear, once you change from the move tool to the eraser tool, the property bar will change to reveal the properties of the eraser tool
So here we are, in part 2 we would look at the Tool Bar, Document Window and the Panes.
After that we can delve into our creative minds and create our very own master piece!
Also a big thanks to @richforever, @derletwins, @tj4real, @anaman, @mcsamm for guiding me around steemit.
Take care and stay safe steemians!
Disclaimer: All images present are mine....@jasoncaesar.


Good one 👏👌
Thanks. These are really basic. The real fun happens in the next 2 posts. Stay safe!
The only thing I don't like about Photoshop is that it has very bad design and it's too complicate to use. But I used it few times.
It does have a complicated interface, but with time, it gets easier. Thanks mate!
You are welcome! :)