Steemit Quick Start Guide - 'From Post to Payout', How to Post, Earn, and Convert SBD into USD (Step-by-Step Tutorial)

Hey friends and new Steemians!
I wanted to put this quick start guide together for all of my friends who are joining Steemit and need help figuring out what to do! How to post, how rewards work, how to turn their SBD into USD, etc.
This community has done so much for me, so I wanted to give back with what I've learned here on Steemit.
This is by no means an extensive guide for this platform, but one that will get you up and running with the basics of posting and turning your rewards into cash you can use out in the 'real world' ;)
In this guide, we're going to cover:
Making a Post (Incuding Formatting Tips)
Your Niche (i.e. where to post)
Getting Paid Out
The Step-by-Step Process of Converting SBD (Steem Dollars) to USD
So congratulations! You've signed up and are ready to start posting and being a part of this community! It's an amazing experience being here on Steemit, where creators of all types are building friendships and initiatives while supporting each other's contributions to the platform.
The first step we're going to cover is posting!
How to Post
This community responds to value! Sharing your creativity, your experiences, and what interests you is a great way to start on Steemit! If you're thinking about what you'd want to post, well take a look at all the categories this amazing platform has to offer. There's definitely a place for you! :)
In order to post, the first thing you'll want to do is click on the Post button in the upper right hand corner of your screen. This button is always available, unless you've already clicked it and are in the middle of a post.

From here you'll now see a blank post, which is all ready for you to express yourself on :)

Markdown/Formatting Tips
I'm going to share with you some markdown tips, the coding language that Steemit uses to format text on your blog posts.
Feel free to save this image if you'd like to refer back to it!

And here's what the text will look like!

Adding Photos
To add a photo to your post, you can drag and drop one from your Finder window, or click 'selecting them' to find one.

Adding Tags
Tags are very important as they place your post in up to 5 of the many different categories we have here on Steemit. Take a look at the Trending page and scroll down to find 'View All Tags', which will show you info on the most popular, and also the more niche categories, and use this to choose up to 5 tags to use for your post.

On this next page, if you click "Payouts", you'll sort all of the Trending topics by how much has been paid out. This is a great way to start in regards to finding which categories are relevant to you.

To add tags to your post, type them in without spaces, and you're good to go.
Here's my example for this post:

After that, just click Post and you're set!
So now that you've posted! What's next?
Once posted, your blog has 7 days to receive upvotes before you are paid out. The number you see next to your blogs is not USD, it is STU, a Steem Token Unit.
To keep it simple, you get paid 75% of the total STU while the curators (those who upvote you) receive 25%. From there, your payout is divided between SBD (Steem Dollars) and SP (Steem Power)
So if your post says $1.00 next to it, you'll receive 0.75, which is then split between SBD and SP. SBD is what you can use to sell for STEEM or to sell for Bitcoin on an exchange, while the other half is converted to Steem Power, which is used to give you curation weight on the platform and increase your upvote amount.

This goes much deeper, but to keep it simple for this guide, we'll be focusing on earning SBD and understanding how to convert that into USD.
So after 7 days, you'll see in your wallet that you received rewards, and then you'll click "Redeem Rewards" to apply your earnings to your account.

Converting Your Earnings into USD
So 7 days have gone by since your first post, and you've received some SBD and want to now convert it to USD and buy your first amount of groceries from the money you earned, congrats!
In order to do this, you'll need to sell your SBD for BTC (Bitcoin) and then sell your BTC for USD.
There are options for this, but this guide will focus on selling SBD for Bitcoin on the Bittrex exchange, and then selling that Bitcoin on Coinbase for USD.
Because of the nature of where Bitcoin is at the moment with high network fees and pending transactions, I've been trading my Bitcoin for LTC (Litecoin), and sending that to Coinbase, which results is a very fast transaction with a much smaller fee.
Simply put, we could sell SBD for BTC and sell BTC for USD. But to save us all money and time, I will be illustrating how to sell SBD for BTC, selling BTC for LTC, and then send LTC to Coinbase to sell for USD.
It may sound like quite a lot, but once you get a hang of it through repetition, you'll have an awesome new skill set :)
Step 1: Sign Up
Sign up for Bittrex and Coinbase. These are both exchanges which allow you to trade cryptocurrencies. Bittrex is more so from crypto to crypto, wheras Coinbase allows you to sell Bitcoin, Litecoin, Ethereum, and Bitcoin Cash for USD.
(Note: at the time of this writing, Bittrex is temporarily not available for new signups as they work on their backend to keep up with current demand. This guide will illustrate how to sell on Bittrex with the intention that you will be able to sign up in the future. I'm sure there are other exchanges that you can sell SBD on, however I am not familiar with them and will simply focus on Bittrex in this guide.)
Step 2: Transfer SBD (Steem Dollars) from your Steemit Wallet to Bittrex
Sign in to Bittrex, and click on the Wallet tab in the upper toolbar.

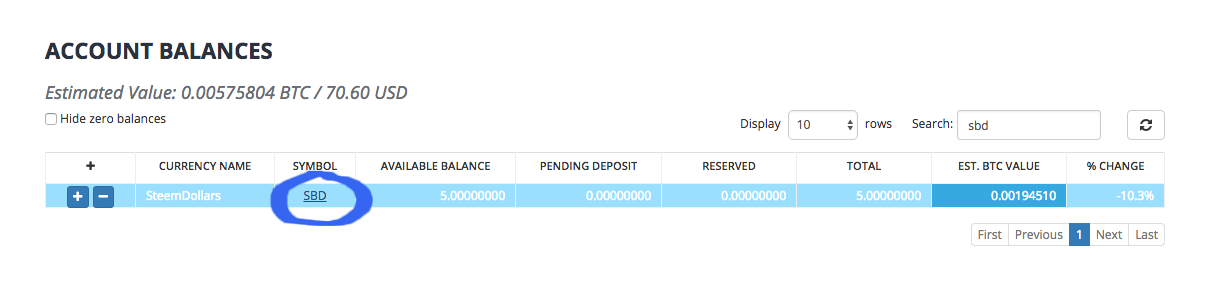
Next, type in 'SBD' in the search bar in the right of the screen, and make sure "Hide Zero Balances" remains unchecked.
What this does is pulls up your SBD wallet.

In order to transfer SBD from Steemit to Bittrex, we will click on the + button next to SBD so we can deposit funds in our SBD wallet.

What we now see is a memo, and the Registered acct. These are the two pieces of info you'll need to send your SBD into Bittrex.

In a new tab, open up your Steemit wallet by clicking on your profile picture and then clicking, 'Wallet'

Next, to the right of Steem Dollars, click the number of SBD and then click Transfer

When the new box opens, you'll want to enter in 'bittrex' in the to field, and copy and paste the long address into the memo field. Finally, choose how much you want to deposit into Bittrex. For this example, I am sending 5 SBD.
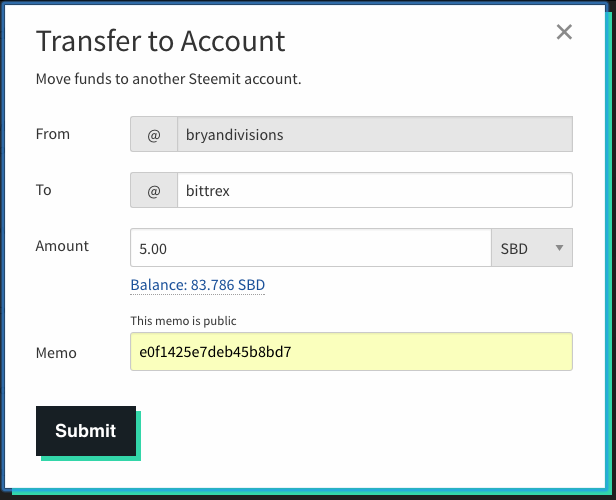
Click submit, re-enter your password and click Submit once more, and wallah! Your SBD has been sent to Bittrex!
Step 3: Sell SBD for BTC (Bitcoin)
Once your SBD shows up in your Bittrex wallet, which may take several minutes, your next step is to sell SBD for BTC.
To do this, click on the SBD symbol right there in your wallet, and it will take you directly to the BTC-SBD market page.
Once on the market page, scroll down and below the chart you'll see that you can buy SBD on the left and sell on the right. Since we're selling our SBD for BTC, we'll focus on the right side of the screen.
Click 'Max' to sell the max amount of SBD you have in your Bittrex wallet, or choose a smaller amount.
Next, choose Bid, Last, or Ask. The Bid option is what sellers use to bid a lower price, sellers use Ask to ask for a higher price, but to keep things simple, if we choose Last, we will sell our SBD for the last price the market bought and sold for.
So let's click Last to keep this example simple.
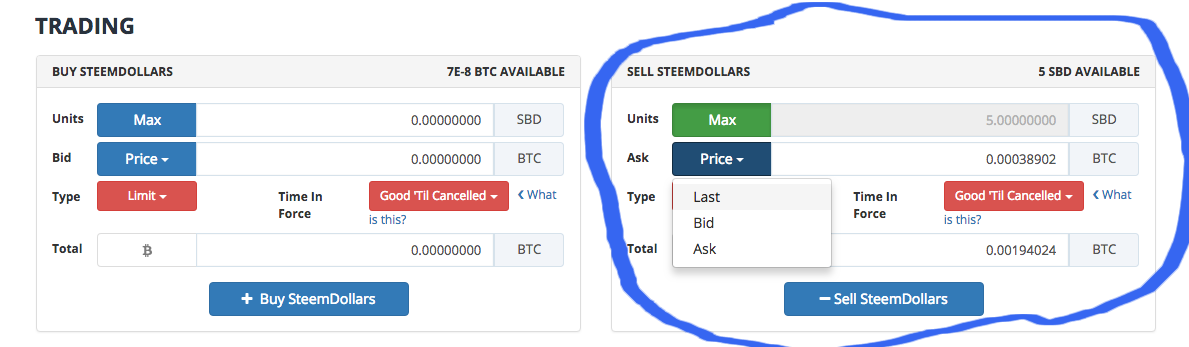
Once you fill these parameters out, you'll see how much BTC you'll have after selling your SBD.
Let's go ahead and click sell, and on the next screen double check your info and click confirm!

(Note: My numbers are different in this example because I clicked 'Last' again, which changed the price and my total of BTC I'd receive)
When you see that your order has been placed, and it has been filled (you'll see this in the top right of the screen) Congrats! You now own Bitcoin!

Next, go back to your wallet, and you'll see you now own BTC (Bitcoin)

Step 4: Sell your BTC for LTC (Litecoin)
Why are we doing this? Well, Litecoin is much faster and cheaper to send than Bitcoin at the moment.
If the "Hide zero balances" box is still unchecked, you should see LTC on your screen. If not, click on the Bittrex logo to take you home and then scroll down to click BTC-LTC. In this case, we're going to click on LTC from the wallet page.

Now that you're on the BTC-LTC market screen, you now want to buy Litecoin. Scroll down past the charts and on the left side of the screen you'll see the buy window. Click max to use your total amount of BTC, click Price to choose your price (select Last if you want to buy it at the last price sold) and now you will see the total amount of LTC you will receive.

On the next screen, double check your order info, and click confirm when ready to sell your BTC for LTC!

You'll now see that your transaction has processed, and when it's complete, head back to the wallet tab to see your new LTC in your wallet!


Congratulations! You now own Litecoin, and are only one more step away from turning that into USD.
Step 5: Sell your LTC for USD
Now that we own Litecoin on Bittrex, we're going to want it send it to our Coinbase wallet so we can sell it for USD, and then send it to our bank or our PayPal account.
Login to Coinbase and click on the Accounts tab.

Next, scroll down to find your Litecoin wallet, and click on receive.

Click 'Show Address', and then copy the address.

Great! Now, you'll want to go back to your Bittrex wallet and click the withdrawal button (the minus sign), next to your LTC balance. Paste the address in the 'Address' field, and click the blue arrow next to quantity to send your max amount of LTC, and finally, click Withdrawal.

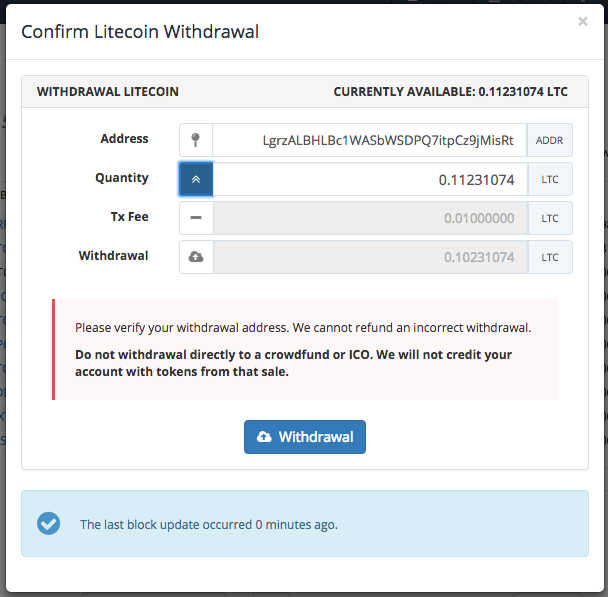
Next, either enter your 6 digit authentication code (if you have two-factor authentication enabled) OR if you don't have this enabled yet, Bittrex will send you an email that you must open in order to verify the withdrawal.
In my case, I have two-factor authentication enabled, so I'll enter the 6 digits from my Google Authenticator app. (You can enable two-factor authentication by clicking on the Settings tab and then clicking on Two Factor Authentication.)
When it has submitted, you'll see this beautiful blue box pop up in the upper right hand corner of your screen.

Back on the Wallets tab, you can see your withdrawal history, and the status of your withdrawal.

Now that the withdrawal has been completed, we'll head back to Coinbase and eagerly wait our LTC's arrival.
We can see that the status is 'Pending' at the moment, so we'll check back soon.

After some time, refresh the page, and you'll see that you've now received LTC in your Coinbase wallet.

You're almost done! The next step is to withdraw the LTC from Coinbase.
Navigate to the Buy/Sell tab. Next, click 'Sell', and then under 'Sell From' choose LTC Wallet.

Next step is your deposit location, which gives you the option to choose your bank account, your USD wallet on Coinbase, or PayPal.
I'll be using PayPal for this example.
Next, click Sell Max under 'Amount', and the form will complete showing you how much LTC you're selling and how much USD you'll receive.


On the right side of the screen you'll see more details about the transaction, and when to expect it in it's new location. In my case, it will be in my PayPal account tomorrow. Everything looks good here, so next, I'll click 'Sell Litecoin - $15.31'
On the next page, review your info and then click 'Confirm Sell' if you approve. (Note: The price may and often does fluctuate due to the market. Don't be worried if this number is slightly different, as you're selling at the last market price on Coinbase)

If the transaction went through, you'll now see a nice big green checkmark with a confirmation that your sell was successfull!

Congratulations!
You just went through the full steps to make a post on Steemit and then to convert that money into USD! The money will soon arrive in your PayPal or your Bank account, which you can then use to buy groceries, pay bills, or spend however you choose!
This is the power of cryptocurrency and Steemit! Being able to earn money in a new way from creativity, which directly affects us and aids us in the real world.
I hope you all enjoyed this guide, and that it helps answer many questions you may have had about how to withdraw your money and make it liquid into USD.
If it has helped you, please upvote and resteem, and share it with your friends!
Bryan Divisions


Wow, this is a very well-organized and detailed guide to Steemit. So much value here! Thank you.
Thank you! Glad you gained value from it! My aim here is to motivate more people to learn and grow this community!
This will be my One-Stop Steemit Shop haha. This post is a powerful resource for anyone who is new to the Steemit community! Great job B!
Thanks bro! I tried to make it as detailed and as simple as possible!